background image

Residen  al Electric Water Heater Use and Care Guide • 23

faucet will help the tank drain faster. 

5

Remove the upper or lower 
access panel on the water 
heater, and then fold back the 

insula  on and remove the plas  c 
element/thermostat cover. 

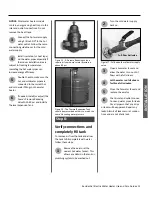
Figure 34 -

Access Panel

6

With the tank drained and 
power o

 , remove the power 

wires from the element you 

intend to replace. 

7

Remove the bad element using 
an element wrench. 

8

Make sure the new element is 
the correct replacement by 
referring to the water heater’s 

data plate for voltage and wa  age 
informa  on.

9

Clean the threads in the tank 
opening with a rag. Insert the 
new element equipped with a 

rubber gasket. NOTE: Use a drop of 
hand dishwashing liquid to lubricate the 
gasket to help avoid damaging the 
gasket as it is being   ghtened. Tighten 
with an element wrench. 

NOTICE: 

Do not turn power back on un  l 

the tank is completely full of water. For 
complete instruc  ons on 

fi

 lling the tank, 

follow Step 8 in the Installa  on sec  on.

10

Re

fi

 ll the tank by opening the 

cold water supply valve. Make 
sure a hot water faucet is open 

and the drain valve is closed. Allow the 
hot water to run full for at least three 
minutes to make sure the tank has all 

the air removed and is completely full 
of water. Failure to perform this step 
can cause the upper hea  ng element to 
burn out. Once you are certain the tank 
is completely full of water, close the hot 
water faucet. 


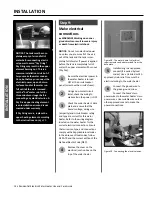
Figure 35 -

Drain Valve

11

Check the newly installed 
element for leaks. If a leak is 
present,   ghten the element 

un  l the leak stops. If you cannot stop 
the leak, drain the tank and remove the 
element. Inspect the gasket for dam-
age. If the gasket is damaged, replace 
the gasket and re-install the element. 

12

Once the element is success-
fully installed and there are no 
leaks, replace the power wires, 

thermostat cover, insula  on, and access 
panel. Make sure all wire connec  ons 
are   ght. Replace the cover on the 
electrical junc  on box.

13

Restore power to the water 
heater. It may take two hours 
for the tank to heat up. 

 Replacing the Thermostat


WARNING! Working on an ener-

gized circuit can result in severe injury 
or death from electrical shock. Turn 
power o

 . Check wires with a non-con-

tact circuit tester to make sure power 
is o

 . When you are 

fi

 nished, be sure 

all covers are secured to reduce the 
risk of 

fi

 re and electric shock. 


To replace the thermostat, you’ll need 
the following tools and supplies: 

•   A non-contact circuit tester. Always 

turn power OFF 
and check with a non-contact circuit tes-
ter before working on the water heater. 

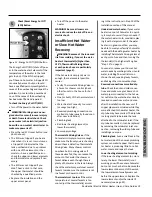
Figure 36 -

Upper and Lower Thermostats

•   A replacement thermostat (available 

at  your local plumbing supplier). 
Note that the upper and lower ther-
mostats are different (above). Some 
models only have one thermostat.

•   A business card to check the gap 

between the thermostat and the tank 

•   Tape and a permanent marker to 

mark the wires

•   A flat blade and a Phillips screwdriver

Steps for Replacing the
Thermostat: 

1

Turn the power OFF at the 
circuit breaker or remove fuses. 

NOTICE:

 It is not necessary to drain the 

tank to replace a thermostat. 

2

Open the electrical junc  on box 

on top of the water heater. Using 
a non-contact circuit tester, check 

the power wires to make certain the 
power is OFF. 

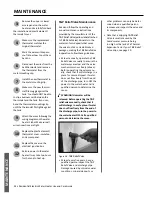
Figure 37 -

Non-Contact Circuit Tester

MAINTENANCE

Summary of Contents for EN6-50-DORT 100

Page 1: ...ec ons or aren t sure you can safely and properly do any of this work yourself Call our Technical Assistance Hotline at 1 800 821 2017 We can help you with installation operations troubleshooting or maintenance Before you call write down the model and serial number from the water heater s data plate Incorrect installa on opera on or service can damage the water heater your house and other property...

Page 2: ...Thermostat access Lower Element and Thermostat access T P relief valve Water shut off Electrical junc on box Expansion tank T P discharge pipe Drain pan discharge pipe Drain pan Drain valve Cold water line Hot water line ECO Reset Bu on on most models ...

Page 3: ...ed could result in death or serious injury CAUTION CAUTION indicates a hazardous situa on that if not avoided could result in minor or moderate injury NOTICE NOTICE indicates prac ces not related to physical injury Drain and flush tank and remove and inspect anode rod a er first six months of opera on and at least annually therea er Operate the Temperature and Pressure Relief Valve T P annu ally a...

Page 4: ...lding Higher tempera tures increase the risk of scalding but even at 120 F hot water can scald If you choose a higher tem perature Thermostatic Mixing Valves located at each point of use are particularly important to help avoid scalding Temperature Time to Produce a Serious Burn 120 F 49 C More than 5 minutes 125 F 52 C 1 to 2 minutes 130 F 54 C About 30 seconds 135 F 57 C About 10 seconds 140 F 6...

Page 5: ...re risk If the water heater is subjected to flood conditions or the thermostat s have been submerged in water the entire water heater must be replaced Make electrical connections prop erly according to the instructions on page 14 Use 10 gauge solid copper wire Use a UL listed or CSA approved strain relief Connect ground wire to green ground screw Explosion Risk High temperatures and pressures in t...

Page 6: ...MR 5 00 State Plumbing Code Other local and state authori es may have similar requirements or other codes applicable to the installa on of this water heater 3 Before you start be sure you have and know how to use the following tools and supplies Plumbing tools and supplies appro priate for the type of water pipes in your home Threaded connectors Figure 1 for the cold and hot water pipes For homes ...

Page 7: ...water supply line and adjust the water pressure control to between 50 and 60 psi If your home does not have a Pressure Reducing Valve install a PRV on the home s main water supply line and set it to between 50 and 60 psi Pressure Reducing Valves are avail able at your local plumbing supplier BACKGROUND Over the years many u li es have increased water sup ply pressures so they can serve more homes ...

Page 8: ...uitable drain pan piped to an adequate drain can help protect flooring from leaks and drips Install a suitable drain pan avail able at your local plumbing suppli er under the water heater Figure 6 to catch condensation or leaks in the piping connections or tank Most codes require and we recom mend installing the water heater in a drain pan that is piped to an adequate drain The drain pan must be a...

Page 9: ... To minimize property damage from leaks inspect and maintain your water heater in accor dance with this manual s instruc ons Install a suitable drain pan under the water heater piped to an adequate drain Inspect the drain pan pipes and surrounding area regularly and fix any leaks found Drain pans are available at your local plumbing supplier Leaks are frequently in the plumbing system itself and n...

Page 10: ...ther injury Step 4 Installing the new water heater 1 Completely read all instruc ons before beginning If you are not sure if you can complete the installa on DO NOT RETURN THIS UNIT TO THE STORE Seek assistance from any of the following sources Schedule an appointment with a qualified person to install your water heater Call our Technical Assistance Hot line at 1 800 821 2017 2 Install a suitable ...

Page 11: ...all it to allow complete drainage of both the T P Relief Valve and the discharge pipe The discharge pipe must withstand 250 F 121 C without distor on Use only copper or CPVC pipe Do not use any other type of pipe such as PVC iron flexible plas c pipe or any type of hose Figure 12 The T P Relief Valve discharge pipe must be installed properly and piped to an adequate drain Terminate the discharge p...

Page 12: ...pper water pipes but some use CPVC or cross linked polyethylene PEX Use fi ngs appropriate for the type of pipe in your home Do not use iron or PVC pipe they are not suitable for potable water 2 Connect the cold water supply using 3 4 inch Na onal Pipe Thread NPT to the cold water inlet nipple For ease of removing the water heater for service or replacement con nect the water pipes with a coupling...

Page 13: ...ressure Reducing Valve is required if your home s water pressure is above 80 psi Figure 16 The Thermal Expansion Tank should be pressurized with air to match the home s incoming water pressure Step 8 Verify connec ons and completely fill tank To remove air from the tank and allow the tank to fill completely with water follow these steps 1 Remove the aerator at the nearest hot water faucet This all...

Page 14: ... out Dry Fire 1 Be sure the electrical power to the water heater is turned OFF at the circuit breaker panel or remove the circuit s fuses 2 Using a non contact circuit tester check the wiring to make certain the power is OFF 3 Check the water heater s data plate and ensure that the home s voltage wiring size ampacity and circuit breaker ra ng and type are correct for this water heater Refer to the...

Page 15: ...t can result in severe injury or death from electrical shock Check wires with a circuit tester to make sure power is off Remove the upper and lower access panels and fold away the insulation Turn the water temperature dial clockwise to increase the tem perature or counter clockwise to decrease the temperature Adjust both thermostats to the same tem perature setting To avoid a shortage of usable hot...

Page 16: ... ng when you return CAUTION Hydrogen gas builds up in a hot water system when it is not used for a long period two weeks or more Hydrogen gas is extremely flammable If the hot water system has not been used for two weeks or more open a hot water faucet for several minutes at the kitchen sink before using any electrical appliances connected to the hot water system Do not smoke or have an open flame...

Page 17: ...r reduce usage Thermostactic Mixing Valve faulty set too low Check hot water at other faucets Non Functioning lower thermostat Replace lower thermostat See page 23 Hot and cold pipe connections reversed Correct piping Leak in plumbing system Check hot water side of home s plumbing system for leaks Melted dip tube Check replace dip tube SLOW HOT WATER RECOVERY page 19 Low supply voltage Check power...

Page 18: ...install the fuses and check the power on both incoming power wires using a non contact circuit tester Turn the power off and replace the cover on the electrical junction box If the water heater is not ge ng power contact a qualified person to have your home s wiring or circuit breakers checked 2 Check the upper hea ng element If the water heater is ge ng electrical power check to see if the upper ...

Page 19: ...ter is simply not warm enough make sure the faucet you are checking doesn t have a defec ve Thermosta c Mixing Valve Many shower controls now have built in mixing valves If these devices fail they can reduce the amount of hot water the shower or faucet delivers even though there is plenty of hot water in the tank Always check the water temperature at several faucets to make sure the problem is not...

Page 20: ...do not operate the water heater without a func oning T P Relief Valve this could cause an explosion Water pressure too high High water pressure can cause the T P Relief Valve to drip Install a Pressure Reduc ing Valve PRV on the main cold water supply line Adjust the PRV to between 50 and 60 psi Thermal Expansion Tank Install a Thermal Expansion Tank If a Thermal Expansion Tank is already installe...

Page 21: ...it s fuses Figure 24 Circuit Breaker 2 Open a hot water faucet and let the hot water run un l it is cool Figure 25 Water Faucet WARNING Be sure the water runs cool before draining the tank to reduce the risk of scalding 3 Connect a garden hose to the drain valve and place the other end of the hose in a drain outside or in buckets 4 Turn the cold water supply valve OFF 5 Open the drain valve on the...

Page 22: ...re and electric shock If you are not comfortable replacing a hea ng element or thermostat your self have this work done by a qualified person To replace the hea ng ele ment you ll need the following tools and supplies Figure 28 Non Contact Circuit Tester Always turn power OFF and check the power wires with a non contact circuit tester before working on the water heater Figure 29 Heating Element wi...

Page 23: ...leak stops If you cannot stop the leak drain the tank and remove the element Inspect the gasket for dam age If the gasket is damaged replace the gasket and re install the element 12 Once the element is success fully installed and there are no leaks replace the power wires thermostat cover insula on and access panel Make sure all wire connec ons are ght Replace the cover on the electrical junc on b...

Page 24: ...lief Valve yellow label a ached to T P Relief Valve Minerals in the water can form deposits that cause the valve to s ck or create blocked passages making the T P Relief Valve inopera ve Follow these guidelines At least annually operate the T P Relief Valve manually to ensure the waterways are clear and the valve mechanism moves freely above Before operating the valve manu ally check that it will ...

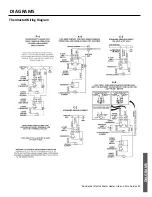
Page 25: ...Residen al Electric Water Heater Use and Care Guide 25 DIAGRAMS DIAGRAMS Thermostat Wiring Diagram ...

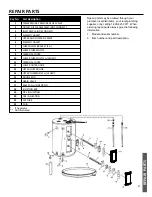
Page 26: ...RE PRESSURE RELIEF VALVE 2 SECONDARY ANODE ROD NIPPLE w HEAT TRAP 3 ELEMENT w GASKET 4 ELEMENT GASKET 5 LOWER OUTER DOOR 6 TERMINAL COVER DOUBLE ELEMENT 7 UPPER THERMOSTAT w HI LIMIT DOUBLE ELEMENT 8 TERMINAL COVER 9 LOWER THERMOSTAT w HI LIMIT SINGLE ELEMENT 10 TERMINAL COVER 11 LOWER THERMOSTAT DOUBLE ELEMENT 12 THERMOSTAT BRACKET EA 13 DRAIN VALVE 14 PRIMARY ANODE 15 HEAT TRAP DIP TUBE COMBO 16...

Page 27: ... TEMPERATURE PRESSURE RELIEF VALVE 2 OUTLET NIPPLE ASSEMBLY SIDE CONNECT 3 INLET NIPPLE SIDE CONNECT 4 ELEMENT GASKET 5 UPPER AND LOWER ELEMENT 6 ELEMENT GASKET 7 THERMOSTAT BRACKET EA 8 LOWER THERMOSTAT 9 TERMINAL COVER 10 LOWER THERMOSTAT w HI LIMIT 11 TERMINAL COVER 12 LOWER OUTER DOOR 13 UPPER OUTER DOOR 14 UPPER THERMOSTAT w HI LIMIT 15 ANODE ROD 16 DRAIN VALVE 17 BASE PAN w SIDE DRAIN 18 JUN...

Page 28: ...t Descrip on 1 PORCELAIN TOP 2 TEMPERATURE PRESSURE REFLIEF VALVE 3 PRIMARY ANODE ROD 4 UPPER THERMOSTAT w HI LIMIT 5 DIP TUBE 6 ELEMENT w GASKET 7 ELEMENT GASKET 8 THERMOSTAT BRACKET EA 9 TERMINAL COVER 10 OUTER DOOR EA 11 LOWER THERMOSTAT w HI LIMIT 12 TERMINAL COVER 13 LOWER THERMOSTAT 14 DRAIN ACCESS DOOR 15 DRAIN VALVE 16 TOE PANEL If Applicable Not Illustrated Teflon is a registered trademar...

Reviews: