background image

Reversing the door

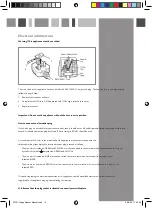
It is possible to reverse the door on this appliance, if required.  
To do so, follow the steps below:

•  

Loosen the hinge fixing screws (1).

•  

Open the door.

•  

Lever off the corner caps (3) with a knife blade.

•  

Insert the hinge fixing screws (1) on the opposite side.

•  

Remove the door fixing screws (2) and relocate the hinges  


according to figure 3.

•  

Locate the door on the hinge fixing screws (1) and tighten.


Do not turn the door upside down.

•  

Insert the corner caps (3) in the exposed holes.

2

fig. 3

FF221 Fridge Freezer Manual.indd   7

28/4/09   17:00:44

Summary of Contents for BU60LF

Page 1: ...BU60LF Built under Fridge Manual for Installation Use and Maintenance...

Page 2: ...ut of the fridge through the channel at the back of the fridge It is important to keep the channel clear at all times The defrosted water is collected in the evaporating tray at the back of the applia...

Page 3: ...eriodically to prevent the defrosted water from collecting inside the refrigerator compartment The drain plug can be used to clear the drain hole Once cleaning is complete reconnect the mains power su...

Page 4: ...ance is working but not very well The appliance is not overloaded The thermostat is set to an appropriate temperature The door is closing properly The cooling system at the rear of the appliance is cl...

Page 5: ...height of the appliance is greater than 850 mm Fig 1 Dimensions of the appliance Fig 2 Dimensions for installation in adjacent units Instructions for fitting the refrigerator in Fig A Volume of the un...

Page 6: ...off the corner caps 3 with a knife blade Insert the hinge fixing screws 1 on the opposite side Remove the door fixing screws 2 and relocate the hinges according to figure 3 Locate the door on the hing...

Page 7: ...arance between the underside of the worktop and upper edge X of the decor panel Screw the four adjusting pins 2 fully into the appliance door Position the decor door on the appliance door introduce th...

Page 8: ...ews 5 turning screws clockwise until considerable resistance is felt figure 7 To adjust the plinth height turn the screws anti clockwise through approximately 8 to 10 revolutions Adjusting the decor d...

Page 9: ...he colours of the wires in the mains lead of this appliance may not correspond with the coloured markings identifying the terminals in your plug proceed as follows The wire which is coloured GREEN and...

Reviews: