background image

Thank you for purchasing our product. We hope you enjoy using the many features and 
benefits it provides. Before using this product please study this entire Instruction Manual 
carefully. Keep this manual in a safe place for future reference. Ensure that other people 
using the product are familiar with these instructions as well. 

WARNING 

•  The installation and repair work must be undertaken by a qualified and competent person.
•  The manufacturer disclaims all liability for any damage or injury caused as a result of  
  not following the instructions of installation.
•  The cooker hood supply should be 220V-240V~50Hz
•  Children less than 8 years of age shall be kept away unless continuously supervised. 
•  This appliance can be used by children aged from8 years and above and persons with  
  reduced physical, sensory or mental capabilities or lack of experience and knowledge if they  
  have been given supervision or instruction concerning use of the appliance in a safe way  
  and understand the hazards involved. Children shall not play with the appliance. Cleaning  
  and user maintenance shall not be made by children without supervision. 
•  Cleaning and user maintenance shall not be mage by children without supervision.
•  When the hood is in repair, maintenance, replacement of parts, please pull out the plug  
  to ensure the safety of people.
CAUTION: Accessible parts may become hot when used with cooking appliance

Summary of Contents for CHM90SS

Page 1: ...CHM90SS 90CM STAINLESS STEEL CHIMNEY HOOD Instruction Manual Please read these instructions carefully before use and retain for future reference ...

Page 2: ... 220V 240V 50Hz Children less than 8 years of age shall be kept away unless continuously supervised This appliance can be used by children aged from8 years and above and persons with reduced physical sensory or mental capabilities or lack of experience and knowledge if they have been given supervision or instruction concerning use of the appliance in a safe way and understand the hazards involved ...

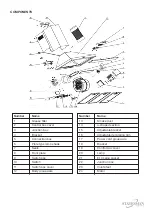
Page 3: ...ower cord groupware 18 Bracket 19 Control box cover 20 Lamp 21 E14 Lamp socket 22 Junction box 23 Volute feet 24 Motor Number Name 1 Grease filter 2 Control box cover 3 Junction box 4 Bracket 5 Connection box 6 Plate type lamp shade 7 Seals 8 Front plate 9 Switch box 10 Switch 11 Switch box cover 12 Body groupware ...

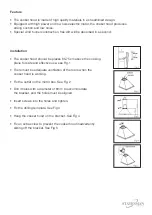
Page 4: ...aces 65 75cm above the cooking plane for safe and effective use see Fig 1 There must be adequate ventilation of the room when the cooker hood is working Fix the outlet on the motor box See Fig 2 Drill 3 holes with a diameter of 8mm to accommodate the bracket and the holes must be aligned Insert screws into the holes and tighten Fix the drilling template See Fig 3 Hang the cooker hood on the bracke...

Page 5: ...ted to the external wall Please make sure the bracket is placed horizontally After installation make sure that the extractor is placed horizontally to avoid grease collection at one end See Fig 8 After installation make sure that the plug can be accessed if necessary Safety Warning This appliance is not intended for use by young children or infirm persons without supervision Plug the power chord i...

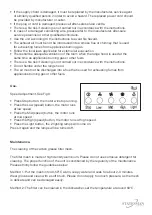
Page 6: ...rried out in accordance with the instructions Do not flambé under the range hood The air must not be discharged into a flue that is used for exhausting fumes from appliances burning gas or other fuels Use Speed adjustment See Fig 9 Press Stop button the motor will stop running Press the Low speed button the motor runs at low speed Press the Mid speed button the motor runs at mid speed Press the Hi...

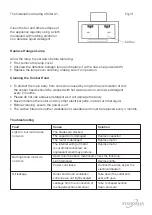
Page 7: ...ers are neither washable nor reusable and must be replaced every 4 months Clean the fan and other surfaces of the appliance regularly using a cloth moistened with rubbing alcohol or non abrasive liquid detergent Troubleshooting Fault Cause Solution Light on but motor does not work Both light and motor do not work Oil leakage The blades are blocked The capacitor is damaged Replace capacitor The mot...

Page 8: ...ot tightly fastened Fasten the motor tightly The cooker hood is not tightly fixed Fix the cooker hood tightly Too much ventilation from open doors or windows Choose a new place to install the appliance or close some doors windows The fixing screws are not tight enough Tighten the fixing screw and make it horizontal The hanging screws are not tight enough Tighten the hanging screw and make it horiz...

Page 9: ...n accordance to with local environmental regulations for waste disposal For more detailed information about treatment recovery and recycling of this product please contact your local city office your household waste disposal service or the shop where you purchased it SERVICE AND SPARE PARTS Should you experience any difficulty in using your Statesman appliance at any time you may contact your Stat...

Reviews: