background image

10

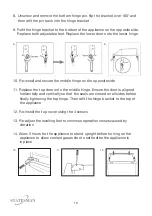
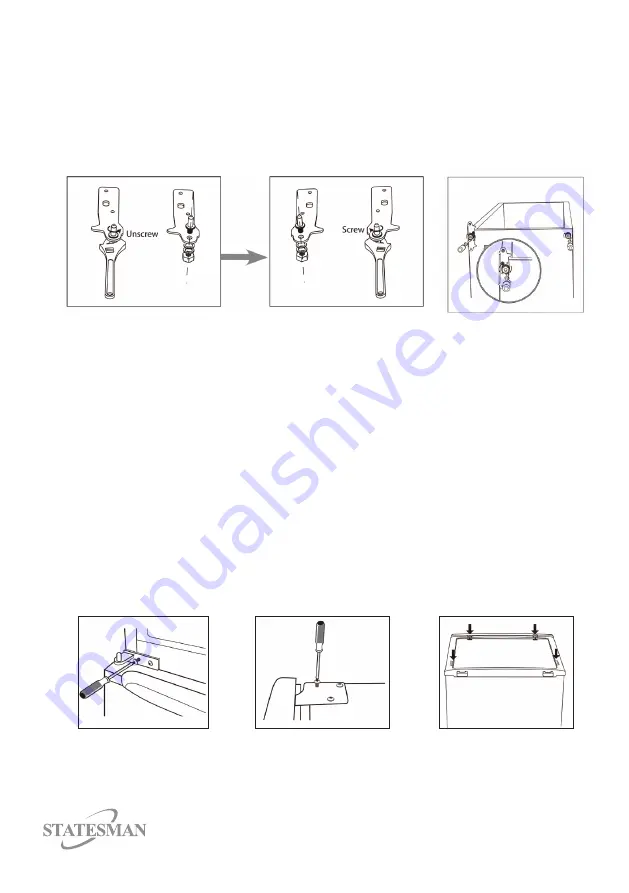
8. Unscrew and remove the bottom hinge pin, flip the bracket over 180° and 

  then refit the pin back into the hinge bracket

10. Re-install and secure the middle hinge on the opposite side

11. Replace the top door onto the middle hinge. Ensure the door is aligned  


horizontally and vertically so that the seals are closed on all sides before  


finally tightening the top hinge. Then refit the hinge bracket to the top of  


the appliance

12. Re-install the top cover using the 4 screws 

13. Re-adjust the levelling feet to minimise operation noises caused by 

 vibration

14. Allow 5 hours for the appliance to stand upright before turning on the 


appliance to allow coolant gases time to settle after the appliance is  


in place  

9. Refit the hinge bracket to the bottom of the appliance on the opposite side. 

  Replace both adjustable feet. Replace the lower door onto the lower hinge

8.

9.

10.

11.

12.

Summary of Contents for F1230APW

Page 1: ...ructions carefully before use and retain for future reference Before switching on your appliance Always check for any damage that may have been caused in transit Instruction Manual F1230APW 50CM 80 20...

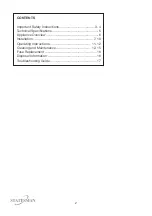
Page 2: ...Safety Instructions 3 4 Technical Specifications 5 Appliance Overview 6 Installation 7 10 Operating Instructions 11 12 Cleaning and Maintenance 12 15 Fuse Replacement 16 Disposal Information 16 Troub...

Page 3: ...e user and invalidate the warranty Check the voltage of the appliance matches the household voltage which is located on the rating label Use of an extension cord is not recommended with this product T...

Page 4: ...t of this product is R600a which is flammable Ensure when moving the appliance or during installation that the cooling system does not get damaged WARNING The appliance is heavy and care is needed whe...

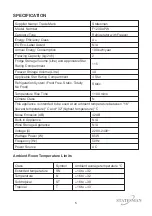
Page 5: ...o 43 Ambient Room Temperature Limits Fridge Storage Volume Litre and Applicable Star Rating Compartment 115 Freezer Storage Volume Litre 40 Applicable Star Rating Compartment 4 Star Refrigeration Syst...

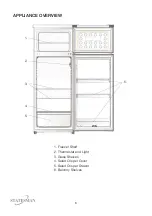
Page 6: ...6 APPLIANCE OVERVIEW 1 2 3 4 5 6 1 Freezer Shelf 2 Thermostat and Light 3 Glass Shelves 4 Salad Crisper Cover 5 Salad Crisper Drawer 6 Balcony Shelves...

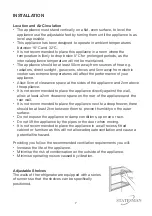
Page 7: ...ove the appliance It is not recommended to place the appliance directly against the wall allow at least a 2cm clearance space on the rear of the appliance and the rear wall It is not recommended to pl...

Page 8: ...oors The appliance doors can be fitted to open to either the left or the right depending on its location The appliance will have to be tilted and supported in order to carry this out It is advisable t...

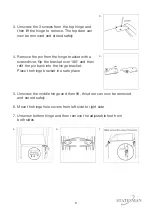
Page 9: ...cket with a screwdriver flip the bracket over 180 and then refit the pin back into the hinge bracket Place the hinge bracket in a safe place 5 Unscrew the middle hinge and then lift this door can now...

Page 10: ...finally tightening the top hinge Then refit the hinge bracket to the top of the appliance 12 Re install the top cover using the 4 screws 13 Re adjust the levelling feet to minimise operation noises ca...

Page 11: ...he food packed wrapped or covered For hygiene reasons always wrap food using a suitable packaging material before storing in your appliance to avoid contact with the surface of the appliance Do not pl...

Page 12: ...itch on and allow the temperature in the appliance to drop back to an adequate temperature 6 Replace the food in the appliance Compartment Type of Food Balcony Shelves Foods with natural preservatives...

Page 13: ...y making sure not to pull the cord 3 Leave the door open to speed up the defrosting process bowls of warm water can be placed inside the appliance to raise the temperature 4 Place a shallow bowl or pa...

Page 14: ...d and follow the cleaning instructions in the Cleaning and Maintenance section Note Leave the door ajar as this will prevent odours and mould accumulating in the appliance and will allow the appliance...

Page 15: ...ing reference the temperature rise time in the technical specifications chart Food must be consumed within this time frame or cooked to then be frozen Thawing Frozen food can be thawed in the refriger...

Page 16: ...e the impact on human health and the environment The crossed out wheeled bin symbol on the product reminds you of your obligation that when you dispose of the appliance it must be separately collected...

Page 17: ...hin the last 24 hours Turn the temperature regulation to a colder setting temporarily The appliance is near a heat source Please look in the Installation section Temperature is set too cold Turn the t...

Page 18: ...18...

Page 19: ...19...

Page 20: ...imer Statesman operate a policy of continual improvement and development We therefore reserve the right to change alter the specification and appearance of our appliances without prior notice All diag...

Reviews: