background image

19

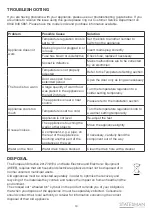
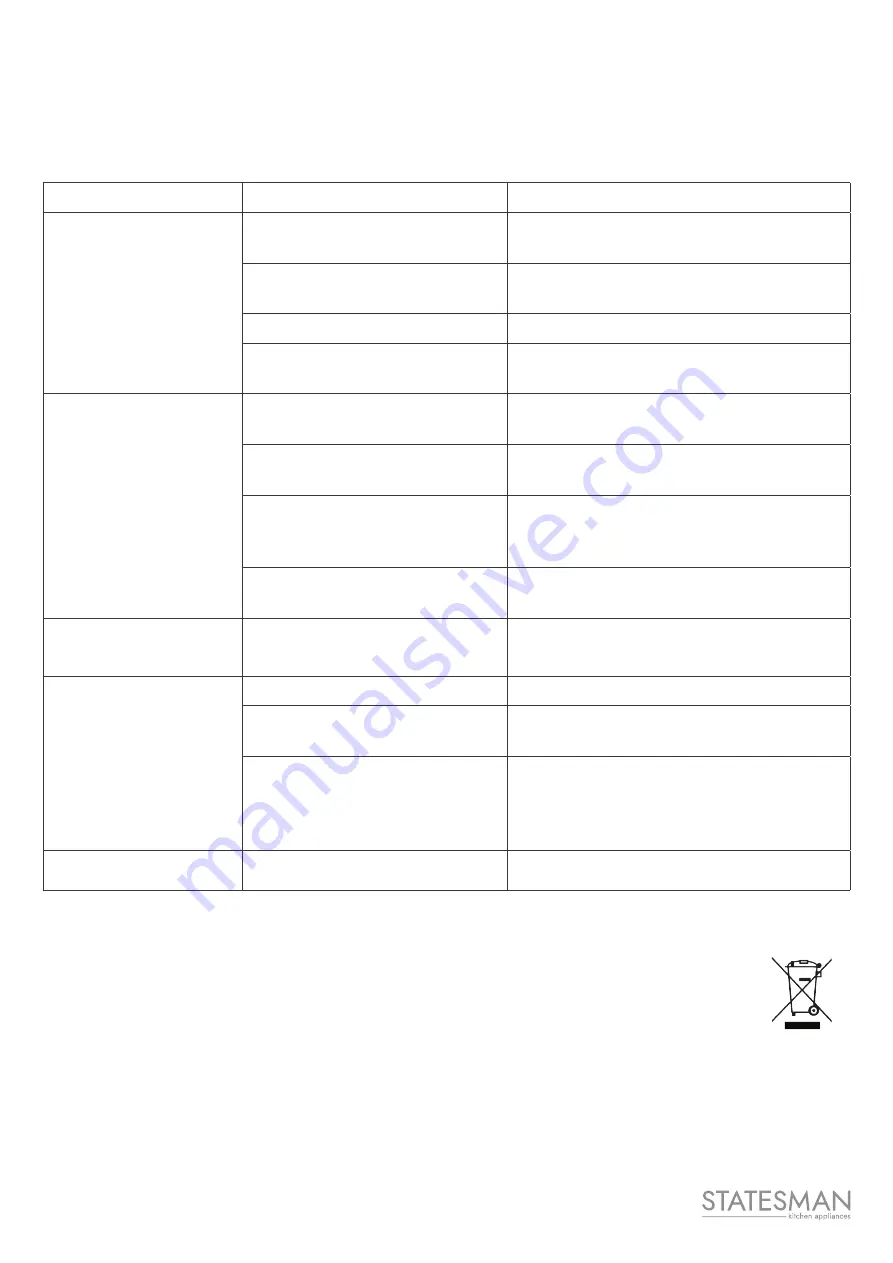
TROUBLESHOOTING

If you are having problems with your appliance, please use our troubleshooting guide below. If you 

are unable to resolve the issue using this guide please ring our Customer Service Department on 

0844 848 5861. Please have the model code and purchase information available.

Problem

Possible Cause

Solution

Appliance does not 

work

Temperature regulation knob is 

set to ‘0’

Set the knob to another number to 

switch on the appliance

Mains plug is not plugged in or 

is loose

Insert mains plug correctly

Fuse has blown or is defective Check fuse, replace if necessary

Socket is defective

Mains malfunctions are to be corrected 

by an electrician

The food is too warm

Temperature is not properly 

adjusted

Refer to the Temperature Setting section

Door was open for an 

extended period

Open the door only as long as necessary

A large quantity of warm food 

was placed in the appliance in 

the last 24 hours

Turn the temperature regulation to a 

colder setting temporarily

The appliance is near a heat 

source

Please refer to the Installation section

Appliance cools too 

much

Temperature is set too cold

Turn the temperature regulation knob to 

a warmer setting temporarily

Unusual noises

Appliance is not level

Re-adjust the feet

The appliance is touching the 

wall or other objects

Move the appliance slightly

A component, e.g. a pipe, on 

the rear of the appliance is 

touching another part of the 

appliance or the wall

If necessary, carefully bend the 

component out of the way

Water on the floor

Water drain hole is blocked

Clean the drain hole with a cleaner

DISPOSAL

The European Directive 2012/19/EU on Waste Electrical and Electronic Equipment 

(WEEE), requires that old household electrical appliances must not be disposed of in 

normal unsorted municipal waste. 

Old appliances must be collected separately in order to optimise the recovery and 

recycling of the materials they contain and reduce the impact on human health and the 

environment. 

The crossed out “wheeled bin” symbol on the product reminds you of your obligation, 

that when you dispose of the appliance it must be separately collected. Consumers 

should contact their local authority or retailer for information concerning the correct 

disposal of their old appliance.

Summary of Contents for FF1755X

Page 1: ...hese instructions carefully before use and retain for future reference Before switching on your appliance Always check for any damage that may have been caused in transit Instruction Manual FRIDGE FRE...

Page 2: ...ocation 12 Electrical Connection 12 Using Your Appliance 13 17 First use 13 Temperature Setting 13 Freezing Fresh Food 13 Storing Frozen Food 14 Thawing 14 Temperature Setting Recommendation 14 Access...

Page 3: ...ngs in the appliance enclosure or the built in structure clear of obstruction WARNING Do not use mechanical devices or other means to accelerate the defrosting process other than those recommended by...

Page 4: ...amage to the appliance To avoid contamination of food please respect the following instructions Opening the door for long periods can cause a significant increase of the temperature in the compartment...

Page 5: ...en for too long at a time Don t set the thermostat to exceedingly cold temperatures All accessories such as drawers shelves balconies etc should be kept there for lower energy consumption Environment...

Page 6: ...Consumption 276kWh Freezing Capacity 3 2Kg 24h Fridge Storage Volume Litre and Applicable Star Rating Compartment 161 Freezer Storage Volume Litres 71 Applicable Star Rating Compartment N A Refrigerat...

Page 7: ...RODUCT OVERVIEW Thermostat and Light Glass Shelves Crisper Cover Crisper Freezer Drawers Leveling Feet Balconies Water Tank This illustration is only for reference for details please check your applia...

Page 8: ...door reversing process All parts removed must be saved to do the re installation of the door Do not lay the unit flat as this may damage the coolant system It s better that 2 people handle the unit du...

Page 9: ...ft pad to avoid scratching 5 Move the hinge hole covers from left side to right side 6 Unscrew bottom hinge Then remove the adjustable feet from both sides 7 Unscrew and remove the bottom hinge pin tu...

Page 10: ...pin in the upper hole of the lower door then tighten the bolts 10 Place the upper door back on Ensure the door is aligned horizontally and vertically so that the seals are closed on all sides before...

Page 11: ...ote This refrigerating appliance is not intended to be used as a built in appliance Leveling the Unit To do this adjust the two leveling feet at the front of the unit If the unit is not level the door...

Page 12: ...liance should not be positioned below overhanging wall units Accurate leveling is ensured by one or more adjustable feet at the base of the cabinet This refrigerating appliance is not intended to be u...

Page 13: ...balconies of fridge compartment Foods with natural preservatives such as jams juices drinks condiments Do not store perishable foods Crisper drawer salad drawer Fruits herbs and vegetables should be...

Page 14: ...an be thawed in the fridge compartment or at room temperature depending on the time available for this operation Small pieces may even be cooked still frozen directly from the freezer In this case coo...

Page 15: ...t different heights To make these adjustments proceed as follows gradually pull the shelf in the direction of the arrows until it comes free then reposition as required Using the Water Dispenser Impor...

Page 16: ...eezing process takes 24 hours No further food to be frozen should be added during this period Only freeze top quality fresh and thoroughly cleaned foodstuffs Prepare food in small portions to enable i...

Page 17: ...ore warm food or evaporating liquids in the refrigerator Cover or wrap food particularly if it has a strong flavour Hints for Refrigeration Useful hints Meat all types wrap in polythene bags and place...

Page 18: ...the juice from orange peel butyric acid cleansers that contain acetic acid Do not allow such substances to come into contact with the appliance parts Do not use any abrasive cleaners Remove the food...

Page 19: ...ease refer to the Installation section Appliance cools too much Temperature is set too cold Turn the temperature regulation knob to a warmer setting temporarily Unusual noises Appliance is not level R...

Page 20: ...0844 848 5861 38 Bluestem Road Ransomes Europark Ipswich IP3 9RR...

Reviews: