background image

16

Burners

•  Remove the burner lids and Flame Spreaders by pulling them upwards and  

  away from the top plate.

•  Soak them in hot water and a little detergent or washing up liquid.

•  After cleaning and washing them, wipe and dry them carefully. Make sure  

  that the flame holes are clean and completely dry.

•  Wipe the fixed part of the burner cup with a damp cloth and dry 

 aftrewards.

•  Gently wipe the ignition device and flame supervision device with a well  

  wrung-out cloth and wipe dry with a clean cloth.

•  Before placing the burners back on the top plate, make sure that the 

  injector is not blocked

Re-assemble the Auxiliary, Semi-rapid, Rapid and 

Triple-crown as follows:

1. Place the flame spreader (4) on to the burner cup (5) so that the ignition  

  device and the flame supervision device extend through their respective 

  holes in the flame spreader. The flame spreader must click into place  

 correctly.

2. Position the burner lid (1, 2, 3) onto the flame speader (4) so that the  

  retaining pins fit into their respective recesses.

Replace parts in the correct order after cleaning.

- Do not mix up the top and bottom.

- The locating pins must fit exaclty into the notches.

Summary of Contents for GH75GB

Page 1: ...tions carefully before use and retain for future reference Before switching on your appliance Always check for any damage that may have been caused in transit Instruction Manual Serial number GH75GB G...

Page 2: ...ntended for domestic household use only When using gas appliances basic safety precautions should always be followed 1 Only a registered CORGI gas safe engineer can install connect or repair this appl...

Page 3: ...educed physical sensory or mental capabilities or lack of experience and knowledge if they have been given supervision or instruction concerning use of the appliance in a safe way and understand the h...

Page 4: ...icinity of the appliance whilst in operation 30 When frying foods always try to ensure that food is as dry as possible as frost or moisture on food may cause hot fat to bubble up and over the sides of...

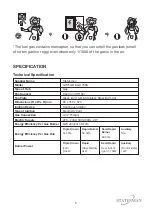
Page 5: ...e of Hob Pan Support Top Plate Dimensions H x W x D mm Ignition Device Type of Ignition Gas Connection Electric Supply Energy Efficiency Per Gas Burner Statesman GH75GB GH75SS Gas Cast Iron HT150 Glas...

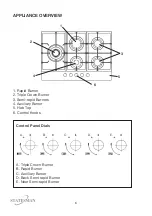
Page 6: ...2 Triple Crown Burner 3 Semi rapid Burners 4 Auxiliary Burner 5 Hob Top 6 Control Knobs 5 1 2 3 4 6 Control Panel Dials A Triple Crown Burner B Rapid Burner C Auxiliary Burner D Back Semi rapid Burner...

Page 7: ...wide worktop providing that the stated minimum distances are allowed Ensure that the selected worktop or unit and all surrounding materials are made of non flammable materials Install a mechanical ve...

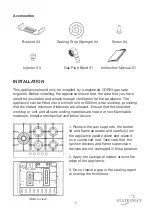
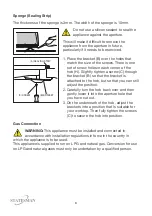
Page 8: ...racket B so that the bracket is attached to the hob but so that you can still adjust the position 2 Carefully turn the hob back over and then gently lower it into the aperture hole that you have cut o...

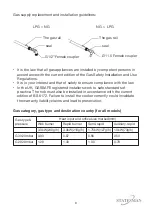
Page 9: ...nce with the law In the UK GASSAFE registered installers work to safe standards of practice The hob must also be installed in accordance with the current edition of BS 6172 Failure to install the cook...

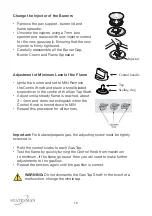
Page 10: ...aling ring Tap Change the Injector of the Burners Remove the pan support burner lid and flame spreader Unscrew the injector using a 7mm box spanner and replace with new injector correct for the new ga...

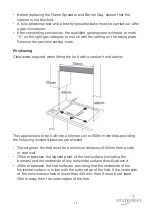
Page 11: ...ob with a cooker hood above This appliance is to be built into a kitchen unit or 600mm worktop providing the following minium distances are allowed The edges of the hob must be a minimum distance of 6...

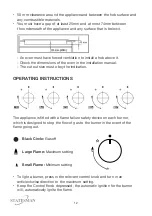
Page 12: ...nticlockwise direction to the maximum setting Keep the Control Knob depressed the automatic ignition for the burner will automatically ignite the flame 50 mm clearance around the appliance and between...

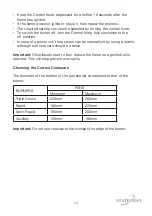
Page 13: ...of a power cut the burners can be manually lit by using a match although extreme care should be taken Important Once liquids start to boil reduce the flame so a gentle boil is reached This will help...

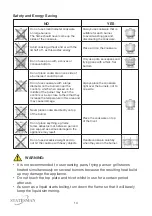
Page 14: ...which when placed on the middle of the burner may touch the controls or be so close to them that they increase the temperature in this area and may cause damage Never place cookware directly on top of...

Page 15: ...e and the control handles with a damp cloth washing up liquid and water For stubborn soiling soak beforehand Dry everything with a clean soft cloth Top Plate Regularly wipe over the top plate using a...

Page 16: ...dry with a clean cloth Before placing the burners back on the top plate make sure that the injector is not blocked Re assemble the Auxiliary Semi rapid Rapid and Triple crown as follows 1 Place the f...

Page 17: ...embly is securely fitted together The gas supply is closed Open the gas supply completely The fuse has blown Change the fuse Inconsistent unstable flame The gas supply is not completely open Open the...

Page 18: ...late and contact a registered CORGI gas safe engineer by the use of a neighbours phone or a mobile phone Note Do not switch on off any electrical appliances including lights Gas can have the smell of...

Page 19: ...D SPARE PARTS Should you experience any difficulty in using your Statesman appliance at any time you may contact your Statesman Retailer or call our Customer Service Department on 0844 848 5861 Discla...

Page 20: ...imer Statesman operate a policy of continual improvement and development We therefore reserve the right to change alter the specification and appearance of our appliances without prior notice All diag...

Reviews: