background image

EN - 18

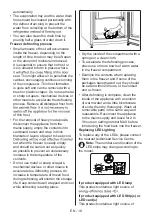
automatically.

•  The evaporation tray and the water drain 

hole should be cleaned periodically with 

the defrost drain plug to prevent the 

water from collecting at the bottom of the 

•  You can also clean the drain hole by 

pouring half a glass of water down it.

Freezer defrosting process

•  Small amounts of frost will accumulate 

inside the freezer, depending on the 

length of time the door may be left open 

or the amount of moisture introduced. 

It is essential to ensure that no frost or 

ice is allowed to form in places where 

seal. This might allow air to penetrate the 

cabinet, encouraging continuous running 

of the compressor. Thin frost formation 

is quite soft and can be removed with a 

brush or plastic scraper. Do not use metal 

or sharp scrapers, mechanical devices or 

other means to accelerate the defrosting 

process. Remove all dislodged frost from 

of thin frost.

•  For the removal of heavy ice deposits, 

disconnect the appliance from the 

mains supply, empty the contents into 

cardboard boxes and wrap in thick 

blankets or layers of paper to keep cool. 

out when the freezer is nearly empty 

and should be carried out as quickly 

as possible to prevent an unnecessary 

increase in the temperature of the 

contents.

•  Do not use metal or sharp scrapers, 

mechanical devices or other means to 

accelerate the defrosting process. An 

increase in temperature of frozen food 

during defrosting will shorten the storage 

life. Keep contents well wrapped and cool 

while defrosting is taking place.

•  Dry the inside of the compartment with a 

sponge or a clean cloth.

•  To accelerate the defrosting process, 

place one or more bowls of warm water 

in the freezer compartment.

•  Examine the contents when replacing 

them in the freezer and if some of the 

packages have thawed out, they should 

be eaten within 24hours, or be cooked 

and re-frozen.

•  After defrosting is complete, clean the 

inside of the appliance with a solution 

of warm water and a little bicarbonate 

of soda, then dry thoroughly. Wash all 

removable parts in the same way and 

reassemble. Reconnect the appliance 

to the mains supply and leave for 2 to 

3 hours on setting number MAX before 

introducing the food back into the freezer.

Replacing LED Lighting

To replace any of the LEDs, please contact 

the nearest Authorised Service Centre.

Note:

 The numbers and location of the 

LED strips may change according to 

the model.

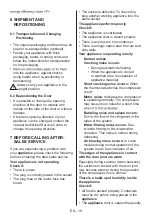
If product equipped with LED lamp

This product contains a light source of 

If product equipped with LED Strip(s) or 

LED card(s)

This product contains a light source of 

Summary of Contents for LF1450W

Page 1: ...these instructions carefully before use and retain for future reference Before switching on your appliance Always check for any damage that may have been caused in transit Instruction Manual LF1450W S...

Page 2: ...operation and maintenance of your appliance Please take the time to read this user manual before using your appliance and keep this book for future reference Icon Type Meaning WARNING Serious injury...

Page 3: ...tting 12 3 3 Temperature Settings Warnings 12 3 4 Accessories 13 3 4 1 Ice Tray 13 3 4 2 The Freezer Box 13 4 FOOD STORAGE 13 4 1 Refrigerator Compartment 13 4 2 Freezer Compartment 14 5 CLEANING AND...

Page 4: ...they are of the type recommended by the manufacturer WARNING Do not damage the refrigerant circuit WARNING When positioning the appliance ensure the supply cord is not trapped or damaged WARNING Do n...

Page 5: ...pplications such as working environments farm houses and by clients in hotels motels and other residential type environments bed and breakfast type environments catering and similar non retail applica...

Page 6: ...es Children are not expected to perform cleaning or user maintenance of the appliance very young children 0 3 years old are not expected to use appliances young children 3 8 years old are not expected...

Page 7: ...cessible drainage systems refrigerator so that it is not in contact with or drip onto other food Two star frozen food compartments are suitable for storing pre frozen food storing or making ice cream...

Page 8: ...r there must be at least 2 cm between them to prevent humidity forming on the outer surface Do not cover the body or top of fridge performance of your fridge freezer Clearance of at least 150 mm is re...

Page 9: ...oduct is disposed of correctly you will help prevent potential negative consequences for the environment and human health which could otherwise be caused by inappropriate waste handling of this produc...

Page 10: ...position of door bins does not Freezer Compartment Freezer Most on stock position 2 1 Electrical information For UK type plug Warning This appliance must be earthed The mains lead of this appliance h...

Page 11: ...ooling air Overall space required in use 3 W3 mm 604 8 D3 mm 538 3 the height width and depth of the appliance including the handle plus the space necessary for free circulation of the cooling air plu...

Page 12: ...the thermostat switch is in the SF position appliance work will automatically return to the operation in the thermostat 3 position according to the time indicated in the note Super freezing This swit...

Page 13: ...reezer Box The freezer box allows food to be accessed more easily The images are representative Freezer boxes or Freezer boxes Freezer upper cover The images are representative Removing the freezer bo...

Page 14: ...elow 0 C are iced and rotted bacterial load increases above 8 C and spoils Do not put hot food in the refrigerator immediately wait for the temperature to pass outside Hot foods increase the degree of...

Page 15: ...om temperature the thermostat setting how often the door is opened the type of food and the length of time required to transport the product from the shop to your home Always follow the instructions p...

Page 16: ...c container 3 NOTE Thawed frozen meat should be cooked as fresh meat If the meat is not cooked after defrosting it must not be re frozen Vegetables and Fruits Preparation Maximum storage time months S...

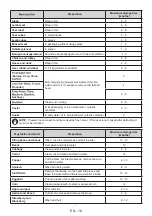
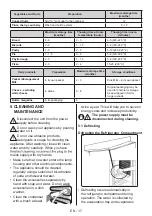
Page 17: ...5 CLEANING AND MAINTENANCE Disconnect the unit from the power supply before cleaning Do not wash your appliance by pouring water on it Do not use abrasive products detergents or soaps for cleaning th...

Page 18: ...necessary increase in the temperature of the contents Do not use metal or sharp scrapers mechanical devices or other means to accelerate the defrosting process An increase in temperature of frozen foo...

Page 19: ...eck this plug another working appliance into the same socket The appliance performs poorly Check if The appliance is overloaded The appliance door is closed properly There is any dust on the condenser...

Page 20: ...the appliance in a way that does not comply with this we emphasise that the manufacturer and the dealer will not be responsible for any repair and failure within the guarantee period 8 TIPS FOR SAVIN...

Page 21: ...on about the energy label 10 INFORMATION FOR TEST INSTITUTES shall be compliant with EN 62552 Ventilation requirements recess dimensions and minimum rear clearances shall be as stated in this User Man...

Page 22: ...38 Bluestem Road Ransomes Europark Ipswich IP3 9RR...

Reviews: