background image

5

GENERAL SAFETY RULES

EN

PERSONAL SAFETY

• 

Stay alert, watch what you are doing and use common sense when operating a 

power tool. Do not use a power tool while you are tired or under the influence of 

drugs, alcohol or medication.


A moment of inattention while operating power tools may 

result in serious personal injury.

• 

Use safety equipment. Always wear eye protection. 

Safety equipment such as 

dust mask, non-skid safety shoes, hard hat, or hearing protection used for appropriate 

conditions will reduce personal injuries. 

• 

Avoid accidental starting. Ensure the switch is in the off position before plugging in. 

Carrying power tools with your finger on the switch or plugging in power tools that have 

the switch on invites accidents.

• 

Remove any adjusting key or wrench before turning the power tool on. 

A wrench or a 

key left attached to a rotating part of the power tool may result in personal injury.

• 

Do not overreach. Keep proper footing and balance at all times. 

This enables better 

control of the power tool in unexpected situations.

• 

Dress properly. Do not wear loose clothing or jewellery. Keep your hair, clothing and 

gloves away from moving parts.


Loose clothes, jewellery or long hair can be caught in 

moving parts.

• 

If devices are provided for the connection of dust extraction and collection facilities, 

ensure these are connected and properly used.


Use of these devices can reduce dust 

related hazards.

POWER TOOL USE AND CARE

• 

Do not force the power tool. Use the correct power tool for your application. 

The 

correct power tool will do the job better and safer at the rate for which it was designed.

• 

Do not use the power tool if the switch does not turn it on and off.

 Any power tool 

that cannot be controlled with the switch is dangerous and must be repaired.

• 

Disconnect the plug from the power source before making any adjustments, 

changing accessories, or storing power tools. 

Such preventive safety measures reduce 

the risk of starting the power tool accidentally.

• 

Store idle power tools out of the reach of children and do not allow persons 

unfamiliar with the power tool or these instructions to operate the power tool. 

Power tools are dangerous in the hands of untrained users.

• 

Maintain power tools. Check for misalignment or binding of moving parts, breakage 

of parts and any other condition that may affect the power tools operation. If 

damaged, have the power tool repaired before use. 

Many accidents are caused by 

poorly maintained power tools. 

• 

Keep cutting tools sharp and clean.

 Properly  maintained  cutting  tools  with sharp  

cutting  edges  are  less  likely  to  bind and are easier to control.

Summary of Contents for RH750CE

Page 1: ...RH750CE Trimmer Elettrorefilatore Фреза челна Фрезер кромочный IT EN BG RU Original instructions Istruzioni originali Оригинална инструкция за използване Оригинальная инструкция по эксплуатации ...

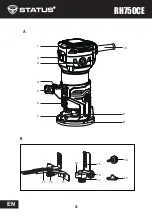
Page 2: ...2 RH750CE EN 11 12 13 18 19 14 15 16 17 2 1 3 5 4 9 8 10 7 6 A B ...

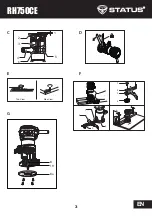
Page 3: ...3 RH750CE EN 1 2 3 4 5 6 C E F G D Top View Side View 1 2 3 4 1 2 3 4 a 19 8 8a ...

Page 4: ... Distractions can cause you to lose control ELECTRICAL SAFETY Power tool plugs must match the outlet Never modify the plug in any way Do not use any adapter plugs with earthed grounded power tools Unmodified plugs and matching outlets will reduce risk of electric shock Avoid body contact with earthed or grounded surfaces such as pipes radiators ranges and refrigerators There is an increased risk o...

Page 5: ...t in moving parts If devices are provided for the connection of dust extraction and collection facilities ensure these are connected and properly used Use of these devices can reduce dust related hazards POWER TOOL USE AND CARE Do not force the power tool Use the correct power tool for your application The correct power tool will do the job better and safer at the rate for which it was designed Do...

Page 6: ...ast as high as the maximum speed indicated on the electrical power tool Parts used at higher than permissible speeds may be ruined The router or other parts must fit precisely in the collet shaft diameter 6 8 12 of your electric power tool Cutting tools which do not fit precisely in the collet of the electric power tool turn unevenly vibrate strongly and can lead to a loss of control Always switch...

Page 7: ...rench 6 Scale indication 7 Collet chuck 8 Base 9 Output shaft 10 Power cable with power plug 11 Straight trim guide 12 Wing nut 13 Flange 14 Roller 15 Curved trim guide 16 Depth adjustment knob 17 Depth adjustment lock knob 18 Fixing knob with washer 19 Template guide Fig C 1 Bit protrusion 2 Tool base 3 Scale 4 Locking lever 5 Adjusting screw 6 Hex nut ...

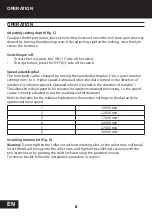
Page 8: ... lower speed is obtained when it is turned in the direction of number 1 This allows the ideal speed to be selected for optimum material processing i e the speed can be correctly adjusted to suit the material and bit diameter Refer to the table for the relationship between the number settings on the dial and the approximate tool speed Installing trimmer bit Fig D Warning Do not tighten the collet n...

Page 9: ...p screw A Loosen the tighten nut on the straight guide and adjust the distance between the bit and the straight guide At the desired distance tighten the tighten nut securely When cutting move the tool with the straight guide flush with the side of the workpiece If the distance a between the side of the workpiece and the cutting position is too wide for the straight guide or if the side of the wor...

Page 10: ...cement of the supply cord is necessary this has to be done by the manufacturer or his agent in order to avoid a safety hazard CLEANING For safe operation always keep the machine and its ventilation slots clean Regularly check to see if any dust or foreign matter has entered the ventilation slots and the grills around the switches Use a soft brush and or air jet to remove any accumulated dust MAINT...

Page 11: ...ssion value ah 7 04 m s2 uncertainty 1 5 m s2 Protection class II We STATUS ITALIA S R L as the responsible manufacturer declare that the following STATUS machine s Trimmer Model No Type RH750CE are of series production and сonforms to the following European Directives 2006 42 EC 2014 30 EU And are manufactured in accordance with the following standards or standardised documents EN 55014 1 2017 EN...

Page 12: ...o vapore Tenere a distanza bambini e terzi durante il funzionamento Per una distrazione potreste perdere il controllo dell utensile SICUREZZA ELETTRICA La spina dell utensile deve essere adatta alla presa utilizzata Non modificare la spina in alcun modo Non utilizzare adattatori con gli utensili collegati a terra L impiego di una spina integra ed una presa adatta riduce i rischi di folgorazione Ev...

Page 13: ... Abiti svolazzanti gioielli o capelli potrebbero impigliarsi nelle parti in movimento In presenza di apparecchiature per il collegamento a dispositivi di aspirazione e raccolta delle polveri accertarsi che essi siano collegati ed utilizzarli correttamente L uso di queste apparecchiature può ridurre i rischi causati dalla polvere USO E MANUTENZIONE DELL UTENSILE Utilizzare l utensile più adatto per...

Page 14: ...ra e sulla fresatrice Con la seconda mano tenere l impugnatura aggiuntiva o l alloggiamento del motore Se entrambe le mani tengono la fresa non possono essere lesionate dalla fresatrice Non fresare mai oggetti metallici chiodi o viti La fresatrice può essere danneggiata e determinare vibrazioni incrementate Utilizzare apparecchi rilevatori adatti per rintracciare le linee di alimentazione nascoste...

Page 15: ...icazione della scala 7 Pinza 8 Base 9 Albero di uscita 10 Cavo di alimentazione con spina 11 Guida di assetto diritta 12 Dado ad alette 13 Flangia 14 Rullo 15 Guida di assetto curva 16 Manopola di regolazione della profondità 17 Manopola di blocco della regolazione della profondità 18 Manopola di fissaggio con rondella 19 Guida ai modelli Fig C 1 Bit sporgenza 2 Base degli strumenti 3 Scala 4 Leva...

Page 16: ...e ruotando la ghiera nella direzione del numero 6 E si ottiene la velocità più bassa quando si gira nella direzione del numero 1 Ciò consente di selezionare la velocità ideale per una lavorazione ottimale del materiale ovvero la velocità può essere regolata correttamente per adattarsi al materiale e al diametro della punta Fare riferimento alla tabella per la relazione tra le impostazioni dei nume...

Page 17: ...ata per tagli dritti durante la smussatura o la scanalatura Collegare la piastra di guida alla guida diritta con il bullone e il dado di serraggio Collegare la guida diritta con la vite di fissaggio A Allentare il dado di serraggio sulla guida diritta e regolare la distanza tra la punta e la guida diritta Alla distanza desiderata serrare saldamente il dado di serraggio Durante il taglio spostare l...

Page 18: ...re regolarmente tutte le parti in movimento Se il cavo di alimentazione è guasto la sostituzione deve essere fatta dal costruttore o da un suo specialista di centro assistenza per ovviare ai pericoli relativi alla sostituzione MANUTENZIONE Allentare la manopola di blocco della regolazione della profondità 17 e ruotare la manopola di regolazione della profondità 16 per impostare l angolo e la profo...

Page 19: ...ta LwA 101 dB A uncertainty 3 dB A Valore delle vibrazioni emesse аh 7 04 m s2 uncertainty 1 5 m s2 Classe di protezione II ACCESSORI Guida per trimmer guida dritta guida per dima chiavi IT DATI TECNICI DICHIARAZIONE DI CONFORMITÀ Noi dichiariamo sotto la nostra personale responsabilità che questo prodotto è in conformità a tutte le disposizioni pertinenti della presente direttive e norme armonizz...

Page 20: ... течности Електрическият двигател на уреда по време на работа изпуска искри и това може да стане причина за пожар По време на работа не се допуска присъствието на странични лица и деца на работното място ЕЛЕКТРИЧЕСКА БЕЗОПАСНОСТ Мрежовата розетка трябва да съответства на щепселната вилка която е монти рана на мрежовия кабел на уреда Забранено е да внасяте промени в конструк цията на вилката и да и...

Page 21: ...а избягване на случайното включване на уреда Преди включване на уреда от него трябва да бъдат свалени регулиращите инструменти отвертките и други Попадането на инструмента в подвижните части на уреда при включване може да стане причината за настъпване на трав ми и да доведе до излизането му от строя По време на работа е необходимо да заемате устойчиво положение Винаги стойте върху устойчива опора ...

Page 22: ...АНЕ Ремонтът на уреда трябва да се извършва в оторизиран сервизен център от квалифициран персонал и само и единствено с оригинални резервни части Използването на резервни части които не са сертифицирани от производителя на съответния уред може да доведе до излизане на уреда от строя и нарушаване на нормите за електрическа безопасност на уреда Дръжте електрическия инструмент за изолираните ръкохват...

Page 23: ...ово дници или се обърнете към местното дружество за електрозахранване Контактът с електрически проводници може да предизвика пожар или токов удар Повре дата на газопровод може да доведе до експлозия Проникването във водопровод причинява материални щети ОПИСАНИЕ ОПИСАНИЕ Фиг A B 1 Циферблат за регулиране на скоростта 2 Превключете 3 Капачка от карбонова четка 4 Копче за регулиране на височината 5 К...

Page 24: ...а скорост се получава при завъртане на циферблата в посока на числото 6 И по ниската скорост се получава при завъртане по посока на номер 1 Това позволява да се избере идеалната скорост за оптимална обработка на матери ала т е скоростта може да бъде правилно настроена за да отговаря на материала и диаметъра на бита Вижте таблицата за връзката между настройките на номера на циферблата и прибли зите...

Page 25: ...в посока на подаване Това ще ви помогне да не се заравнява със страната на детайла Прав водач фиг F Правият водач ефективно се използва за прави срезове при скосяване или набраз дяване Прикрепете водещата плоча към правия водач с болта и затегнете гайката Закрепете правия водач с винта на скобата A Разхлабете затягащата гайка върху правия водач и регулирайте разстоянието между бита и правия водач ...

Page 26: ...е ПОДДРЪЖКА Разхлабете копчето за заключване 4 за да преместите извитото направляващо покритие 15 докато разстоянието между бита и ролката 14 е приблизително 19 mm до 25 mm Затегнете копчето за заключване 4 за да фиксирате позицията на извития тапи церен водач 15 Разхлабете копчето за регулиране на дълбочината 17 и завъртете копчето за регулиране на дълбочината 16 за да зададете ъгъла и дълбочинат...

Page 27: ...ите изде лия и да променя спецификациите без предупреждение Окомплектовка Паралелен водач спирачка на ролката втулка за копиране гаечен ключ ТЕХНИЧЕСКИ ДАННИ ПРЕДУПРЕЖДЕНИЕ Не се допуска употребата на спирт бензин или други разтворители Никога не изпол звайте разяждащи препарати за почистване на пластмасовите части Не се допуска влизането на вода в контакт с машината РЕЗЕРВНИ ЧАСТИ За да се осигур...

Page 28: ...9 A11 2010 EN 60745 2 17 2010 Техническа документация STATUS ITALIA S R L via Aldo Moro 14 A 36060 Pianezze VI ITALY Caron Giacinto Director STATUS Italia S r l STATUS ITALIA S R L ул Алдо Моро 14 А 36060 Пианезе Виченца Италия ДЕКЛАРАЦИЯ ЗА СЪОТВЕТСТВИЕ Дистрибутор на територията на България Спринтер ООД Адрес по регистрация България гр София 1000 бул Христо Ботев 28 ет 7 Адрес за кореспонденция ...

Page 29: ... внимания в процессе работы может быть причиной потери вашего контроля ЭЛЕКТРОБЕЗОПАСНОСТЬ a Электрические ручные машины должны иметь штепсельный разъем Запрещается использовать нестандартную вилку и иные способы соединения с источником пита ния b Не допускайте контакта тела с заземлением и заземленными поверхностями таки ми как трубы радиаторы батареи и т п c Запрещается работать машиной в услови...

Page 30: ...ружайте машину Правильно ее используйте согласно назначению она будет работать лучше и безопаснее в том режиме для которого предназначена b Не работайте машиной если выключатель не обеспечивает ее включение или выключение Машина с неисправным органом управления таким как выключатель опасна и должна подлежать ремонту c Отсоединяйте штепсельную вилку от сети или аккумуляторную батарею от машины до в...

Page 31: ...ектроинструмента Режущие инструменты которые точно не помещаются в цангу электроинструмента вращаются неравномерно сильно вибрируют и могут привести к потере контроля Всегда включайте электроинструмент перед установкой его на заготовку Суще ствует также риск отдачи если электрический инструмент зацепится за деталь Держите руки подальше от зоны резания и маршрутизатора Держите вторую руку на дополн...

Page 32: ...он 8 База 9 Выходной вал 10 Кабель питания с вилкой 11 Прямая накладка направляющей 12 барашковая гайка 13 Фланец 14 Ролик 15 Изогнутая накладка 16 Ручка регулировки глубины 17 Ручка блокировки регулировки глу бины 18 Фиксирующая ручка с шайбой 19 Копировальная втулка Рис С 1 Глубина погружения 2 Основа инструмента 3 Масштаб 4 Рычаг блокировки 5 Регулировочный винт 6 Шестигранная гайка ...

Page 33: ...ается при повороте диска в направлении числа 6 И более низкая скорость достигается при его повороте в направлении 1 Это позволяет выбрать оптимальную скорость для оптимальной обработки материа ла то есть скорость можно правильно отрегулировать в соответствии с материалом и диаметром долота Обратитесь к таблице для связи между настройками числа на циферблате и приблизи тельной скоростью инструмента...

Page 34: ...е ее с правой стороны в направлении подачи Это поможет держать его на одном уровне со стороной заготов ки Прямая направляющая рис F Прямая направляющая эффективно используется для прямых разрезов при снятии фаски или нарезании канавок Прикрепите направляющую пластину к прямой направляющей с помощью болта и гайки Прикрепите прямую направляющую с помощью зажимного винта A Ослабьте гайку на прямой на...

Page 35: ...авляющую шаблона 19 к основанию 8 Поместите опорную плиту 8a назад и затяните винты Надежно закрепите шаблонную доску не входит в комплект на заготовке Поместите триммер на доску шаблонов и удерживайте направляющую шаблона 19 двигаясь вдоль края прорези шаблона ОБСЛУЖИВАНИЕ ОБЩИЙ ОСМОТР Проверяйте регулярно все элементы крепления и убедитесь в том что они крепко затянуты В том случае если какой ли...

Page 36: ...14 30 EU Также соответствует нижеперечисленным стандартам EN 55014 1 2017 EN 55014 2 2015 EN 61000 3 2 2014 EN 61000 3 3 2013 EN 60745 1 2009 A11 2010 EN 60745 2 17 2010 Техническа документация находится у производителя STATUS ITALIA S R L via Aldo Moro 14 A 36060 Pianezze VI ITALY Изделия соответствуют требованиям следующих технических регламентов Таможен ного союза ТР ТС 004 2011 ТР ТС 010 2011 ...

Page 37: ...ровальная втулка ключи ТЕХНИЧЕСКИЕ ХАРАКТЕРИСТИКИ Модель RH750CE Напряжение питания 220 240 В 50 Гц Мощность 750 Вт Частота ходов без нагрузки 10000 30000 об мин Диаметр хвостовика фрезы 6 мм Масса 1 8 кг Срок службы 5 лет А взвешенный уровень звукового давления LpA 90 дБ A Погрешность 3 дБ A А взвешенный уровень звуковой мощности LwA 101 дБ A Погрешность 3 дБ A Величина излученных вибраций ah 7 0...

Page 38: ...38 ...

Page 39: ...39 ...

Page 40: ......

Reviews: