background image

ENGLISH

16

16

3.2 Assembling

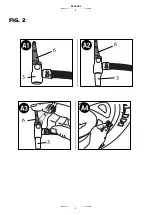
Valve Adapter (FIG. 2) 

•Push adapter 6 downwards onto the threaded section of 

the valve rod or one of the three accessories delivered 

together with the inflating device (fig. A2).

•When the adapter is positioned completely down on the 

threads, press lever 6 with your finger downward so as to 

fix it in its position (figure A3).

•To release the adapter 3, pull lever 6 upwards and pull 

the adapter 3.

•Operate  your  inflating  device  only  with  the  nozzles  as 

included or with standard valves for tires (figure A4). 

Accessories

• Place the universal valve adaptor 3 over the stud of the 

inflator needle or the conical nozzle.

• Press lever 6 of the universal valve adaptor downward 

until it wedges into its position.

• Put inflator needle 10 or the conical nozzle into the object 

that is to be inflated.

Remark:

The conical nozzles 9 and standard extension nozzles 11 

and the inflator needle 10 shown in figure C are delivered 

together with the compressor. 

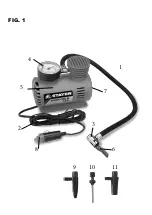
3.3 Illustrated description

1. Universal adapter sleeve air valve 

2. Cord 

3. Universal adapter for valves. 

4. Gauge 

5. Motor housing 

6. Lever universal adapter 

7. Switch on / off 

8. 12V Plug 

9. Standard nozzle 

10. Needle for inflating 

11. Nozzle extension

4. Operating instructions

4.1 Positioning and testing

To switch the compressor on, you must use the ON/OFF 

switch 7 located at the upper portion of the compressor. 

Connection to power supply:

Risk of unsafe operation

• Do not operate the compressor when the motor of the 

automobile is running.

• Always completely extend the 12V DC cable 2 before 

each use.

• To turn the compressor on, plug the 12V adapter into the 

vehicle’s 12V socket for accessories, and press switch 7 

towards red in position “I”.

To  turn  the  compressor  off,  press  switch  7  into  position 

“O”.

4.2 Setting operations:

Risk of explosion. Too much air pressure 

causes risk of blasting. Check which is the 

maximum pressure established by the 

manufacturer of the articles that will be inflated.

• To operate the valve adapter 3, position the lever 6 

upward and then penetrate the valve to inflate the object 

adapter or floating (9-11) or balls (9) and close the lever 6 

to seal the circuit (Figure A1-A4) 

• To activate the compressor, connect the adapter to 12 

volt accessory outlet 12 volt vehicle and press the red 

switch to position “I”. 

• If necessary, turn the key to start the car capable of 

powering a contact. 

• To turn off the compressor, press the 7 “O”.

REMARK: 

Let the lever 6 always in its upward position 

when not in used.

Pressure gauge

This gauge located on the upper portion of the inflating 

device, will provide you with a lecture in PSI in black 

(kilogram per square centimeter) and as well in bares in 

red:  kg/cm2  Newton  per  square  meter).    In  the  case  of 

vehicle tires, it is recommended to control the pressure 

lecture with another gauge for tires.

5. Maintenance and servicing instruction

5.1 Cleaning and servicing

   To clean the tool, only use a damp cloth. Never allow 

water penetrating into the tool, and do not immerse 

any of its parts into a liquid, making sure that you have 

disconnected the plug from the electrical power point.  

5.2  Repair service

The customer service will provide you with advice on your 

eventual inquiries regarding repair and maintenance of 

your product as well as on spare parts.

You  may  also  obtain  Exploded  view  drawings  and 

information on the spare parts on the internet under:

info@grupostayer.com

Our team of technical advisors will be happy to advise you 

in respect of the acquisition, application and settings of 

the products and accessories. 

Summary of Contents for MINICOM B 12V

Page 1: ... Istruzioni d uso Operating instructions Instructions d emploi Manual de instruções Área Empresarial Andalucía Sector 1 C Sierra de Cazorla 7 28320 Pinto Madrid SPAIN Email sales grupostayer com Email info grupostayer com MINICOM B 12V Οδηγίες λειτουργίας EL ...

Page 2: ...FIG 1 8 1 7 2 6 3 4 5 9 10 11 ...

Page 3: ...ESPAÑOL 3 3 FIG 2 6 6 3 3 6 3 ...

Page 4: ...90 12 18 30 II 0 50 6 1 MINICOM B 12V V 1 Kg cm2 0 981 Bar L min V1 kg Bar ...

Page 5: ...dade com as seguintes normas ou documentos normativos EN 1012 1 EN 62841 1 EN 55014 1 EN 55014 2 EN 61000 3 2 EN 61000 3 3 de acordo com os regulamentos 2006 42 CE 2014 35 UE 2014 30 UE 2011 65 UE TR Bu ürünün aşağıdaki standart ve standardizasyon belgeleri ile uyumunun doğruluğunu yegane sorumluluğumuz altında beyan ederiz EN 1012 1 EN 62841 1 EN 55014 1 EN 55014 2 EN 61000 3 2 EN 61000 3 3 direk...

Page 6: ...atos de seguridad con suela antideslizante casco o protectores auditivos c Evite una puesta en marcha fortuita del aparato Asegúrese de que la herramienta eléctrica está apa gada antes de conectarla a la toma de corriente y o la batería de desconectarla o de transportarla Si trans porta la herramienta eléctrica sujetándola por el interrup tor de conexión desconexión o si introduce el enchufe en la...

Page 7: ...e ya que podrían explotar y producir lesio nes personales si se excede el valor máximo de presión No deje el inflador funcionando sin atención Podría hacer explotar los neumáticos u otros elementos ADVERTENCIA Riesgo de descarga eléctrica Apague y desenchufe el inflador cuando no esté en uso cuando lo limpie o cuando cambie las boquillas No exponga el inflador a la lluvia o a condiciones de humeda...

Page 8: ...a y haga penetrar la válvula del objeto a hinchar ó el adaptador para flotadores 9 11 ó pelotas 9 y cierre la palanca 6 para sellar el circuito Figura A1 A4 Para encender el compresor enchufe el adaptador de 12 voltios en la toma para accesorios de 12 voltios del vehículo y presione el interruptor para rojo posición I Si es necesario ponga la llave de arranque del coche en posición contacto para a...

Page 9: ...ación con otras herramientas eléctricas También es adecuado para estimar provisionalmente la solicitación experimentada por las vibraciones El nivel de vibraciones indicado ha sido determinado para las aplicaciones prin cipales de la herramienta eléctrica Por ello el nivel de vibraciones puede ser diferente si la herramienta eléctrica se utiliza para otras aplicaciones con útiles diferentes o si e...

Page 10: ...e l accensione involontaria dell utensile Accertarsi che l utensile elettrico sia spento prima di collegarlo all alimentazione di corrente e o alla batteria di prenderlo o di trasportarlo Il fatto di tenere il dito sopra l interruttore o di collegare l utensile elettrico acceso all alimentazione di corrente potrà essere causa di incidenti d Togliere gli attrezzi di regolazione o la chiave inglese ...

Page 11: ...esplosione Gonfi gli elementi secondo le raccomandazioni del fabbricante in quanto possono esplodere e provocare lesioni personali se si eccede il valore massimo di pressione Non lasci il gonfiatore in esecuzione senza vigilanza Potrebbe far esplodere i neumatici o altri oggetti AVVERTENZA Rischio di scarica elettrica Spenga e sconnetta il gonfiatore quando non sia in uso quando lo pulisce o quand...

Page 12: ...ndere sempre il cavo 2 di CC di12 V completamente prima di ogni utilizzazione Per attivare il compressore connetta l adattatore di 12 volt nella presa per accessorio di 12 volt del veicolo e prema l interruttore per rosso sulla posizione I Per spegnere il compressore prema l interruttore 7 in posizione O 4 2 Operazioni di regolazione Rischio di esplosione Troppa pressione di aria provoca pericolo ...

Page 13: ...o di potenza acustica 99 dB A Tolleranza K 3 dB Indossare dei protettori auditivi Livello totale di vibrazioni somma vettoriale di tre direzioni determinato secondo EN 60745 levigatura di parete di gesso ah 4 m s2 K 1 5 m s2 Il livello di vibrazioni indicato in queste struzioni è stato determinato secondo il procedimento di misurazione fissato nella norma EN 60745 e può servire come base di confro...

Page 14: ...ack picking up or carrying the tool Carrying power tools with your finger on the switch or energising power tools that have the switch on invites accidents d Remove any adjusting key or wrench before turning the power tool on A wrench or a key left attached to a rotating part of the power tool may result in personal injury e Do not overreach Keep proper footing and balance at all times This enable...

Page 15: ...dance with manufacturer s recommendations as they may explore and cause personal injuries when their maximum pressure value is exceeded Do not leave the inflating device unattended during operation It might cause tires or other elements to explode WARNING Hazard of electrical discharge Switch off and unplug the inflating device when not in use when cleaning it or when changing nozzles Do not expos...

Page 16: ... switch 7 towards red in position I To turn the compressor off press switch 7 into position O 4 2 Setting operations Risk of explosion Too much air pressure causes risk of blasting Check which is the maximum pressure established by the manufacturer of the articles that will be inflated To operate the valve adapter 3 position the lever 6 upward and then penetrate the valve to inflate the object ada...

Page 17: ...5 m s2 Total level of vibrations vector sum of three directions determined according to EN 60745 Plaster wall sanding ah 4 m s2 K 1 5 m s2 The level of vibrations stated in these instructions has been determined according to regulation EN 60745 and may serve as a basis for comparison with other electric tools The level of vibrations as stated has been determined for the main applications of the el...

Page 18: ... assurer que l interrupteur est en position arrêt avant de brancher l outil au secteur et ou au bloc de batteries de le ramasser ou de le porter Porter les outils en ayant le doigt sur l interrupteur ou brancher des outils dont l interrupteur est en position marche est source d accidents d Retirer toute clé de réglage avant de mettre l outil en marche Une clé laissée fixée sur une partie tournante...

Page 19: ... Gonflez les éléments selon les recommandations du fabricant car ils pourraient exploser et produire des lésions corporelles si la valeur maximale de pression est dépassée Ne laissez pas le gonfleur en marche sans attention Il pourrait faire exploser les pneus ou d autres éléments ATTENTION Risque de décharge électrique Éteignez et débranchez le gonfleur lorsqu il n est pas en marche lorsque vous ...

Page 20: ...z toujours le câble 2 de CC de 12 V complètement avant chaque usage Pour allumer le compresseur branchez l adaptateur de 12 volts dans la prise pour accessoires de 12 volts du véhicule et appuyez sur l interrupteur pour rou ge position I Pour éteindre le compresseur appuyez sur l interrupteur 7 à la position O 4 2 Opérations d ajustement Risque d explosion Trop de pression d air produit un danger ...

Page 21: ...l car les dénominations commerciales de certains appareils peuvent changer Information sur les bruits et les vibrations Bruit déterminé selon EN 60745 Le niveau de pression sonore typique de l appareil déterminé avec un filtre A atteint Niveau de pression sonore 88 dB A niveau de puissance acoustique 99 dB A Tolérance K 3 dB Porter des protecteurs auditifs Niveau total de vibrations somme vectorie...

Page 22: ...desligada antes de conectá la à corrente eléctrica e ou ao acumulador antes de apanhá la ou carregá la Manter o dedo sobre o interruptor ao transportar a ferramenta eléctrica ou conectar a ferramenta já ligada à rede pode levar a graves acidentes d Remover chaves de ajustes ou chaves de fenda antes de ligar a ferramenta eléctrica Uma chave de fenda ou chave de ajuste que se encontre numa parte móv...

Page 23: ...co de explosão Insufle os elementos de conformidade às recomendações do fabricante já que podem explorar e produzir lesões pessoais se fosse excedido o valor máximo de pressão Não deixe o insuflador a trabalhar sem atenção Poderia fazer explodir os pneumáticos ou outros elementos ADVERTÊNCIA Risco de descarga elétrica Desligue e tire da tomada o insuflador quando não esteja em uso quando o limpe o...

Page 24: ...12 V por completo antes de utiliza lo cada vez Para ligar o compressor conecte o adaptador de 12 vóltios a uma tomada para acessórios de 12 vóltios do veículo e prima o interruptor para vermelho posição I 4 2 Instrucciones generales de uso Risco de explosão Demasiada pressão de ar produz perigo de estouro Verifique qual é a máxima pressão estabelecida pelo fabricante dos objetos que serão insuflad...

Page 25: ... variar Informação sobre ruídos e vibrações Ruído determinado segundo EN 60745 O nível de pressão sonora típico do aparelho estabelecido com um filtro A ascende a Nível de pressão sonora 88 dB A nível de potência acústica 99 dB A Tolerância K 3 dB Pôr protetores auditivos Nível total de vibrações soma vetorial de três direções determinado segundo EN 60745 Lixado de parede de gesso ah 4 m s2 K 1 5 ...

Page 26: ...ση απενεργοποίησης προτούσυνδέσετε το εργαλείο στην πηγή τροφοδοσίας ή και στην μπαταρία και προτού το κρατήσετε στα χέρια σας ή το μεταφέρετε Αν κατά τη μεταφορά ηλεκτρικών εργαλείων έχετε το δάκτυλό σας επάνω στο διακόπτη ή αν ενεργοποιηθούν ενώ ο διακόπτης είναι πατημένος μπορεί να προκληθεί ατύχημα δ Απομακρύνετε τυχόν κλειδί ρύθμισης ή οδοντωτό κλειδί πριν από την ενεργοποίηση του εργαλείου Έ...

Page 27: ...εις του κατασκευαστή διότι ενδέχεται να εκραγούν και να προκαλέσουν τραυματισμούς σε περίπτωση υπέρβασης της μέγιστης τιμής πίεσης Μην αφήνετε τη συσκευή φουσκώματος χωρίς επίβλεψη κατά τη λειτουργία Θα μπορούσε να προκαλέσει εκρήξεις ελαστικών ή άλλων στοιχείων ΠΡΟΕΙΔΟΠΟΙΗΣΗ Κίνδυνος ηλεκτρικής εκκένωσης Απενεργοποιείτε και αποσυνδέετε τη συσκευή φουσκώματος όταν δεν τη χρησιμοποιείτε όταν την κα...

Page 28: ...λειτουργίας Μην θέτετε σε λειτουργία τον συμπιεστή όταν λειτουργεί το μοτέρ του αυτοκινήτου Πάντοτε να εκτείνετε πλήρως το καλώδιο 12V DC 2 πριν από κάθε χρήση Για να ενεργοποιήσετε τον συμπιεστή συνδέστε τον προσαρμογέα 12V στην υποδοχή 12V του αυτοκινήτου για παρελκόμενα και πιέστε τον διακόπτη 7 προς το κόκκινο στη θέση I Για να απενεργοποιήσετε τον συμπιεστή πατήστε το διακόπτη 7 στη θέση O 4 ...

Page 29: ...αι με ένα φίλτρο Α ανέρχεται σε Επίπεδο ηχητικής πίεσης 88 dB A Στάθμη ακουστικής ισχύος 99 dB A Ανοχή K 3 dB Φοράτε προστατευτικά αυτιών Συνολικό επίπεδο δονήσεων διανυσματικό άθροισμα τριών κατευθύνσεων που προσδιορίζονται σύμφωνα με το πρότυπο EN 60745 Λείανση σοβαντισμένου τοίχου ah 4 m s2 K 1 5 m s2 Το επίπεδο δονήσεων που αναφέρεται σε αυτές τις οδηγίες έχει καθοριστεί σύμφωνα με τον κανονισ...

Page 30: ...ucto que haya sufrido algún desgaste en alguna de sus piezas por el uso normal de la herramienta siendo esta pieza un consumible accesorios o elemento sujeto al desgaste que debería de cambiarse por su propio uso por parte del usuario g Cualquier producto que presente una falla debida a un manejo inadecuado de la herramienta incompatible con los usos o aplicaciones indicadas en el manual de la her...

Page 31: ...ponents consumables accessories or components subject to wear that must be replaced by the owner g Products that show any kind of misuse or application which deviates from its original intended uses listed in the Users guide h Products that show lack of correct maintenance from the owner The owner is responsible for the tool s maintenance in order to preserve its service life i Accessories and too...

Page 32: ...www grupostayer com Área Empresarial Andalucía Sector 1 C Sierra de Cazorla 7 28320 Pinto Madrid SPAIN Email sales grupostayer com Email info grupostayer com ...

Reviews: