


ENGLISH
10
10
To replace the buffer, simply:
- Lock the disk shaft using shaft lock button.
- Using your hands, or if necesary, an open- ended wrench,
unscrew the buffer counter clockwise.
REPLACING THE LAMBSWOOL PAD
The lambswool pad must only be mounted on the rubber
backing plate which not only provides the flexibility
required but also permits the user to work on the most
delicate areas without damaging the surface.
To fit the lambswool pad, simply loosen the outer
drawstring.
Fit the pad on the rubber backing plate, making sure that
it covers the entire plate surface.
Secure the pad to the plate by tightening the outer
drawstring.
Feed the drawstring ends inside between the pad and
rubber backing plate.
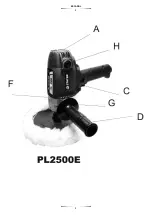
SIDE HANDLE
Side handle (D) ensures operator safety and should be
mounted as follows:
- Srew the handle into the threaded hole (G), on the left
or right as required.
USE OF THE HAND GUARD
For additional protection of hands while using the machine,
insert the hand guard (L) in front of the side handle (D).
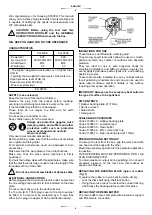
START-UP AND STOPPING
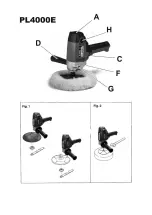
PL4000
Single- speed polisher
- Press safety button (B) and control button (C) while
holding the tool firmly in both hands: one hand on the
rear handle and the other on the side handle.
- Release the safety button during work.
- Release the control button to stop the tool.
- Two speed polisher.
To turn on the polisher press power switch (C) located
inside the rear handle.
This model is fitted with an additional two- speed selection
switch (E).
Set to position I for slow speed.
Set to position II for fast speed.
Speed change operations may also be performed while
the tool is running.
This model is not fitted with a safety button. To turn the
polisher on, press the power switch located inside the top
handle.
Release the control button to stop the tool.
PL2500
- Electronic polisher.
To turn on the polisher press power switch (C) located
inside the rear handle.
This tool is provided with an electronic unit that enables
the speed adjustment of the tool- holder shaft according to
the surface to be polished and the type of grinder used. By
turning the small wheel situated at the back of the machine
(H) it is indeed possible to adjust the rotation speed of the
shaft in five different positions.
This model is not fitted with a safety button. To turn the
polisher on, press the power switch located inside the top
handle.
- Release the control button to stop the tool.
IMPORTANT: NEVER LEAVE THE TOOL
UNATTENDED WHEN IT IS “ON”
ON COMPLETION OF WORK, REMOVE THE
PLUG FROM THE MAINS SOCKET.
CLEANING
The tool should be cleaned regularly by blowing a jet of air
through air vents (A) to ensure that the motor is properly
ventilated and operates perfectly.
This operation is advised especially when working on wet
filler whose dust gradually clogs the air vents.
GEAR LUBRICATION
Gear head grease should be changed after 500 hours of
operation; pack the unit with a quantity of grease equal to
1/3 of the volume of the head. ATHESA EP GREASE 2 is
recommended. This operation must be carried out by an
authorized service assistance centre.
BRUSH REPLACEMENT
When renewing the brushes, grind the commutation to
ensure optimum brush contact and longer motor duration.
This operation must be carried out by an authorized
service asistance centre.
SPARE PARTS AND SERVICE
All our tools are covered by guarantee.
Authorised Service Centers provided throught the national
territory offer a valuable, rapid and competent after- sales
support to costumers.
TECHNICAL DATA
The values given are valid for nominal voltages [U]
230/240 V ~ 50/60 Hz - 110/120 V ~ 60Hz. For lower
voltage and models for specific countries, these values
can vary. Please observe the article number on the type
plate of your machine. The trade names of the individual
machines may vary.
DECLARATION OF CONFORMITY
We declare under our sole responsibility that this product is
in conformity with the following standards or standardized
documents:
EN60745-1, EN60745-2-4, EN55014-1, EN55014-2,
EN61000-3-2, EN61000-3-3, according to the provisions
of the directives 2006/42/CE, 2014/30/EU.
January, 2017
Ramiro de la Fuente
Director Manager
Summary of Contents for PL2500E
Page 2: ......
Page 3: ...ESPA OL 3 3...
Page 4: ......
Page 17: ...NOTAS 17...
Page 18: ...NOTAS 18...


