background image

Mounting 

8.0 

Standard Planar Mounting 

 8.3 

To install planar mounts: 

1.

Use 1/4-20 x 5/8 Socket Head Screws (A) to mount on the base of the planar mount to the 
interior of the  adductor.

2.

Screw the 1/4-20 x  5/8 Button Head Screws (B) through the slots on the planar mount onto
the mounting hardware on the chair.

3.

Tighten with  3/16 T-Handle.

All Season Mounting 

 8.4 

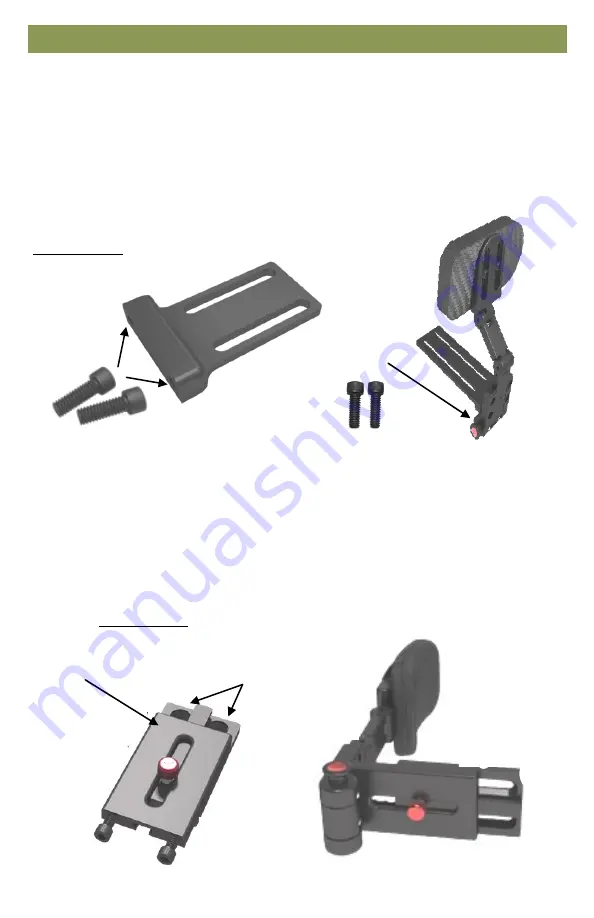
To install the All Season Mounts: 

1.

Attach the All Season Bracket to the chair by using the 1/4-20 x 1/2” Flat Head Screws (A).
Tighten with 5/32 T– Handle.

2.

Use the 1/4-20 x 3/4 Socket Head Screws (B)  to directly mount the All Season Bracket.
Tighten with a 3/16 T-Handle.

3.

Press down on the red button (C) to make lateral adjustments.

(A) 

(B) 

(B

((A) 

(C) 

(B)

Torque Settings:

1/4-20 screws = 6.3lb.-ft

Torque Settings:

1/4-20 screws = 6.3lb.-ft

Summary of Contents for Pelvic Support

Page 1: ...USER MANUAL Pelvic Support The World s Best Adductors Stealth s User Manual and Maintenance Guide for The World s Best Adductors...

Page 2: ...warnings in this document may result in property damage injury or death Product misuse due to failure of the following instructions will void the warranty Immediately discontinue use if any function i...

Page 3: ...th and understand all safety aspects of the devices mentioned In order for our products to be used successfully you must Read and understand all instructions and warnings Maintain our products accordi...

Page 4: ...our supplier or Stealth Products at 512 715 9995 or toll free at 1 800 965 9229 Always keep the operating instructions in a safe place so they may be referenced as necessary All information pictures i...

Page 5: ...s LLC Any alteration or lack of serial number where applicable will automatically void this warranty Stealth Products LLC is liable for replacement parts only Stealth Products LLC is not liable for an...

Page 6: ...ility vi 6 3 Testing vi 7 0 Functioning 1 7 1 Operating Adductors 1 7 2 Adjusting Adductors 1 8 0 Mounting 2 8 1 Standard Track Mounting 2 8 2 Standard Cane Mounting 2 8 3 Standard Planar Mounting 3 8...

Page 7: ...f obstacles until the user is fully capable of driving safely The World s Best Adductors should be adjusted with the user in the chair in order to promote the best position and maximum comfort for the...

Page 8: ...n Adjusting Adductors 7 2 Standard adductors offer three points of adjustment To adjust angles B and C 1 Lightly loosen 1 4 20 x 1 screws 2 Set desired angles and retighten screws with 3 16 T Handle D...

Page 9: ...iversal Track Nut G 2 Tighten with a 3 16 T Handle Standard Cane Mounting 8 2 To adjust standard cane mounting 1 Insert the 1 4 20 x 3 4 Socket Head Screws H into the male tube clamp through the count...

Page 10: ...dware on the chair 3 Tighten with 3 16 T Handle All Season Mounting 8 4 To install the All Season Mounts 1 Attach the All Season Bracket to the chair by using the 1 4 20 x 1 2 Flat Head Screws A Tight...

Page 11: ...ace Contact mounts are pre assembled before they are delivered To adjust the angle of the pad mount 1 Loosen the 10 32 x 1 2 Socket Head Screws with a 3 16 T Handle 2 Adjust pad mount to desired angle...

Page 12: ...position for the client Can the user safely operate the chair in the position they are seated in Is the placement of each of the adductors in an optimal position for the user If needed adjust the addu...

Page 13: ...from the laterals Machine wash in cold water on delicate cycle or dry clean and dry Maintenance 10 2 Periodically check the hardware for loose screws or worn areas Check the pad cover for any breakdow...

Page 14: ...a NOTES 11 0...

Page 15: ...b NOTES 11 0...

Page 16: ...Stealth Products LLC info stealthproducts com www stealthproducts com 1 800 965 9229 1 512 715 9995 104 John Kelly Drive Burnet TX 78611 P91D275 Revision Date 2019 12 17...

Reviews: