Installation and Use
Care and Cleaning
We recommend that all products be examined on a regular basis for wear and function.
Check the stitching on the webbing for stress or damage. If loose, frayed or broken
parts are discovered, discontinue use and contact your provider. Repairs should only
be performed by a wheelchair service professional and with genuine Stealth Products
parts, fasteners or items appropriate for the service required.
Surfaces may be cleaned with a damp cloth and a mild, non-abrasive cleaner. Ensure
all cleaners are approved for finished steel, aluminum, plastic and upholstered surfaces.
Vests and straps that are removable and DO NOT contain metal components may be
machine washed warm (40°C), permanent press, gentle cycle.
DO NOT bleach. DO NOT tumble dry. Dry flat. DO NOT iron.
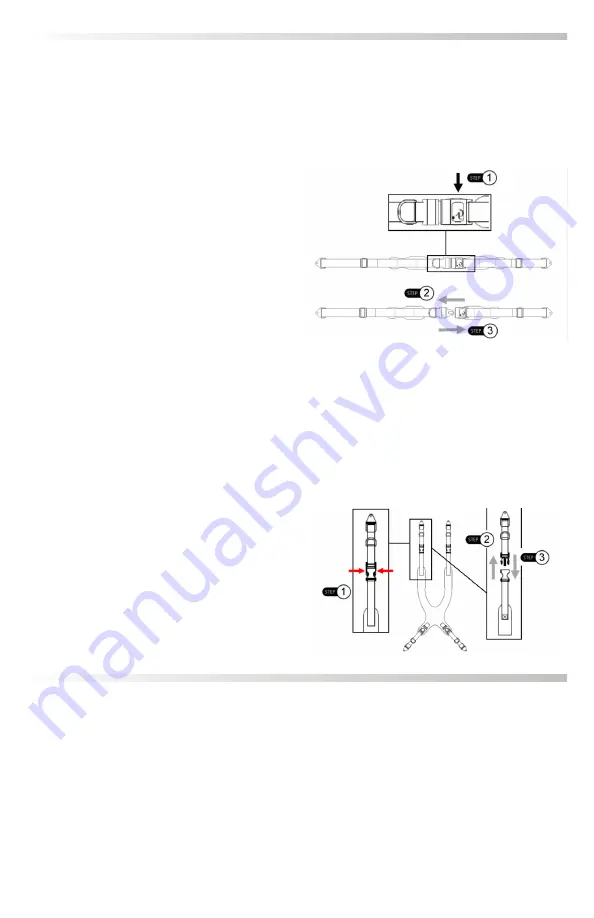
Push-Button Buckle
The Push-Button Buckle is used on Stealth Positioning™ pelvic belts.
Step 1:
To release the buckle, depress the button with the Stealth Positioning™ logo on the
buckle housing. This will disengage the locking mechanism.
Step 2:
Pull gently on the male side of the
buckle while holding the push button. It
should
release
and
separate
from
the
housing. Make any adjustments to the belt as
necessary.
Step 3:
To reattach the buckle, slide the male
side of the buckle back into the housing. A
audible ‘click’ should occur, indicating that
the belt is secure. If the button does not latch
and hold, immediately refrain from using the
product.
Side-Release Buckle
The Side-Release Buckle is used on the following Stealth Positioning™ products: Pelvic Belts,
Backpack Straps, Y-Straps, Shoe Holders, Positioning Systems, Chest Straps, and Foot
Positioners
Step 1:
To remove the side-release buckle from the belt, pinch the buttons on the sides of
the buckle. This will disengage the locking mechanism.
Step 2:
Slide the male portion of the buckle
from the housing.
Make any adjustments
necessary.
Step 3:
To reattach the side-release buckle,
slide the male portion of the buckle into the
housing.
A audible ‘click’ should occur,
indicating that the belt is secure. If the buckle
does not latch and hold, immediately refrain
from using the product.


