background image

ENGLISH  |  3

10.

 Do not use unit where aerosol-based products are being used, or where oxygen is being 

administered.

11.

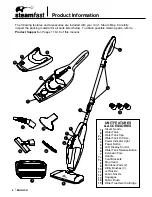
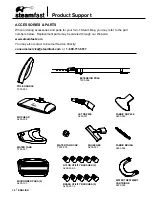
 Unit is only meant to be used with recommended SF-295 3-in-1 Steam Mop accessories. Us-

ing other types of attachments may cause damage to unit or injury.

12.

 If Power Indicator Light does not illuminate when the Power Button is pressed On, unit is not 

operating normally. Immediately turn unit off and disconnect from power supply – have unit 

serviced by qualified service personnel.

13.

 When filling Water Tank, only water should be used in unit – other cleaning agents could dam-

age unit or cause injury.  Distilled or de-mineralized water is highly recommended, in order to 

minimize potential build-up of mineral deposits.  Do not overfill unit.

14.

 Do not attempt to use unit without properly filling Water Tank.

15.

 To reduce risk of contact with hot water emitting from Steam Nozzle, check appliance before 

each use by positioning it away from body and turning it on.  Do not operate unit if Steam 

Nozzle is blocked.

16.

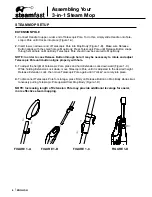
 Burns can occur from touching hot metal parts, hot water, or steam.  Do not touch Steam 

Nozzle or attempt to connect accessories while unit is in use.  Use caution when you turn unit 

upside-down – there may be hot water in unit.

17.

 Use caution when using unit on uneven surfaces, such as stairs.

18.

 When steaming any surface for the first time, it is recommended that you consult the manu-

facturer’s guidelines for material being steamed.  For items in question, test on a small incon-

spicuous area before proceeding.

19.

 Steaming unsealed hardwood or unglazed ceramic surfaces is not recommended, and may 

result in warping or damage to the surface.  Steam may remove the sheen from surfaces 

treated with wax.

20.

 When steam mopping, never leave unit resting in one spot on any surface for any period of 

time – prolonged exposure to heat and moisture may damage floor surfaces.

21.

 Do not allow power cord to touch hot surfaces during use.  Wrap cord loosely around Cord 

Brackets when storing.

22.

 Always allow 3-in-1 Steam Mop to cool completely (at least 30 minutes) and empty Water 

Tank before storing.  Do not store unit with a damp Microfiber Pad still attached.

SAVE THESE INSTRUCTIONS!

FOR HOUSEHOLD USE ONLY

Questions or comments?

• www.steamfast.com
• consumerservice@steamfast.com
• 1-800-711-6617

Speak your mind!  We invite you to review this product online:

www.steamfast.com/reviews

Summary of Contents for SF-295

Page 1: ...LE SF 295 MODELO SF 295 ENGLISH p 2 FRANÇAIS p 21 ESPAÑOL p 40 KEEP YOUR RECEIPT FOR WARRANTY PURPOSES Please read all instructions before use GARDEZ VOTRE REÇU AUX FINS DE LA GARANTIE Veuillez lire toutes les instructions avant l utilisation GUARDE SU RECIBO A EFECTOS DE LA GARANTÍA Lea todas las instrucciones antes de usarlo ...

Page 2: ...ndle let it hang over edges of counters or be crimped or closed in doors 6 Never yank power cord to disconnect from outlet instead grasp plug and pull to disconnect 7 Do not operate unit with a damaged power cord or if the unit has been dropped or damaged To avoid risk of electrical shock do not disassemble unit contact Steamfast Consumer Service for examination and repair Incorrect reassembly can...

Page 3: ...o not touch Steam Nozzle or attempt to connect accessories while unit is in use Use caution when you turn unit upside down there may be hot water in unit 17 Use caution when using unit on uneven surfaces such as stairs 18 When steaming any surface for the first time it is recommended that you consult the manu facturer s guidelines for material being steamed For items in question test on a small in...

Page 4: ...ual UNIT FEATURES ACCESSORIES Steam Nozzle Water Tank Water Tank Cap Water Tank Fill Hole Power Indicator Light Power Button LCD Display Control Water Tank Release Button Extension Pole Handle Cord Brackets Mop Head Microfiber Pads 2 Utility Brushes 3 Jet Nozzle Fabric Nozzle Squeegee Fabric Brush Water Treatment Cartridge 1 2 2a 2b 3 4 5 6 7 7a 7b 8 9 10 11 12 13 14 15 Product Information 2 2A 2B...

Page 5: ...t this unit be used on unsealed floors Use care when steaming floors that may be warped or damaged by heat and moisture and limit use of this unit on these types of surfaces The Microfiber Pads 9 each attach to the pad grips on the bottom of the Mop Head The Pads are designed to clean scuffs and stains from hard floors The Microfiber Pads are reusable and machine washable Two Pads are included NOT...

Page 6: ...essary to rotate and adjust Telescopic Pole until button aligns properly with hole 3 To adjust the height of Telescopic Pole press and hold Extension Lock downward Figure 1 C While holding Extension Lock down move Telescopic Pole until it is adjusted to the desired height Release Extension Lock then move Telescopic Pole again until it clicks securely into place 4 To disconnect Telescopic Pole for ...

Page 7: ...crofiber Pad Make sure Mop Head is oriented with Pad as shown and centered as best as possible Figure 3 3 Press Mop Head firmly down onto Microfiber Pad Fastener strips will adhere to pad grips on underside of Mop Head Pad should now be attached and ready for use CAUTION Use care when handling a recently used Microfiber Pad as it may still be hot NOTE Microfiber Pads are machine washable To avoid ...

Page 8: ...irmly on release button while simultaneously pulling Jet Nozzle away from Steam Nozzle UTILITY BRUSHES CAUTION Metal tip of Jet Nozzle becomes hot during use Always allow unit to cool before connecting disconnecting any accessories 1 Align Utility Brush by lining up the ridge on the inside of the Brush with the groove on Jet Nozzle as shown FIGURE 5 and press it firmly on as far as it will go STEA...

Page 9: ...n Fabric Nozzle with Steam Nozzle as shown FIGURE 7 2 Slide Fabric Nozzle into Steam Nozzle press ing firmly until release button snaps through hole 3 To remove Fabric Nozzle press firmly on release button while simultaneously pulling Fabric Nozzle away from Steam Nozzle FABRIC BRUSH CAUTION Always allow unit to cool before connecting disconnecting any accessories 1 Align Fabric Brush with Fabric ...

Page 10: ...gure 3 3 Slide the Water Tank Release Button upward and hold Insert Water Tank inside the cavity of Mop Body inserting and aligning the bottom of Water Tank first Push Water Tank forward until locked into place NOTE In order to significantly reduce mineral build up and prolong the life of your 3 in 1 Steam Mop use of distilled or de mineralized water in the unit is highly recommended Refer to Page...

Page 11: ...ction away from yourself other people pets and plants when steaming STEAM MOPPING NOTE It is recommended to sweep or vacuum floors before mopping Make sure Extension Pole Mop Head and a Microfiber Pad are all properly connected Refer to Pages 6 7 for details Follow General Operating Instructions above to begin steaming Mop using a steady back and forth motion over the floor working your way backwa...

Page 12: ...y steam them Heavier fabrics may require repeated steaming to achieve desired results To remove exceptionally stubborn wrinkles steam both sides of fabric Be especially careful when steaming any delicate fabrics that may be damaged by water spotting STEAM CLEANING CAUTION When steaming any surface for the first time it is recommended that you test on a small inconspicuous area before proceeding Do...

Page 13: ...ur desired results Higher steam settings increase the amount of moisture being emitted with the steam STEAM MOPPING FABRIC STEAMING STEAM CLEANING Level 1 3 Steam Setting Smooth flat surfaces Sealed hardwood Sealed laminate Linoleum Ceramic Granite Marble Level 3 5 Steam Setting Textured porous surfaces Stained concrete Vinyl Tile Level 1 2 Steam Setting Most fabrics Garments Upholstery Level 3 5 ...

Page 14: ...t a small inconspicuous spot before pro ceeding Steam is effective for removing spots and stains from clothing and upholstery This can be done with steam alone or with a stain remover designed for your specific use DO NOT put any type of chemical or liquid product in your steamer Only water is to be used in the unit Older dried stains on carpet or hard floor surfaces may require a bit of extra scr...

Page 15: ...d or de mineralized water when using your 3 in 1 Steam Mop In addition it is recommended that the cleaning procedure below be followed at least once a month in order to remove any deposits that form This will help to extend the life of your 3 in 1 Steam Mop and keep it functioning at its maximum potential To remove mineral build up 1 Follow STEPS 1 4 under Proper Storage section above However do n...

Page 16: ... Refer to Mineral Build up section on Page 15 for cleaning procedure Refer to Filling Water Tank procedure on Page 10 Reset circuit breaker ground fault interrupter or replace fuse If you need assistance contact a licensed electrician Immediately cease usage and unplug Contact Consumer Service for further assistance see Page 17 for details If brass ball has become discon nected contact Consumer Se...

Page 17: ...e have the following information ready before calling Purchase information where and when you purchased this product Copy of purchase receipt proof of purchase Product serial number located on electrical specification label on back of unit Date code 4 digit number located on electrical specification label For information regarding your 1 year limited warranty refer to Page 19 of this manual PRODUC...

Page 18: ...m You may also contact Consumer Service directly consumerservice steamfast com or 1 800 711 6617 MOP HEAD A295 008 JET NOZZLE A295 001 SQUEEGEE A295 003 FABRIC NOZZLE A295 002 EXTENSION POLE T295 004 MICROFIBER PADS 2 A295 100 WATER TANK T295 007 POLE HANDLE T295 003 WATER TANK CAP T295 008 WATER TREATMENT CARTRIDGE A295 009 FABRIC BRUSH A295 004 BRASS UTILITY BRUSHES 5 A295 007 5 NYLON UTILITY BR...

Page 19: ... Product as specified in the Owner s Guide Use of the Product other than for normal household purposes Normal wear and tear Used consumable parts accessories and attachments including but not limited to brushes hang ers scrub pads and mop pads Use of parts and accessories other than those produced or recommended by Steamfast Cosmetic damage such as scratches nicks and dents Damage caused by accide...

Page 20: ... Warranty Repair 415 E 13th Street Andover KS 67002 To assure proper handling packages must be clearly marked with the RA number Packages not clearly marked with the RA number may be refused at the receiving dock Important After receiving return authorization carefully pack the Product to avoid damage in ship ping Damage in shipping is not covered by the Warranty and shall be the sole responsibili...

Page 21: ...oduct online evalúe este producto en línea évaluer ce produit en ligne www steamfast com reviews Steamfast 415 East 13th Andover KS 67002 1 800 711 6617 www steamfast com consumerservice steamfast com T295 005 R V00 ...

Reviews: