10
Top Innovations, Inc.
ENGLISH
ESP
AÑOL
U
SING THE
C
OMPACT
D
IGITAL
S
TEAM
P
RESS
PRESSING AND STEAMING TIPS
Shirts and Blouses
1.
First, place shoulder yoke on Ironing Board and press.
2.
Next, place sleeves on Ironing Board (with fold parallel to long seam) and press.
3.
Place cuffs on end of Ironing Board and press.
4.
Place bottom of shirt into space behind Ironing Board. Begin by pressing the side with pocket,
pulling shirt towards you as you press each section.
5.
Finish by pressing collar of shirt.
General Tips
•
Placing a cloth between fabric and Pressing Plate may help to protect delicate fabrics.
•
Buttons and zippers: if you have older types of buttons and/or plastic zippers, special care should
be taken in order to avoid melting. In order to do so, place garment face-down and cover with a
cloth before pressing.
•
Embroidery should be placed face-down on Ironing Board to reduce wear and prevent damage to
delicate areas.
•
Moistening fabrics will help to remove exceptionally stubborn wrinkles. To do this, use steam
burst function. For lower temperature settings, use a spray bottle (not included).
•
Place a damp cloth over fabric before pressing, which will help with stubborn wrinkles or heavy
gauge fabrics.
•
To press large pieces of fabric, place entire piece in space behind Ironing Board. Pull fabric
towards you, over Ironing Board, and lower Pressing Plate. Press fabric in sections until
completed.
•
When using starch or sizing, place a thin cloth between the starched fabric and the Pressing Plate
in order to protect the Pressing Plate.
OPTIONAL PRESSING CUSHION (SOLD SEPARATELY)
Using Pressing Cushion
•
Pressing Cushion is meant for use with garments that have darts, curved seams, shoulder pads, etc.
•
Use Pressing Cushion in areas where no creases are desired, or to shape a tailored garment.
•
Pressing Cushion should be placed underneath dart, seam, or shoulder pad being pressed.
IMPORTANT: Do not try to force Pressing Plate completely closed against Ironing Board with
Pressing Cushion is in between. Doing so may cause damage to unit and/or Pressing Cushion.
Pressing Cushion & Pleated Pants
1.
Place Pressing Cushion under waistband and press, repositioning waistband until completely
pressed.
2.
To press in-seam, place Pressing Cushion under area to be pressed.
3.
Place pleated area on Ironing Board. Carefully fold pleats and press.
To purchase the optional Spray Bottle and Pressing Cushion, refer to order form on Page 14 for details.
7
Top Innovations, Inc.
U
SAR EL
P
RENSA
C
OMPACTA
D
IGITAL DE
V
APOR
LLENANDO EL TANQUE DE AGUA
No es necesario llenar el Tanque de Agua si usted se propone
solamente utilizar la unidad para planchar en seco. Sin embargo, si
usted desea utilizar la función de la ráfaga de vapor, el Tanque de
Agua se deberá llenar según los pasos siguientes:
1.
Coloque la
Prensa Compacta Digital de Vapor
en una superficie
plana, llana. Asegúrese que el cable eléctrico esté desenchufado
del enchufe eléctrico.
2.
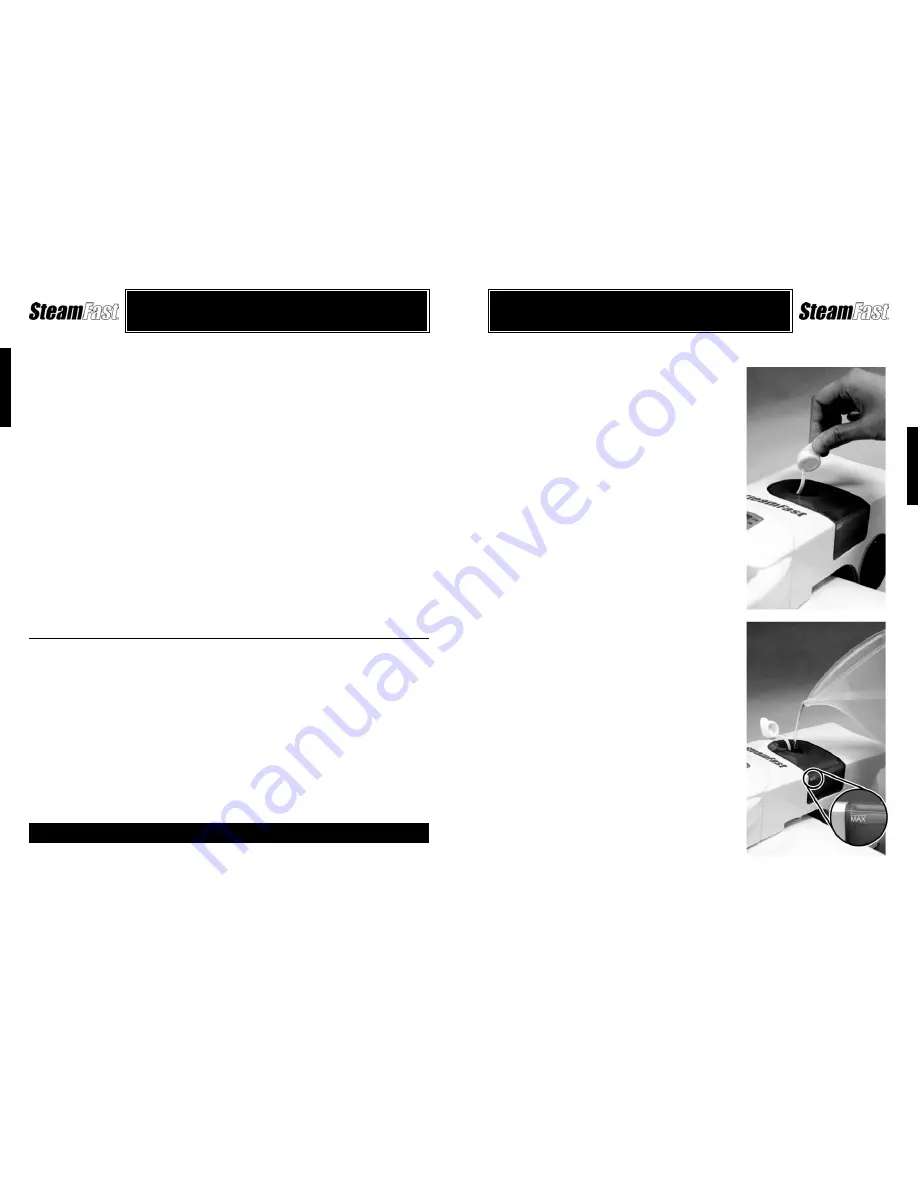
Quite el Enchufe del Tanque de Agua establecido encima de
Tanque de Agua al agujero del terraplén de la exposición
(FIGURA 1-A).
NOTA: El Enchufe del Tanque de Agua se ata a la unidad, y
no se puede quitar totalmente. Procure no forzarlo para
soltarlo.
3.
Con la Taza Medidora incluida, llene el Tanque de Agua hasta la
línea MAX con agua destilada (FIGURA 1-B).
PRECAUCIÓN: Solamente agua destilada se debe utilizar en
la unidad. Otros agentes químicos limpiadores pudieran
dañar la unidad o causar lesiones.
NOTA: Para ampliar la vida de su
Prensa Compacta Digital de
Vapor
, y asegurarse de que continúa funcionando al
máximo potencial, es altamente recomendable que se utilice
agua destilada o desmineralizada.
4.
Coloque con seguridad el Enchufe del Tanque de Agua para cubrir
el agujero del terraplén. Cerciórese de que esté cerrado
totalmente para evitar que se derrame el agua.
FIGURA 1
A
B


