


8
Top Innovations, Inc.
ENGLISH
ESP
AÑOL
U
SING THE
C
OMPACT
D
IGITAL
S
TEAM
P
RESS
OPERATING
COMPACT DIGITAL STEAM PRESS
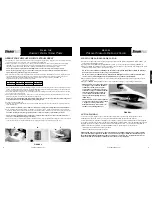
1.
For first-time use, remove protective plastic cover that is shipped on electrical plug. Plug power cord into electrical outlet and
set On/Off Switch to “On” (I) position. Power Indicator Light will illuminate.
2.
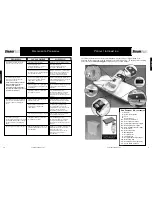
Identify type of fabric you are going to press, and use Fabric Select Button to choose a corresponding temperature setting
(FIGURE 2-A). As Fabric Select Button is pressed, the illuminated Indicator Light will cycle through four available
temperature settings (NYLON, WOOL/SILK, COTTON, MAX/LINEN), as well as default power mode.
NOTE: Power Indicator Light will not remain illuminated once one of the temperature settings is selected.
NOTE: If you are planning to press a variety of materials, it is best to start with the most delicate fabrics first, as
higher temperatures will cause damage to Nylon and Silk.
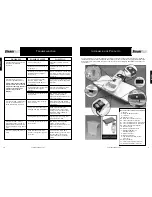
3.
When one of the four temperature settings (NYLON, WOOL/SILK, COTTON, MAX/LINEN) is selected, Heating Indicator
Lights will illuminate and begin blinking. Heating Indicator Lights will illuminate in sequence, beginning at the lowest
indicator (green) and working up to higher indicators (yellow, orange, red) as the unit heats (FIGURE 2-B).
Approximate heating times for each setting are as follows:
When a Heating Indicator Light stops blinking and glows solid, the unit is then fully heated to the corresponding temperature
setting. If a higher temperature is selected, the next Heating Indicator Light will then begin blinking, as the unit continues to
heat. This will continue until the selected temperature is reached.
4.
Once the Heating Indicator Light for the selected temperature stops blinking and remains steady, the Pressing Plate is heated.
You are now ready to begin pressing.
5.
While pushing down on Pressing Plate, slide Lock to “Unlock” position to release Pressing Plate (FIGURE 2-C). Pressing
Plate will spring into raised position and remain there automatically.
NOTE: To prevent Pressing Plate from being unintentionally opened, Lock can only be unlocked while Pressing Plate is
being SIMULTANEOUSLY PUSHED DOWN against Ironing Board.
6.
Lay fabric flat on Ironing Board.
7.
If desired, press Steam Burst Button to release a burst of steam onto fabric. Refer to Page 9 for more information about the
steam burst function.
NOTE: Steam burst function is only available on the highest two temperature settings (COTTON and MAX/LINEN).
8.
Lower Pressing Plate onto Ironing Board, so that fabric is pressed in between. Hold Pressing Plate down for 8-10 seconds,
then lift up. Repeat until you have achieved desired crease and smoothness. Refer to Page 10 for more specific pressing tips.
CAUTION: Holding Pressing Plate against fabric for more than 10 seconds may result in damage to fabric.
NOTE: Leaving Pressing Plate open or closed for more than 8 minutes will cause the unit’s Auto Shut-Off feature to
activate. See Auto Shut-Off section Page 9 for details.
9.
Once pressing tasks are complete, immediately set On/Off Switch to “Off” (O) position and unplug power cord from electrical
outlet. Refer to Page 11 for further information about cleaning and storage of
Compact Digital Steam Press
.
FIGURE 2
A
B
C
NYLON
1:30
MINUTES
WOOL/SILK
2:10
MINUTES
COTTON
2:55
MINUTES
MAX/LINEN
3:05
MINUTES
9
Top Innovations, Inc.
U
SAR EL
P
RENSA
C
OMPACTA
D
IGITAL DE
V
APOR
FUNCIÓN DE LA RÁFAGA DE VAPOR
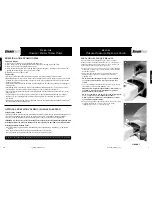
1.
Cerciórese de que se haya seleccionado el ajuste más alto en la temperatura (ALGODÓN, MAX/LINO), y la
unidad esté completamente caliente.
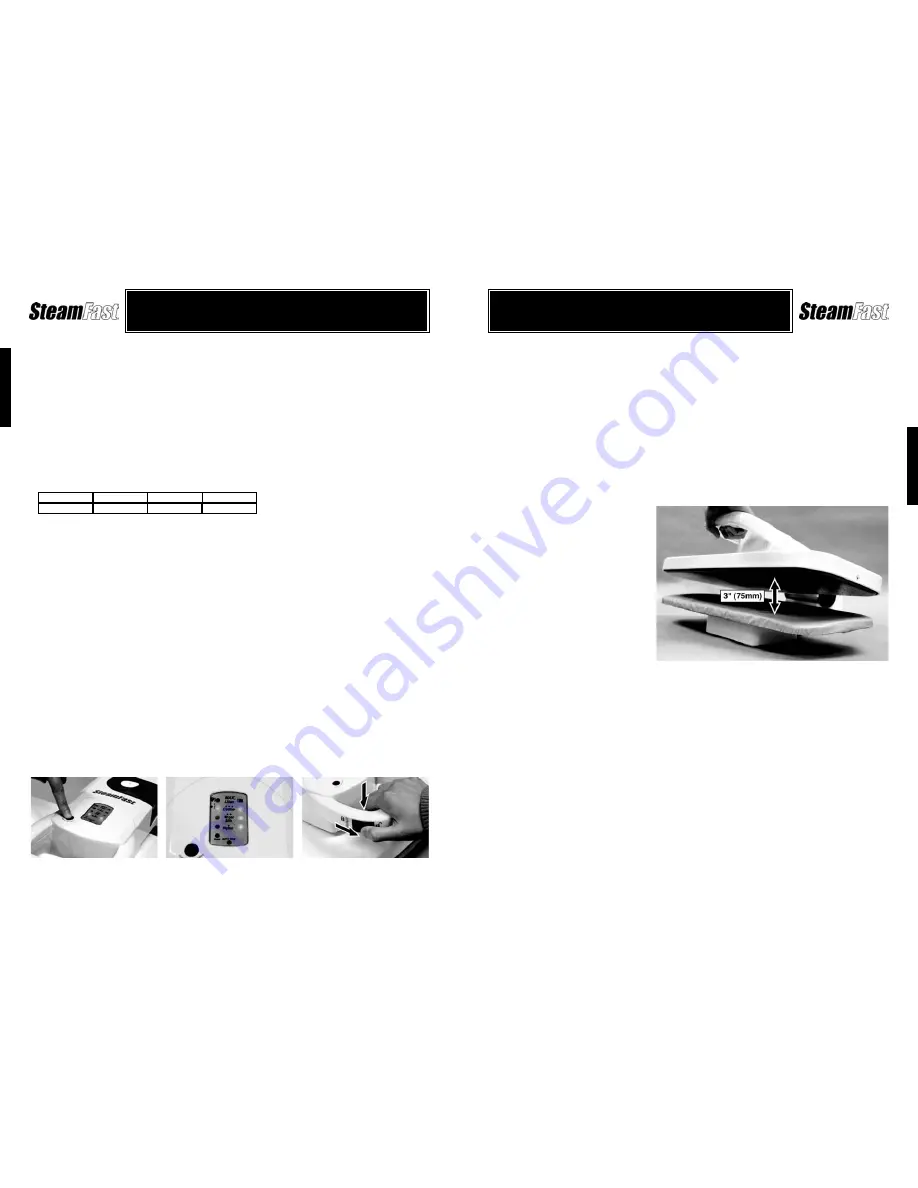
2.
Sostenga la Placa de Planchar aproximadamente 75 mm. (3”) sobre el Tablero de Planchar (FIGURA 3).
3.
Empuje el Botón de la Ráfaga de Vapor para liberar una sola ráfaga de vapor sobre la tela. Empújelo en varias
ocasiones (hasta cuatro veces) si se desea más vapor.
NOTA: Para el uso inicial, la unidad puede necesitar ser preparada bombeando el Botón de la Ráfaga
de Vapor varias veces antes de que el vapor sea producido.
NOTA: Para la mejor calidad del vapor, el Botón de la Ráfaga de Vapor no se debe presionar más de
cuatro veces en sucesión rápida antes de permitir un breve período de calentamiento.
4.
Baje la Placa de Planchar sobre la tela. Sujete la Placa de Planchar hacia abajo por 8-10 segundos, después
levante el respaldo.
5.
Repita los
PASOS 2-4
de arriba hasta que se haya alcanzado el pliegue y la suavidad que usted desea.
PRECAUCIÓN: No utilice la función de
la ráfaga de vapor cuando la unidad es
totalmente cerrada, pues ésta puede
causar daño a la unidad. Para mejores
resultados, sostenga la Placa de Planchar
abierta aproximadamente 75 mm. (3”)
sobre el Tablero de Planchar cuando
empuje el Botón de Ráfaga de Vapor
(FIGURA 3).
PRECAUCIÓN: Para reducir al mínimo
el riesgo del contacto con el agua caliente
o el vapor, no sostenga la Placa de
Planchar abierta a más de 75 mm. (3”)
cuando se use la Ráfaga de Vapor.
AUTO-APAGADO
La
Prensa Compacta Digital de Vapor
incorpora una característica avanzada de Auto-Apagado el cual es
diseñado para activarse en caso de que se haya desatendido la unidad por más de ocho minutos.
La activación del Auto-Apagado es señalada por el continuo centelleo de la Luz del Indicador de Auto-Apagado,
el estado del resto de las otras luces (las Luces del Indicador de la Temperatura, Luces del Indicador del Calor) se
apagarán. Durante este tiempo, la corriente eléctrica del calentador se corta, y si esta se deja desatendida, la
unidad eventualmente se enfriara. La funcionalidad del calor se puede restaurar de dos maneras:
• Mueva la Placa Caliente para arriba o para abajo
• Presione el Botón Seleccionador de la Tela
PRECAUCIÓN: El Auto-Apagado, es una característica de seguridad solamente, y no se debe sustituir
para la desactivación regular de la unidad. La única manera de apagar totalmente la unidad es fijar el
Interruptor Iluminado Encendido/Apagado a la posición de "Apagado" (O). El cable eléctrico se debe
desenchufar siempre de cualquier enchufe eléctrico cuando no se esté usando.
FIGURA 3


