background image

ENGLISH | 5

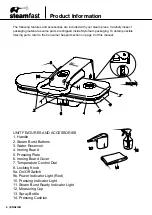
•  The 

Handle

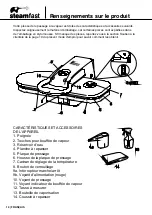
 (1) is used to safely lift up and lower the Pressing Plate, and carry the unit.

•  The 

Steam Burst Buttons

 (2) are located on either side of the Handle, and produce a powerful burst 

of steam when pressed.

•  The 

Water Reservoir

 (3) is the tank in which water is stored for use by the unit. There must 

be water in the Water Reservoir in order for the unit's steam burst function to work correctly.

•  The 

Ironing Board

 (4) is the padded surface onto which fabric is placed during pressing.

•  The 

Pressing Plate

 (5) is the large temperature-controlled surface that heats and presses fabric.

•  The 

Ironing Board Cover

 (6) is the durable cover that protects the Ironing Board. The fabric 

cover is removable and can be washed.

•  The 

Temperature Control Dial

 (7) is used to select a desired temperature, by turning it to the fabric 

setting that matches the material that you are pressing.

•  The 

Locking Knob

 (8) locks the Pressing Plate and Ironing Board together. This allows for carrying 

and storage of the unit.

•  The 

On/Off Switch 

(9a) activates and deactivates the unit.

•  The 

Power Indicator Light

 (Red) (9b) illuminates when the On/Off Switch is set to the “On” (I) position, 

providing you with a clear visual indication that the unit is powered on.

•  The 

Pressing Indicator Light 

(Orange) (10) illuminates while the unit is heating to the selected 

temperature. When deactivated, this indicates that you are ready to press.

•  The 

Steam Burst Ready Indicator Light

 (Orange) (11) illuminates once the unit is ready to produce 

bursts of steam, providing you with a clear visual indication that you can begin using the Steam Burst 

Buttons.

•  The 

Measuring Cup

 (12) is designed to assist you in easily filling the Water Reservoir with distilled 

water.

•  The 

Spray Bottle

 (13) allows you to moisten fabrics before pressing, which helps to make the 

pressing process easier and more effective in certain instances.

•  The 

Pressing Cushion

 (14) is a fabric-covered pad used for pressing gathered or contoured areas 

such as sleeves, darts, or collars.

Summary of Contents for SF-623

Page 1: ...emploi MODEL SF 623 MOD LE SF 623 MODELO SF 623 ENGLISH p 2 FRAN AIS p 12 ESPA OL p 22 KEEP YOUR RECEIPT FOR WARRANTY PURPOSES Please read all instructions before use GARDEZ VOTRE RE U AUX FINS DE LA...

Page 2: ...ower cord as handle let it hang over edges of counters or be crimped or closed in doors 6 Never yank power cord to disconnect from outlet instead grasp plug and pull smoothly to disconnect 7 Do not op...

Page 3: ...t water emitting from Pressing Plate check appliance before each use by positioning it away from body and turning it on Do not operate unit if Pressing Plate is blocked 16 Burns can occur from touchin...

Page 4: ...to the Consumer Support section on page 9 of this manual UNIT FEATURES AND ACCESSORIES 1 Handle 2 Steam Burst Buttons 3 Water Reservoir 4 Ironing Board 5 Pressing Plate 6 Ironing Board Cover 7 Tempera...

Page 5: ...locks the Pressing Plate and Ironing Board together This allows for carrying and storage of the unit The On Off Switch 9a activates and deactivates the unit The Power Indicator Light Red 9b illuminate...

Page 6: ...ivate You are now ready to begin pressing 4 Lay fabric flat on Ironing Board 5 If pressing wool cotton or linen you may choose to spray with a burst of steam This function is available once Steam Burs...

Page 7: ...ce Pressing Cushion under waistband and press repositioning waistband until completely pressed 2 To press inseam place Pressing Cushion under area to be pressed 3 Place pleated area on Ironing Board C...

Page 8: ...ace Pressing Cushion in the middle of Ironing Board 3 Place a clean towel over Pressing Cushion and Ironing Board 4 Set Temperature Control Dial to the highest setting LINEN 5 When Steam Burst Ready I...

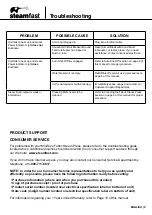
Page 9: ...to be cleaned Refer to Cleaning the Fabric Steam Press section on page 8 of this manual for proper procedure PRODUCT SUPPORT CONSUMER SERVICE For problems with your Mid Size Fabric Steam Press please...

Page 10: ...quential damages or allow limitations on how long an implied warranty lasts so the above limitations or exclusions may not apply to you This warranty gives you specific legal rights and you may have o...

Page 11: ......

Page 12: ...d une poign e ne le laissez pas pendre du bord d un plan de travail ne le pincez pas dans une porte et ne refermez pas une porte sur lui 6 Ne tirez jamais d un coup sec sur le cordon d alimentation po...

Page 13: ...diffuse la plaque vapeur v rifiez l appareil avant chaque utilisation en l loignant de votre corps puis en le mettant sous tension Ne faites pas fonctionner l appareil si la plaque vapeur est bloqu e...

Page 14: ...ction Soutien la client le de la page 19 du pr sent mode d emploi pour savoir comment les obtenir CARACT RISTIQUES ET ACCESSOIRES DE L APPAREIL 1 Poign e 2 Touches pour bouff e de vapeur 3 R servoir d...

Page 15: ...errouillage 8 verrouille la plaque de pressage et la planche repasser l une contre l autre ce qui permet de transporter et de ranger l appareil L interrupteur marche arr t 9a permet d allumer et d tei...

Page 16: ...sur la planche repasser 5 Si vous pressez de la laine du coton ou du lin vous pouvez l humidifier l aide d une bouff e de vapeur Vous pouvez utiliser cette fonction lorsque le voyant indicateur de va...

Page 17: ...le ci d placez la ceinture jusqu ce qu elle soit enti rement press e 2 Pour presser la couture d entrejambe placez le coussin repasser sous la zone presser 3 Posez la zone pliss e sur la planche repas...

Page 18: ...re sur le coussin repasser et la planche repasser 4 R glez le cadran de r glage de la temp rature au r glage le plus lev LINEN 5 Lorsque le voyant indicateur de vapeur s illumine abaissez la plaque de...

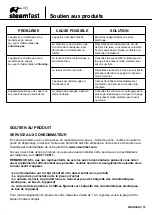
Page 19: ...Garantie Limit e de 1 An reportez vous la page 20 du pr sent mode d emploi PROBL ME CAUSE POSSIBLE SOLUTION L appareil ne chauffe pas et ne produit pas de vapeur Le voyant d alimentation ne s illumin...

Page 20: ...s limitations sur la dur e d une garantie implicite de sorte que les limitations ou exclusions susmentionn es peuvent ne pas s appliquer vous Cette garantie vous donne des droits l gaux sp cifiques en...

Page 21: ...fran ais 21...
Page 22: ...de reducir la probabilidad de sobrecarga NO enchufe otro artefacto de alto vatiaje en el mismo circuito de esta unidad 5 Para evitar el riesgo de descarga el ctrica no sumerja la unidad en agua ni ot...

Page 23: ...lesiones Se recomienda el uso de agua desmineralizada o destilada para minimizar la posible acumulaci n de dep sitos minerales 15 Para reducir el riesgo de contacto con el agua caliente que sale de l...

Page 24: ...sulte la secci n Servicio de Atenci n al Cliente en la p gina 29 de este manual CARACTER STICAS Y ACCESORIOS DE LA UNIDAD 1 Mango 2 Botones rociadores de vapor 3 Tanque de agua 4 Tabla de planchar 5 P...

Page 25: ...traba 8 traba la placa de planchado y la tabla de planchar Esto permite el transporte y el almacenamiento de la unidad El interruptor de encendido apagado 9a activa y desactiva la unidad La luz indic...

Page 26: ...ienda la tela estirada sobre la tabla de planchar 5 Si plancha lana algod n o lino puede optar por rociar con un chorro de vapor Esta funci n est disponible una vez que se enciende la luz indicadora d...

Page 27: ...do debajo del rea que se planchar 3 Coloque el rea plisada sobre la tabla de planchar Doble cuidadosamente las tablas y planche OTRAS T CNICAS La colocaci n de un pa o entre la tela y la Placa de Plan...

Page 28: ...a tabla de planchar 3 Coloque una toalla limpia sobre la almohadilla de planchado y la tabla de planchar 4 Coloque el cuadrante de control de temperatura en el ajuste m s alto LINO 5 Cuando se enciend...

Page 29: ...za Consulte la secci n Limpieza de la plancha a vapor para telas en la p gina 8 de este manual para conocer el procedimiento adecuado APOYO DEL PRODUCTO SERVICIO DE ATENCI N AL CLIENTE Para solucionar...

Page 30: ...EN SU DURACI N A LA DURACI N DE ESTA GARANT A Algunos estados no permiten la exclusi n ni la limitaci n de los da os indirectos o emergentes ni permiten limitaciones a la duraci n de la garant a impl...

Page 31: ...roducto disponible en www steamfast com 2011 Vornado Air LLC Andover KS 67002 Las especificaciones est n sujetas a modificaciones sin previo aviso Steamfast es una marca comercial propiedad de Vornado...

Page 32: ...this product online valuer ce produit en ligne eval e este producto en l nea www steamfast com reviews Steamfast 415 East 13th Street Andover KS 67002 1 800 711 6617 www steamfast com consumerservice...

Reviews: