background image

8 | ENGLISH

OPERATING UNIT

DRY IRONING

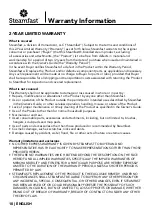
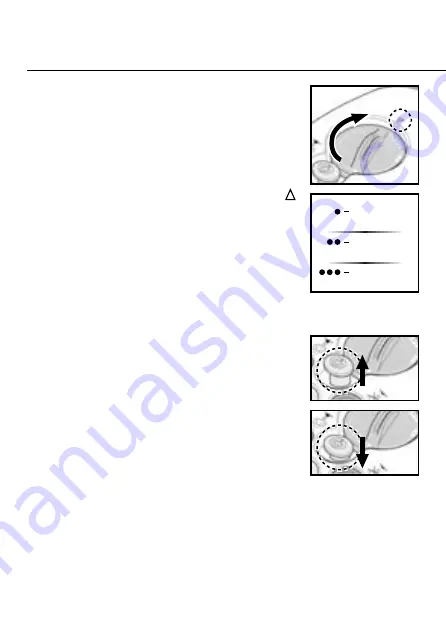
IMPORTANT: Make sure Steam Button is locked in lowered 

position (FIGURE 4-B) before dry ironing.  This will prevent any 

water from accidentally dripping.

1.

 Plug power cord into a convenient electrical outlet. 

2.

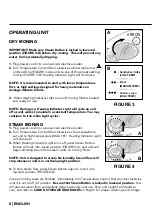
 Turn Temperature Control Dial clockwise so that small arrow (     ) 

on Hand Grip (FIGURE 3-A) points to one of three heat settings 

on Dial (FIGURE 3-B). Heating Indicator Light will illuminate.

NOTE: It is recommended to start with lower temperatures  

first, as high settings designed for heavy materials can

damage delicate fabrics.

3.

  When Heating Indicator Light turns off, Ironing Plate is heated 

and ready for use.

NOTE: During use, Heating Indicator Light will cycle on and 

off as unit works to maintain a constant temperature. You may 

continue to iron while Light cycles.

STEAM IRONING

1.

 Plug power cord into a convenient electrical outlet. 

2.

 Turn Temperature Control Dial clockwise as far as possible to 

set unit to high temperature (MAX •••).  Heating Indicator Light 

will illuminate.

3.

 When Heating Indicator Light turns off, press Steam Button. 

Button will lock into raised position (FIGURE 4-A), and unit will 

begin emitting steam from steam vents on Ironing Plate.

NOTE: Unit is designed to steam horizontally. Steam flow will 

stop whenever unit is in vertical upright position.

4.

 To stop steam flow, press Steam Button again to lock it into 

lowered position (FIGURE 4-B).

A

B

A

B

ARROW

Synthetics, Silks

(LOW TEMP)

Wool

(MEDIUM TEMP)

Cotton, Linen

(HIGH TEMP)

FIGURE 3

FIGURE 4

Once all ironing tasks are finished, immediately turn Temperature Control Dial counter-clockwise 

until it is set to off (O) position. 

Be sure that Steam Button is locked in lowered position

 - this 

will prevent water from accidentally dripping during next use. Prop unit upright on Stands to 

cool, and refer to 

CARE & STORAGE GUIDELINES

 on Page 9 for proper cleaning and storage.

Summary of Contents for SF-717

Page 1: ...H O M E A W A Y S T E A M I R O N O W N E R S G U I D E...

Page 2: ...liquids Do not use power cord as handle allow it to hang over edge of counters or be crimped or closed in doors 6 The iron should always be turned OFF before plugging or unplugging from outlet Never y...

Page 3: ...ecommended that you consult the manufacturer s guidelines for material being steamed For items in question test on an inconspicuous area before proceeding 19 Do not allow power cord to touch hot surfa...

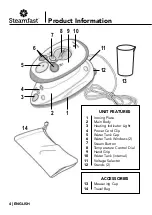
Page 4: ...14 1 2 3 4 12 13 5 7 6 11 8 9 10 UNIT FEATURES Ironing Plate Main Body Heating Indicator Light Power Cord Clip Water Tank Cap Water Tank Windows 2 Steam Button Temperature Control Dial Hand Grip Water...

Page 5: ...d position enabling steam Refer to Page 8 for details The Temperature Control Dial is turned to select one the three heat settings and to turn heating off Refer to Page 8 for details The Hand Grip is...

Page 6: ...e plugging power cord into an electrical outlet To change the voltage setting NOTE These steps assume that Voltage Selector is still set to 100 127V default 1 Locate Voltage Selector recessed inside s...

Page 7: ...s maximum potential it is highly recommended that distilled or de mineralized water be used in Water Tank 4 Open Water Tank Cap Pour water from Measuring Cup into Water Tank FIGURE 2 Close Water Tank...

Page 8: ...cord into a convenient electrical outlet 2 Turn Temperature Control Dial clockwise as far as possible to set unit to high temperature MAX Heating Indicator Light will illuminate 3 When Heating Indicat...

Page 9: ...and Grip and secure end in Power Cord Clip as shown FIGURE 5 Place unit and Measuring Cup inside Travel bag and store in a cool dry location MINERAL BUILD UP 1 Follow STEPS 1 3 under CLEANING STORAGE...

Page 10: ...careless operation handling misuse or abuse of the Product Lack of proper maintenance or timely cleaning of the Product as specified in the Owner s Guide Use of the Product other than for normal house...

Page 11: ...urchase After receiving the RA form the Product must be shipped postage prepaid by Buyer to Steamfast Attn Warranty Repair 415 E 13th Street Andover KS 67002 To assure proper handling packages must be...

Page 12: ...Steamfast 415 East 13th Street Andover KS 67002 1 800 711 6617 steamfast com consumerservice steamfast com T717 005 RA V02...

Reviews: