-18-
ST1001 6" Jointer
•
Remove foreign objects from the stock.
Make
sure that any stock you process with the jointer
is clean and free of any dirt, nails, staples, tiny
rocks or any other foreign objects that may dam-
age the jointer blades.
•
Only process natural wood fiber through
your jointer.
Never joint MDF, particle board,
plywood, laminates or other synthetically made
materials.
•
Make sure all stock is sufficiently dry before
jointing.
Jointing wood with a moisture content
over 20% will cause unnecessary wear on the
knives and yield poor cutting results.
•
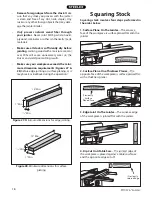
Make sure your workpiece exceeds the mini-
mum dimension requirements
(
Figures 27 &
28
) before edge jointing or surface planing, or it
may break or kickback during the operation!
Figure 27.
Minimum dimensions for edge jointing.
1
⁄
2
" Min.
1" Min.
10" Min.
Figure 28.
Minimum dimensions for surface
planing.
1
⁄
2
" Min.
1" Min.
10" Min.
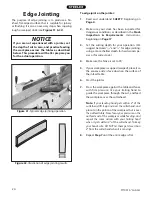
Squaring stock involves four steps performed in
the order below:
1. Surface Plane On The Jointer
—The concave
face of the workpiece is surface planed flat with the
jointer.
��
��
��
Previously
Jointed Edge
Previously
Surface
Planed Face
2.
Surface Plane On a Thickness Planer
—The
opposite face of the workpiece is surface planed flat
with a thickness planer.
3. Edge Joint On The Jointer
—The concave edge
of the workpiece is jointed flat with the jointer.
4. Rip Cut On A Table Saw
—The jointed edge of
the workpiece is placed against a table saw fence
and the opposite edge cut off.
Squaring Stock
Summary of Contents for ST1001
Page 2: ......
Page 36: ...34 ST1001 6 Jointer ST1001 Wiring Diagram...
Page 37: ...ST1001 6 Jointer 35 Jointer Breakdown...
Page 39: ...ST1001 6 Jointer 37 Fence Breakdown...
Page 44: ......
Page 47: ......
Page 48: ......


