-40-
ST1013 12" Jointer (Mfd. Since 3/16)
Tensioning/Replacing
V-Belt
To ensure optimum power transmission from the
motor to the cutterhead, the belt must be in good
condition (free from cracks, fraying and wear) and
properly tensioned. As the machine is used, the belts
will slightly wear and stretch, eventually losing their
efficiency of transmitted power until they can be
retensioned.
Also, a new belt typically has a break-in period, and
should be checked/retensioned after the first 16
hours of belt life, as it will stretch and seat during this
time.
Tools Needed
Qty
Wrenches or Sockets 13mm ............................................. 2
Tensioning Belt
1. DISCONNECT MACHINE FROM POWER!
2. Open pulley cover.
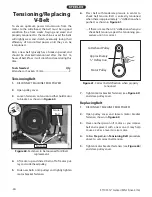
3. Loosen fasteners on tension rod that hold motor
to bracket, as shown in Figure 60.
4. Lift motor up and slide V-belts off of motor pul-
ley and cutterhead pulley.
5. Slide new belts onto pulleys and lightly tighten
motor bracket fasteners.
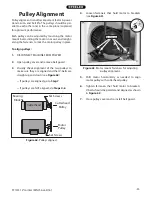
Motor Pulley
Approximately
1
/
4
" Deflection
Cutterhead Pulley
Figure 61. Correct belt deflection when properly
tensioned.
Replacing Belt
1. DISCONNECT MACHINE FROM POWER!
2. Open pulley cover and loosen motor bracket
fasteners shown in Figure 60.
3. Have another person lift motor as you remove
belt and replace it with a new one. It may help
to use a 2x4 as a lever to raise motor.
4. Follow
Steps 4–6 in Tensioning Belt procedure
above to set correct belt tension.
5. Tighten motor bracket fasteners (see Figure 60)
and close pulley cover.
6. Press belt with moderate pressure in center to
check belt tension. Belt is correctly tensioned
when there is approximately
1
⁄
4
" deflection when
pushed, as shown in Figure 61.
—If there is more than 1⁄4" deflection when you
check belt tension, repeat the tensioning pro-
cedure until it is correct.
7. Tighten motor bracket fasteners (see Figure 60),
and close pulley cover.
Figure 60. Fasteners to be loosened for V-Belt
replacement.
Tension
Rod
Fasteners

