background image

By SteelTech Inc.

Version 7

UL 2523-2009

CAN/CSA B366.1-2011

O

G

OPERATION AND 

MAINTENANCE 

MANUAL

EPA Certified Wood 
Burning Furnaces

Summary of Contents for HeatMaster G Series

Page 1: ...By SteelTech Inc Version 7 UL 2523 2009 CAN CSA B366 1 2011 O G OPERATION AND MAINTENANCE MANUAL EPA Certified Wood Burning Furnaces ...

Page 2: ...1 Heatmasterss G Series Furnace Operating Manual ...

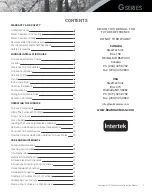
Page 3: ...rss com www heatmasterss com WARRANTY AND SAFETY Limited Warranty 3 Water Treatment And Testing 4 Water Treatment Policy 4 Recommended Operating Levels 4 Test Parameters and What They Mean 4 Safety Precautions 5 FURNACE INSTALLATION GUIDE Furnace Specification Charts 6 Location 6 Clearance To Combustibles 6 Furnace Foundation 7 Unit Foot Prints 7 Trench 7 Indoor Installation 8 Chimney Installation...

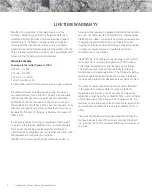
Page 4: ...or any other cost other than the replacement component or furnace SteelTech Inc always has the right to decide if a part or furnace will be repaired or replaced and will not be liable for any cost not authorized by a SteelTech Inc representative SteelTech Inc does not warranty any damage caused due to negligence and deterioration due to lack of proper ongoing maintenance physical damage caused by ...

Page 5: ...and after that Additional treatment may have to be added for water with more severe properties or for systems with more chemically demanding requirements RECOMMENDED OPERATING LEVELS ARE AS FOLLOWS Conductivity 100 4000 ppm pH 8 5 10 5 Nitrates no less than 730 ppm TEST PARAMETERS AND WHAT THEY MEAN Conductivity Conductivity is a measurement of minerals in your furnace water While it is common to ...

Page 6: ...ions wiring plumbing and building codes All models operate at atmospheric pressure DO NOT obstruct block or plug the overflow vent tube in any way which is located on top of the furnace When installing the furnace the chimney should never be connected to a chimney flue serving another appliance DO NOT operate furnace in event of power failure Use caution when opening the firebox and ash cleaning d...

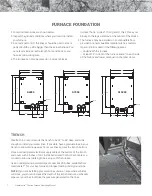
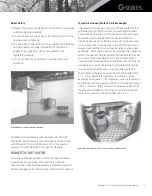
Page 7: ...he United States after May 15 2020 is taken off of the furnace GSERIES LOCATION Where you install the furnace will have an effect on the efficiency of your furnace Although the furnace is very well insulated installing the furnace outdoors will mean some heat loss at the furnace The furnace will have less heat loss when installed indoors away from the elements that can cause heat loss Maintain an ...

Page 8: ...ENCH SteelTech Inc recommends the trench to be 24 to 36 deep and wide enough to install your water lines If possible have a gradual slope in your trench to allow drainage away from your lines and out the trench bottom Place a properly rated electrical supply cable at the bottom of the trench and cover with 6 inches of dirt Install burial rated Cat5 or Cat6 cable or a conduit to allow networking to...

Page 9: ...ng the furnace the chimney should never be connected to a chimney flue serving another appliance Make sure the chimney flue pipe and draft inducer fan stay clean and in good condition at all times The top of the chimney must extend at least 3 0 feet above the highest point where it exits the roof and be at least 2 0 feet taller than any point of the roof within 10 0 feet For a new chimney use an i...

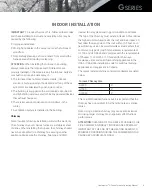
Page 10: ...erminates 2 feet above the roof at the 10 foot perimeter 10 HeatmasterSS G Series Furnace Operating Manual CHIMNEY INSTALLATION ATTENTION Before installing check with local building codes for information regarding chimney height and distances to adjacent buildings etc You may need to obtain a building permit for the installation of this appliance or the chimney We recommend that chimneys being ins...

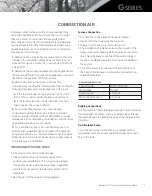
Page 11: ...ed space or an unconfined space in a building with unusually tight construction an additional source of make up air is required Please consult an HVAC professional to determine the best way to supply make up air for this type of installation WIRING AND HYDRONIC LINES All wiring must conform to local codes Use an electrical wire rated and approved for underground installations This wiring can be pl...

Page 12: ...cially if these points are higher than the furnace Airlocks can restrict system flow limiting the BTU s available to your building This may also lead to your furnace overheating and cause temperature swings in the water feeding the house DISCLAIMER The following information in the interior connections are examples and suggestions only When installing a furnace and its parts it is best to consult y...

Page 13: ... heat exchanger must be mounted so that air blows through the fins coils The exchanger should be mounted below the A C coil if possible The exchanger should be sized to fit existing duct work and should produce about as many BTU s as the existing heat source An exchanger that produces too many BTU s will result in uneven heat and the fan stopping too quickly while a heat exchanger that is undersiz...

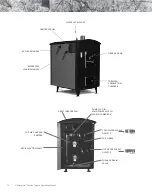
Page 14: ...NDUCER FAN TOP AIR CONTROL DAMPER FURNACE DRAIN VALVE HOT WATER SUPPLY OUTLETS TOP AIRBOX COLD WATER SUPPLY OUTLETS PUMP PLUG IN MAIN POWER SWITCH LEAD IN POWER BOX FIREBOX DOOR EZ CLEAN HANDLE SMOKELESS LOADING HANDLE CONTROL PANEL WATER LEVEL FLOAT TORNADO COMBUSTION CHAMBER ...

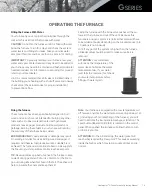
Page 15: ...rnace is equipped with a low temperature cut off feature Anytime the water temperature drops below 140 F including your first initial firing of the furnace you will need to activate the low temperature bypass function The silver button labeled Cold Start is located on the control panel When pushed the furnace will allow the fan to turn on to start your fire ATTENTION On the initial startup the wat...

Page 16: ...on the wood Do not keep the wood in a woodshed or under a tarp during the summer as the moisture that evaporates from the wood will have nowhere to go 16 HeatmasterSS G Series Furnace Operating Manual WOOD QUALITY This furnace is designed to burn natural wood only Higher burning air dried seasoned hardwoods 15 25 moisture content as compared to softwoods or too green and freshly cut hardwoods DO N...

Page 17: ...smoke or flame exits the firebox door when you open it 2 Crack the firebox door open to the safety catch for at least 15 seconds to allow smoke to exit the chimney and prevent blow back 3 Open the door slowly while standing behind the door 4 Use your ash rake to knock charred wood down and level the coal bed Hint If there is a minimal coal bed left use the ash rake to rake through the ash bed to s...

Page 18: ...erate with fuel loading or ash removal doors open Do not store fuel or other combustible material within marked installation clearance Inspect and clean flues and chimney regularly Remove ashes regularly CAUTION Hot surfaces Keep children away and do not touch during operation For more information on wood quality follow these links EPA s Burnwise Program http www epa gov burnwise How to Use a Mois...

Page 19: ...rough the furnace The fan should be on whenever the furnace is in a heating cycle or when the smoke bypass is open Smokeless Loading Handle Use the Smokeless Loading Handle whenever the firebox loading door is open The bypass handle is located on the side of the furnace and opens a direct exit out of the firebox through the chimney whenever pushed towards the rear of the furnace This will allow yo...

Page 20: ...19 Heatmasterss G Series Furnace Operating Manual AIR DAMPER ALARM LED LIGHT SMOKELESS LOADING HANDLE COLD START BUTTON FURNACE ON OFF SWITCH DRAFT INDUCER FAN FAN BREAKER FURNACE CONTROL ...

Page 21: ...FICATION OUTDOOR FURNACE WORKS SteelTech Inc is proud of its reputation for producing innovative outdoor heating methods and our G Series outdoor furnaces are continuing that trend They operate more efficiently with fewer emissions than other outdoor furnaces The HeatMasterSS G Series wood furnaces use up to 50 less wood to create the same heat How It Works Wood gas is generated in a high temperat...

Page 22: ... wood fuel that leaves quite a bit of ash you may need to clean your firebox out every 2 4 weeks to get optimal performance from your furnace Check the fan motor and wheel for creosote buildup The motor and wheel can be easily removed by unplugging the wires to the fan and loosen the nuts on the stainless steel plate On a seasonal basis when the furnace is not in use you will have to Remove all as...

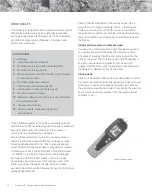
Page 23: ...trical power to the furnace and components is shut off It can be washed using water and a mild nonabrasive cleaner suitable for painted surfaces ATTENTION Avoid direct water pressure CLEANING TOOLS Tool 1 Has a round edge that is meant to be used to clean out the round ports A in the refractory The straight edge can be used as a general scraping and cleaning edge This tool is also good for your da...

Page 24: ...he service tools provided with your furnace Remove the flue access cover and inspect that area for possible blockage If the area is sticky with creosote inspect the smoke by pass plate for leakage and adjust as necessary Do the spirals in the heat exchange tubes have full movement up and down If not inspect the linkage for damage Flush the heat exchanger tubes with water to loosen them if necessar...

Page 25: ...ws until furnace cools down Check that all doors are closing properly and that door gasket is completely sealing Check that the damper plate is opening and closing properly It should be completely closed when the furnace temperature is over 180 F Check water level Check to ensure all pumps in the system are running If there is a runaway or chimney fire Make sure the firebox and lower combustion ch...

Page 26: ...e OUTPUT terminals If there is 24 volts DC across the terminals and the green LED on the front is illuminated the power supply is working If there is not 24 volts DC check for 115V AC power on the INPUT terminals If there is no power check for power at the control power switch If there is 115V AC on the INPUT terminals but not 24V DC TROUBLESHOOTING The door may need to be adjusted To do this loos...

Page 27: ...move and inspect the switch If it is dirty it may be cleaned up tested and re installed If it is faulty it should be replaced By Pass Door Switch Test the By Pass Switch using an electrical test meter Measure the voltage across the M and I2 terminals on the Siemens control There should be 24 VDC when the by pass is in the CLOSED position If there is no power across those terminals isolate the swit...

Page 28: ...uck pry it off and clean as necessary The damper plates may be lubricated with a light coating of automatic transmission fluid if necessary If the damper plate is not stuck but the actuator will not turn test the electrical at the actuator The mode selector should be set to mode 3 Remove the screw in the electrical cover of the actuator Pull and wiggle gently on the cover to remove it from the act...

Page 29: ...ositive Press the OK key to save your changes and adjust other settings Press the ESC key to close the black box and toggle between screens Press the UP arrow repeatedly to return to the run screen INSTRUCTIONS FOR EDITING CONTROL SETTINGS This screen displays the primary status information at a glance The 2nd line displays the current status mode of the furnace Heat Cycle Idle Timer Cycle or Cold...

Page 30: ...r and 30 minutes Once this Delay time has passed the furnace will start the fan and open the dampers to provide air to the coal bed for the set On Time 3 Minutes and 0 Seconds After this first cycle the control will run the On Time cycle every Off Time 30 minutes and 0 seconds When the furnace water cools below this setpoint it will assume the firebox is empty and will shut down to conserve heat O...

Page 31: ...needed the by pass must be closed and opened again Operating the smoke by pass for extended periods of time may overheat the motor causing premature failure The water temperature has dropped below the Low Temperature Shut Down setpoint The furnace shuts down to conserve heat assuming the firebox is empty and needs to be reloaded The high temperature limit switch has been activated 195 F The furnac...

Page 32: ... Assign your furnace an IP address See page 33 for these instructions Once you have followed these steps you should be able to access your furnace on your home network via an internet browser See page 35 for these instructions Hardwired LAN Line This is the preferred method to connect your furnace to your home network You will need to run and connect a Cat 5 or 6 cable from your home router or net...

Page 33: ...you will see a window similar to the one in figure 2 Enter the command ipconfig You ll see a screen with similar data as shown in figure 3 Paying attention to the addresses that we ve highlighted within the square in figure 3 you ll need to take note of three addresses The line IPv4 Address is the IP address of the computer that you are currently working on The IP address that you ll be assigning ...

Page 34: ...e and can t be used for your furnace Change your the last 3 digits Figure 5 of your IP address to a number between 200 250 to ping an address with a higher number as your router is less likely to assign an address within this range Only change the last three numbers in the address as shown in figure 5 You may need to try a few different numbers before you will find an available address Once you fi...

Page 35: ...splaying date and time as shown above Press the ESC key you should see the screen shown above We need to stop the Logo s program to make this IP address change Select STOP and press the OK button Select Yes Select Network Select IP Address Using the four arrow keys change the IP address to the one you found to be available on your network in the previous section Also change the subnet mask and the...

Page 36: ... is 192 168 1 250 Enter this in the browser URL and hit enter Leave the name field as Web User Enter the password heatmaster then click log on VIEWING YOUR FURNACE IN A WEB BROWSER After you have set these three addresses scroll back and restart the furnace by selecting start Select Yes to start the Logo s program again At this point you should be able to access your furnace on your home network G...

Page 37: ...uttons on the screen to navigate the furnace control just as if you were standing at your furnace This page can be accessed from any web browser enabled device connected to your home network Bookmark this page in your web browser allowing you quick access to this page at any time The Screen that you see in figure 2 should load Figure 2 Figure 3 ...

Page 38: ...37 Heatmasterss G Series Furnace Operating Manual ...

Page 39: ...Heatmasterss G Series Furnace Operating Manual 38 GSERIES ...

Page 40: ...gs and heat exchangers For more information on our parts or to arrange product installation please contact your local HeatMasterSS dealer HeatMasterSS Box158 Winkler Manitoba Canada R6W 4A4 Phone 204 325 9792 Fax 204 325 9803 Toll Free 1 877 325 9792 Email info heatmasterss com heatmasterss com ...

Reviews: