


V06-2017
ST2520
2
STEENBECK ST2520 Film Rewinder / Inspection Table
1.0 INSTRUCTIONS
. (assembly)
Please read this instruction carefully.
NEVER lift the film rewinder at the top plate.
1. Fasten rollers to film rewinder legs (if removed for shipping)
Stop rollers go to the front.
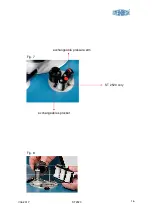
2. Install the counter display (when delivered and removed for shipping)
3. Insert flat cable connector of the counter display (when delivered) to
adjacent plug. (be careful not to bend any contacts).
Install working lamp (when delivered) and plug it in the wall socket at
the back of the table.
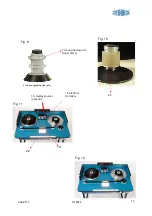
4. When counter is fitted, fit the sprocket to the counter pick up shaft
(when removed for shipping). Make sure that sprocket is in the
lowest position (turn sprocket while holding lower ring in position).
Check if pinch roller arm closes properly.
5. Exchangeable rollers can be put on the special platform under the
counter display. (fig. 11)
6. Connect foot pedal control cable to adjacent plug at the bottom of
film rewinder housing, left side. (when delivered)
7. Check line voltage and frequency correspond to the readings in the
machine type and serial number label at the rear of the frame/housing.
8. Check if power plug fits into the local socket.
if not, replace plug for a local plug:
yellow/green: earth
blue: neutral
brown: live / phase
9. Please check the power ground system of the wall socket is OK.
This is important for the safety of the operator and static electricity.
10. Switch on power and run table slowly in left and right direction.
11. Check counter system (if delivered) by turning by hand the sprocket.
12. Check lighting with dimmer and ground glass.
13. Connect foot control (if delivered).
14. Check foot control.
15. Put a little vaseline on inner plastic friction rings of the film plates
(see fig. 20, page 21) and ring on friction base plate (fig. 15, page 19)
16. Put film plates on the friction discs.


