UNPACKING
Open the box and carefully remove the unit and any accessories.
Carefully remove the unit from the polystyrene packaging and protective PVC bag.
Please keep all packaging materials just in case the unit needs future servicing, etc.
LOCATION OF CONTROLS AND FUNCTIONS
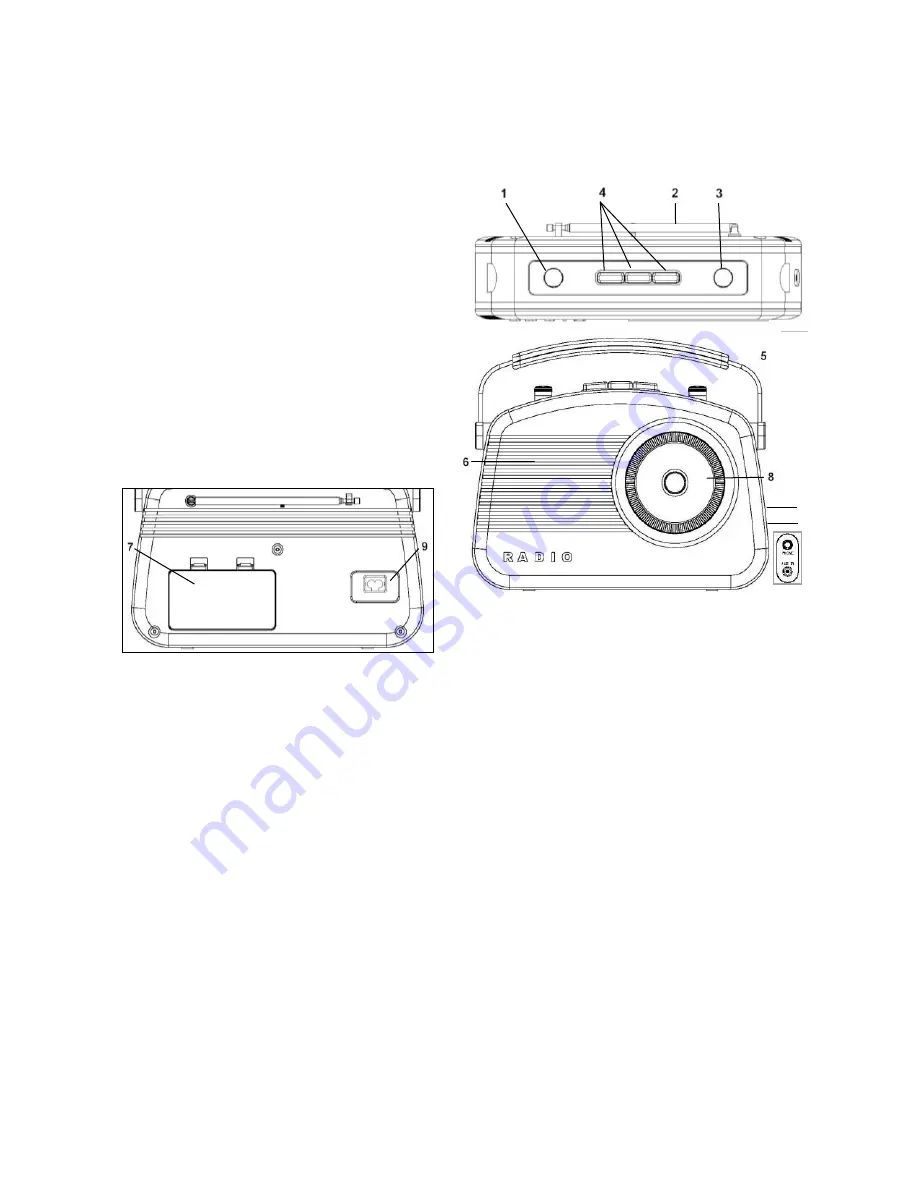
TOP VIEW
1. On / Off switch and Volume control
2. Telescopic Antenna
3. Tone control
4. FM / MW / LW Frequency & Band Switches
FRONT & REAR VIEW
5. Handle
6. Speaker
7. Battery compartment
8. Frequency Dial and Tuning knob
9. AC 230 V~ 50Hz Socket
for detachable Power Cord*
10. Headphone Socket (3.5mm dia)
11. Auxiliary Input Socket (3.5mm dia)
Accessory supplied*: 1 x AC Mains Power Cord
POWER SUPPLY
MAINS OPERATION
The device is designed for mains power supply AC 230 V~50Hz. Do not connect the device to any
other power supply to avoid damage that is not covered by your warranty.
1. Connect the smaller plug to the AC socket at the rear of the device. Make sure that the plug is
completely inserted.
2. Insert the 3-pin mains plug into an AC Mains wall outlet.
BATTERY OPERATION
1.
Open the battery compartment cover (7) by pressing the two brackets (marked “OPEN”) at the
same time. Remove
the cover and insert 6 x „C‟ Size batteries (R14/UM-2) (not supplied),
observing the correct polarities (+ / -).
2. Close the battery compartment by pushing in the two bottom tabs of the cover into the
corresponding recesses and then push the cover towards the device until the brackets audibly click
into place.
IMPORTANT NOTES:
If the device is operated exclusively by AC Mains power, or if it is not being used for more than a
month, please remove the batteries to avoid any damage through leaking batteries.
Replace the batteries if the volume of the device becomes lower or the sound becomes distorted.
10
11


