Notes:
- The recording speed is 1:1 and the same as the actual playing time of the playing source.
- To suspend the recording process, press the
“
CD 2
Play/Pause
” button (19)
,
“ bUSY “ will flash for a second
on the LCD display - a new recording track number will be generated and the recording will be paused. To
re-start the recording, press the
CD 2
“Play/Pause
” button (19) again, the play indicator “ “ will show on
the LCD display.
- When the capacity of the disc CD-R disc is full,
the word “FULL” will appear on the display – press the “
CD 2
Stop
” button (18) and change to another empty/blank CD-R disc to continue recording.
B. CD RECORDING SETTINGS (on the remote control only)
i) Recording level
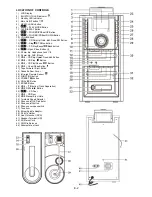
The recording level can be adjusted with the
REC LEVEL +/-
button (53/54) on the remote control to avoid distortion
if the record source level is too high.
ii
) Track Separation during CD Recording
It is possible to separate the music tracks that are being recorded track-after-track, by using either the
Auto
(a)
or
the
Manual (b)
mode before or during recording:
a) Auto mode
P
ress the “
AUTO/MANUAL
“ button (57) when getting ready to use the recording function, the LCD display will show
-20db, -30db, -40db, and the
“AUTO TRACK” icon will appear on the LCD display.
When the recording sound level has dropped below the -20 / -30 / -40dB (recording signal) respectively, the track
that is currently being recorded will end and at that moment a new track will be generated
– afterwards the unit will
automatically continue recording the next track.
Note:
It is recommended to set a lower recording level for a music source with clear performance (such as a CD or
MP3 via Aux-in), and set a higher recording level for a higher noise music source - such as a vinyl record (Phono):
“ – 20db or – 30db “ – for recording from Aux-in with a digital music source.
“ – 30db or – 40db “ – for recording from Tape or Phono mode.
“ ------- “ – auto mode off.
The above is just a recommendation, the actual performance varies and is affected by the differences in music
source. If the cut-off is always misjudged for certain music files, please use the
Manual Mode (b)
instead.
b) Manual mode
Press the “
CD 2
track separation “
“ button (28) on the front panel (or 57 on the Remote Control) once - at any
time during recording - in any mode - and the system will generate a new track and continue recording. The word
“bUSY “ will briefly show on the LCD display, which indicates the unit is successfully creating a new track.
iii) Finalizing a CD-R(W) disc
You must convert the CD-R(W) disc into a standard Audio CD before you can play it back in any another Audio CD
player, including
CD 1
.
This process is known as “
FINALIZING
” - a table of contents (TOC) will be written on the
CD at the same time. The procedure is as follows:
1. Select the
CD 2
function mode (24), ensure the recorded CD-R(W) disc to be finalized is in the
CD 2
tray.
2. Ensure the CD 1s not playing, and then press the
FINALIZE
button (26)
. “ Fin-d “ appears on the CD Recorder
operation display. (If you wish to quit the finalizing mode for any reason, press the
“
CD 2
Stop
” button (18).
3. Press the
“
CD 2
Play/Pause
” button (19) to start finalizing and the CD Recorder operation display will show
“ bUSY“ during this process.
4. After finalizing has completed, the CD tray
will open automatically and “OPEN“ will appear on the CD Recorder
operation display.
Notes:
- The time it takes to finalize a disc depends on the contents of the recorded disc - this may take up to 15 minutes,
but usually less.
- No buttons will be working during the finalizing process.
- Never turn the power off or unplug the power cord during the finalizing process.
- Once recorded on and after finalizing a disc
you cannot record again on a “CD-R” disc or erase any tracks.
-
Although a finalized “
CD-R
”
disc may play on other CD
Players, remember that a finalized “
CD-RW
”
disc is not
guaranteed to play on all other CD Players.
- Due to differences in compatibility with the unit of CD-R or CD-RW discs, please change to another brand, or
another disc in the pack, if you find the performance of the recording not satisfactory - this is not a malfunction.
iv) Erasing or Un-finalizing a CD-RW Disc
It is possible to erase the last recorded track or erase all track
s recorded on a “
CD-RW
” (re-writeable) disc.
Notes:
It is NOT possible to un-finalize or delete tracks from a
“
CD-R
”
disc
.
If you wish to erase the last track of a finalized
“
CD-RW
”
, you must UN-FINALIZE THE WHOLE disc first.
E-10


