
Sonnenkollektor
| 2014_V1
Page 3 of 14
EN
General Information
Solar Collector Location
Your solar collector needs a place with maximum possible sunlight.
You will need to position the heater lower than the pool’s water
level.
There has to be a safe distance away from the pool (safety dis-
tance).
The solar collector has to be set up in a way which enables maxi-
mum possible sunlight. Also consider an optimal angle to the sun,
but this angle should be not more than 30°.
The solar collector's fold-out supports enable it to be correctly an-
gled.
NOTE: The solar collector is to be installed between the filter system
(after the water is filtered) and the pool water inlet, AFTER the water
is filtered. The solar collector must come after the filter to prevent
buildup in the tubing.
Before installing the solar collector, make sure that the suction and
pressure hoses on the filter are closed or blocked to prevent water
flow.
Connecting Multiple Units
DO NOT install multiple units directly into the return line. Doing so
may damage the product and will void the warranty.
To install multiple units, you MUST use a bypass valve and “T” con-
nector with pressure gauge (not included, but optionally available
under the Article No. 00-60045 Bypass Set). The hose for a multiple
unit installation MUST be at least 32 or 38 mm diameter.
For further information regarding the installation of the solar collector
please contact our customer service or ask your local swimming pool
specialty retailer.
Maintenance
To prevent damage, the solar coils should always be covered with
the clear acrylic dome included in the package. The solar collector
should not be exposed to cold weather. Prior to the first frost, or at
the end of your swim season, the solar collector should be removed
from its connections to the pool and stored in a frost free location.
Technical Data
Dimensions: L 570mm x W 570mm x H 270mm
External dome: 560mm
Hose diameter: Inside 24mm – Outside 38mm
Weight: 8,0 Kilogram
Water capacity: 10 Liter
Max. pressure: 1 bar at 20°C
water passage: min. 2.000 l/h; max. 7.500 l/h
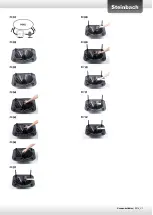
Installation
The system layouts below will help you install the solar collector(s) to
your above ground pool. Picture 1
Place the heater in a location where it will receive the greatest
amount of sunlight, but keep a sufficient minimum distance from
pool. NOTE: Hose connectors may come preinstalled.
Always ensure that the solar collector faces in a SOUTHERLY direc-
tion, and that solar radiation on the solar collector is unrestricted
throughout the day. Make sure that the solar radiation is not dis-
turbed by plants or other obstacles.
By expending the feets the optimum angle of the sunbeams can be
reached. We recommend that the same angle is used for roof instal-
lations.
Installation
Determine the correct position for setting up the solar col-
lector.
Switch off the pump ensure that no water can run out of
the pool by blocking or shutting off the pool inlet.
Attach the supports to the underside
of the solar collector. Picture 2,3
Attach the two connection adapters
to the underside of the solar collector. Picture 4,5,6
Connect the hoses between the filtration system, the solar
collector and the pool.
32 mm hose connection installation: This is pushed directly
over the connection adapter and secured with the hose
clamp. Picture 7
38 mm hose connection installation: The 32/38 mm rubber reducer is
first pushed over the connection adapter. Next, the 38 mm hose is
pushed over the reducer and secured with a hose clamp. Picture 8,9,10
Optional (not included) Intex special adapter: Intex special
adapter No. 00-40934, required for larger INTEX pools fit-
ted with a cartridge filter system (with a flow rate from
5,700 litres/hour). Picture 11,12
Ensure ALL hose connections are tight and the hoses are NOT
kinked or bent at severe angles. If the hoses are leaking, check to
make sure ALL of the parts that have O-Rings have them attached
and are screwed on tightly. DO NOT over tighten hose clamps (15
kg max torque).
Clean any dust or dirt from the hemispherical transparent
cover.
Open the pool inlet and switch on the pump.
Check the device and hose lines for tightness.
And now, with the help of the solar collector, you will be able to
save money and heat your water for free.
Winterizing
Drain all the water from the solar collector by disconnecting the
tubes. Store in a location protected from frost. Reconnect the pool
return tubes.
Do NOT allow standing water inside the solar collector to freeze.
Water expands as it freezes and can rupture the solar coils on the
heater.
Steinbach VertriebsgmbH,
Aistingerstrasse 2, 4311 Schwertberg, Österreich
FR/IT/CZ/HU/HR/SK/SLO/RO/BG/TR: +43 (0) 7262 / 61431-0
e-mail: service@steinbach.at
www.steinbach.at
Summary of Contents for speedsolar Series
Page 14: ...Sonnenkollektor 2014_V1...


