background image

9

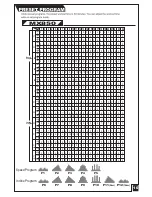
MX800

P1

P2

P3

P4

P5

 10  11  12  13  14  15  16  17  18  19  20  21  22  23  24  25  26  27 28  29  30

SEGMENT

P1

1   2   3   4   5   6   7   8   9

P2

P3

P4

P5

2   2   2   3   3   3   4   4   4   3   3   3   2   2   2   3   3   3   4   4   4   3   3   3   2   2   3   3   2   2
3   3   3   4   4   4   5   5   5   4   4   4   3   3   3   4   4   4   5   5   5   4   4   4   3   3   4   4   3   3
4   4   4   5   5   5   6   6   6   5   5   5   4   4   4   5   5   5   6   6   6   5   5   5   4   4   5   5   4   4
2   2   2   3   3   3   4   4   4   5   5   5   6   6   6   7   7   7   8   8   8   6   6   6   4   4   4   2   2   2
3   3   3   4   4   4   5   5   5   6   6   6   7   7   7   8   8   8   9   9   9   7   7   7   5   5   5   3   3   3
4   4   4   5   5   5   6   6   6   7   7   7   8   8   8   9   9   9                 8   8   8   6   6   6   4   4   4
2   2   2   4   4   4   6   6   6   8   8   8   7   7   7   6   6   6   5   5   5   4   4   4   3   3   3   2   2   2
3   3   3   5   5   5   7   7   7   9   9   9   8   8   8   7   7   7   6   6   6   5   5   5   4   4   4   3   3   3
4   4   4   6   6   6   8   8   8                 9   9   9   8   8   8   7   7   7   6   6   6   5   5   5   4   4   4
1   1   1   3   3   3   6   6   6   7   7   7   7   8   8   8   8   7   7   7   7   6   6   6   3   3   3   1   1   1  
2   2   2   4   4   4   7   7   7   8   8   8   8   9   9   9   9   8   8   8   8   7   7   7   4   4   4   2   2   2
3   3   3   5   5   5   8   8   8   9   9   9   9                     9   9   9   9   8   8   8   5   5   5   3   3   3  
1   1   1   7   7   7   2   2   2   9   9   9   9   2   2   2   2   9   9   9   9   2   2   2   7   7   7   1   1   1
2   2   2   8   8   8   2   2   2                     3   3   3   3                       2   2   2   8   8   8   2   2   2  
3   3   3   9   9   9   2   2   2                     4   4   4   4                       2   2   2   9   9   9   3   3   3  

P6

P7

P8

LEVEL 

1

LEVEL 

2

LEVEL  

3

LEVEL 

1

LEVEL 

1

LEVEL 

2

LEVEL 

1

LEVEL 

2

LEVEL  

2

LEVEL 

3

LEVEL  

3

LEVEL 

1

LEVEL  

2

LEVEL 

3

LEVEL 

2

LEVEL 

3

LEVEL  

3

LEVEL 

1

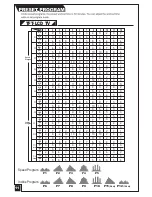
P9

2   2   2   3   3   3   4   4   4   3   3   3   2   2   2   3   3   3   4   4   4   3   3   3   2   2   3   3   2   2
3   3   3   4   4   4   5   5   5   4   4   4   3   3   3   4   4   4   5   5   5   4   4   4   3   3   4   4   3   3
4   4   4   5   5   5   6   6   6   5   5   5   4   4   4   5   5   5   6   6   6   5   5   5   4   4   5   5   4   4  

Speed

Program

10   10    10    

10   10    10   10

10   10    10   10

10   10    10    

10   10    10   10

11    11    11   11

11    11    11   11  

P10

P11

P12

Incline

Program

LEVEL 

1

LEVEL 

2

LEVEL  

3

LEVEL 

1

LEVEL 

1

LEVEL 

2

LEVEL 

1

LEVEL 

2

LEVEL  

2

LEVEL 

3

LEVEL  

3

LEVEL 

1

LEVEL  

2

LEVEL 

3

LEVEL 

2

LEVEL 

3

LEVEL  

3

LEVEL 

1

2   2   2   3   3   3   4   4   4   5   5   5   6   6   6   7   7   7   8   8   8   6   6   6   4   4   4   2   2   2
3   3   3   4   4   4   5   5   5   6   6   6   7   7   7   8   8   8   9   9   9   7   7   7   5   5   5   3   3   3
4   4   4   5   5   5   6   6   6   7   7   7   8   8   8   9   9   9                 8   8   8   6   6   6   4   4   4
2   2   2   4   4   4   6   6   6   8   8   8   7   7   7   6   6   6   5   5   5   4   4   4   3   3   3   2   2   2
3   3   3   5   5   5   7   7   7   9   9   9   8   8   8   7   7   7   6   6   6   5   5   5   4   4   4   3   3   3
4   4   4   6   6   6   8   8   8                 9   9   9   8   8   8   7   7   7   6   6   6   5   5   5   4   4   4
1   1   1   3   3   3   6   6   6   7   7   7   7   8   8   8   8   7   7   7   7   6   6   6   3   3   3   1   1   1
2   2   2   4   4   4   7   7   7   8   8   8   8   9   9   9   9   8   8   8   8   7   7   7   4   4   4   2   2   2
3   3   3   5   5   5   8   8   8   9   9   9   9                     9   9   9   9   8   8   8   5   5   5   3   3   3
1   1   1   7   7   7   2   2   2   9   9   9   9   2   2   2   2   9   9   9   9   2   2   2   7   7   7   1   1   1  
2   2   2   8   8   8   2   2   2                     3   3   3   3                     2   2   2   8   8   8   2   2   2
3   3   3   9   9   9   2   2   2                     4   4   4   4                     2   2   2   9   9   9   3   3   3
2   2   2   4   4   4   6   6   6   8   8   8   7   7   7   6   6   6   5   5   5   4   4   4   3   3   3   2   2   2
3   3   3   5   5   5   7   7   7   9   9   9   8   8   8   7   7   7   6   6   6   5   5   5   4   4   4   3   3   3
4   4   4   6   6   6   8   8   8                 9   9   9   8   8   8   7   7   7   6   6   6   5   5   5   4   4   4  
2   2   2   3   3   3   4   4   4   3   3   3   2   2   2   3   3   3   4   4   4   3   3   3   2   2   3   3   2   2
3   3   3   4   4   4   5   5   5   4   4   4   3   3   3   4   4   4   5   5   5   4   4   4   3   3   4   4   3   3
4   4   4   5   5   5   6   6   6   5   5   5   4   4   4   5   5   5   6   6   6   5   5   5   4   4   5   5   4   4

10   10    10    

10   10    10    

10   10    10   10

10   10    10   10

10   10    10   10

11    11    11   11

11    11    11   11

10   10    10    

(5km)

(10km)

P6

P7

P8

P9

P10

P12

(10km)

P11

(5km)

Speed Program:

Incline Program:

Summary of Contents for mx800

Page 1: ...re the enjoyable and trouble free operation of your new treadmill we strongly suggest you read this manual carefully and follow its recommendations MX850 MX800 Important Safety Instruction 1 Assembly Instruction 2 CONSOLE OPERATION 4 Preset Program 9 Utilizattion 12 Maintenance 13 2006 11 MX8 3 ...

Page 2: ...Never use extension cords between the treadmill and wall outlet 1 Pls pay attention the power cable need individual power source strictly can not be usage mutual power supply with another equipment ...

Page 3: ...e all of the parts out of the box remove all plastic bags and lay them out on the floor to become familiar with the compoents Make sure that you remove all parts packaged underneath the readmill You may need to slightly pick up the back of the treadmill to get better access to the parts on the bottom You will notice that the treadmill is completely assembled except for the handlebars and the displ...

Page 4: ...ght side FIG 4 5 Attach base frame covers 13 and 14 to match cover 12 on left base frame and then tighten with screws 23 24 FIG 4 6 Repeat the same on right side for base frame covers 15 16 17 FIG 5 Warning 1 Be careful to avoid machine tilt or getting hurt 2 Do not have the wire harness inside of handlebars get pinched 1 Attach and tighten screw and washer 21 22 on right left handlebars 2 Attach ...

Page 5: ...ing This will increase the speed in 0 1 km h or 0 1 mph SPEED down This will select program level in setting mode before starting This will decrease the speed in 0 1 km h or 0 1 mph ENTER This will set up each program into every step Quick keys for speed incline Quick keys for incline 4 6 8 10 Quick keys for speed 4 6 8 10 km hr If the light under each button is flashing it means to use that butto...

Page 6: ...his will select program level in setting mode before starting This will increase the speed in 0 1 km h or 0 1 mph SPEED down This will select program level in setting mode before starting This will decrease the speed in 0 1 km h or 0 1 mph ENTER This will set up each program into every step Quick keys for speed incline Quick keys for incline 4 6 8 10 Quick keys for speed 4 6 8 10 km hr If the ligh...

Page 7: ...2 Hold for 3 4 seconds enter into MENU to setup screen 1 In TV mode Press to select channel 2 In MENU mode Press to select item to set up 1 In TV Vedio MP3 mode Press to adjust volume 2 In MENU mode Press to adjust the value of each item POWER ON OFF Item BRIGHTNESS CONTRAST SHARP COLOR TINT MUTE TV SYSTEM AUTO SCAN RESET QUIT Description Adjust BRIGHTNESS 0 63 Adjust CONTRAST 0 63 Adjust SHARP 0 ...

Page 8: ...en press ENTER 3 Time window is flashing Using speed or incline arrow buttons to input workout time 10 99 Min 4 Press START MX850 1 Attach safety key and 12 Alpha bumericdisplay shows Welcome To Strength Master 2 Press Mode into Mannual aditing mode 12 Alpha numeric display shows SET TIME 3 Using speed or incline arrow buttons to input workout time 10 99 Min Press ENTER 4 Press START P1 P5 Automat...

Page 9: ...arming up the program compares actual heart rate and target heart rate every 12 15 seconds 3 If the actual heart rate is less than target heart rate increases speed by 0 2km h every time and increases incline by 1 once changing speed by 5 times If the actual heart rate is reached target heart rate decreases speed by 0 2km h every time and decreases incline by 1 once changing speed by 5 times 4 If ...

Page 10: ...4 4 5 5 5 6 6 6 5 5 5 4 4 5 5 4 4 Speed Program 10 10 10 10 10 10 10 10 10 10 10 10 10 10 10 10 10 10 11 11 11 11 11 11 11 11 P10 P11 P12 Incline Program LEVEL 1 LEVEL 2 LEVEL 3 LEVEL 1 LEVEL 1 LEVEL 2 LEVEL 1 LEVEL 2 LEVEL 2 LEVEL 3 LEVEL 3 LEVEL 1 LEVEL 2 LEVEL 3 LEVEL 2 LEVEL 3 LEVEL 3 LEVEL 1 2 2 2 3 3 3 4 4 4 5 5 5 6 6 6 7 7 7 8 8 8 6 6 6 4 4 4 2 2 2 3 3 3 4 4 4 5 5 5 6 6 6 7 7 7 8 8 8 9 9 9 ...

Page 11: ... 2 2 3 3 4 4 5 5 5 4 4 4 3 3 3 4 4 4 5 5 5 4 4 4 3 3 4 4 5 5 6 6 6 5 5 5 4 4 4 5 5 5 6 6 6 5 5 5 4 4 Speed Program 10 10 10 10 10 10 10 10 10 10 11 11 11 P10 P11 P12 Incline Program LEVEL 1 LEVEL 2 LEVEL 3 LEVEL 1 LEVEL 1 LEVEL 2 LEVEL 1 LEVEL 2 LEVEL 2 LEVEL 3 LEVEL 3 LEVEL 1 LEVEL 2 LEVEL 3 LEVEL 2 LEVEL 3 LEVEL 3 LEVEL 1 2 2 3 3 4 4 5 5 6 6 7 7 7 8 8 8 6 6 6 4 4 4 2 2 3 3 4 4 5 5 6 6 7 7 8 8 8 ...

Page 12: ... 7 8 9 7 8 9 6 7 8 5 6 7 4 5 6 3 4 5 2 3 4 7 8 9 7 8 9 1 2 3 3 4 5 6 7 8 8 9 10 8 9 10 7 8 9 7 8 9 6 7 8 3 4 5 1 2 3 9 10 11 9 10 11 1 2 3 7 8 9 2 2 2 2 3 4 2 3 4 9 10 11 9 10 11 2 2 2 7 8 9 1 2 3 4 5 6 3 4 5 2 3 4 2 3 4 3 4 5 2 3 4 3 4 5 4 5 6 3 4 5 2 3 4 3 4 5 2 3 4 5 6 7 6 7 8 2 3 4 3 4 5 4 5 6 7 8 9 7 8 9 8 9 10 8 9 10 6 7 8 4 5 6 2 3 4 8 9 10 8 9 10 2 3 4 4 5 6 6 7 8 7 8 9 7 8 9 6 7 8 5 6 7 4...

Page 13: ...situation I 12 ...
Page 14: ...ick Before proceeding ensure the treadmill power is off and unplugged Fold up the treadmill to upright position Loosen the running belt and then spray silicone on the inner side of running belt from both sides Ensure spray entire running belt Please see illustration After spraying please align the running belt and adjust the running belt tension on 13 GAP GAP ...

Page 15: ...ne value 1 When the position of incline is lower than middle level press Mode and incline up buttons Hold both buttons and the incline will be raised Release the two buttons till the incline position is up to middle level 2 When the position of incline is higher than middle level press Mode and incline down buttons Hold both buttons and the incline will be reduced Release the two buttons till the ...

Reviews: