10
11
12
13
14
15
16
17
1
2
3
4
5
6
7
8
9
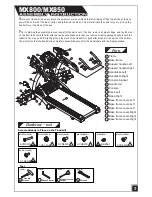
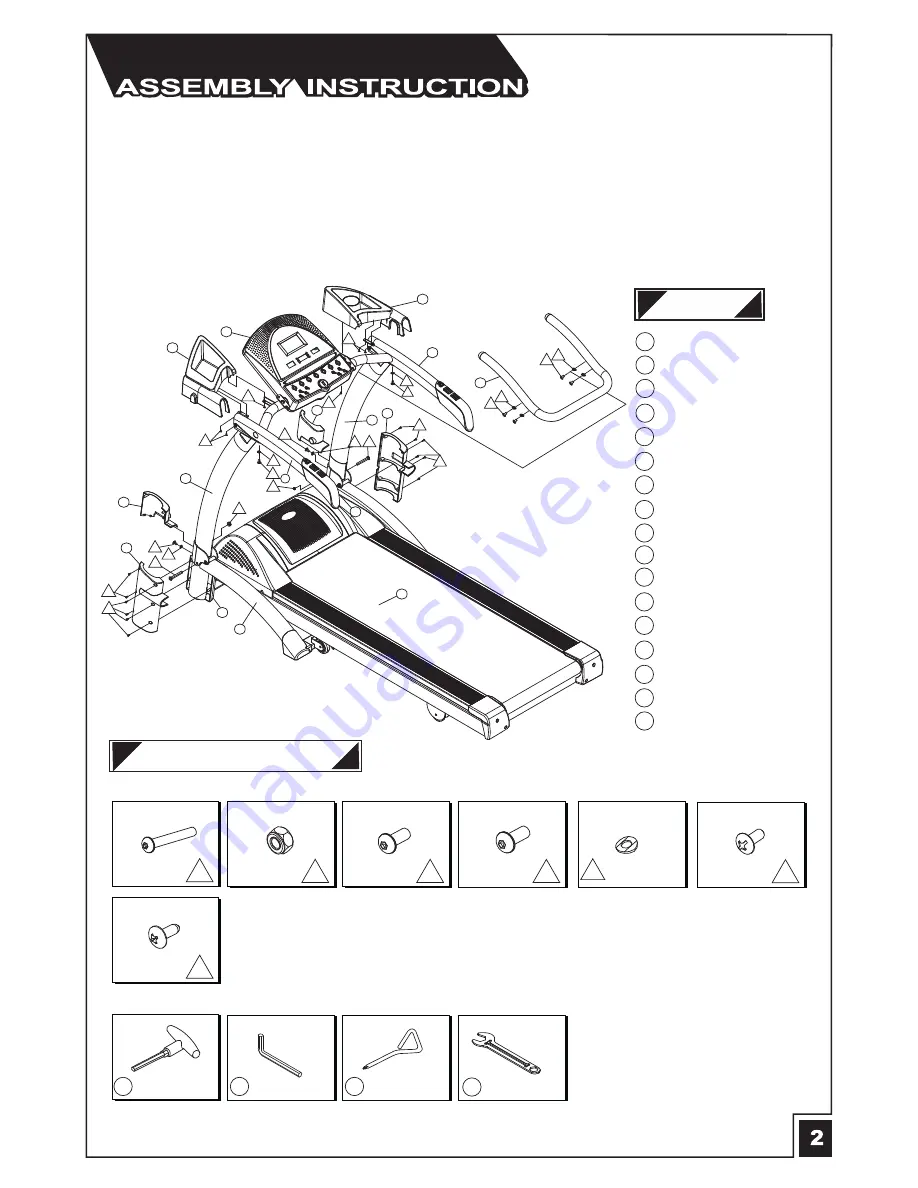
Frame
Base frame
Support handle-Left
Support handle-Right
Handlebar-Left
Handlebar-Right
Console bracket
Handle rail
Console
Rack-Left
Rack-Right
Base frame cover-Left
Base frame cover-Left
Base frame cover-Left
Base frame cover-Right
Base frame cover-Right
Base frame cover-Right
Parts
S
ince your treadmill is a heavy piece of equipment, we recommend that after taking off the top portion of the box,
you slit the corners of the lower carton and fold down the sides. This will eliminate the need for you to pick up the
treadmill over the sides of the box.
P
rior to starting the assembly process take all of the parts out of the box, remove all plastic bags, and lay them out
on the floor to become familiar with the compoents. Make sure that you remove all parts packaged underneath the
readmill. You may need to slightly pick up the back of the treadmill to get better access to the parts on the bottom.
You will notice that the treadmill is completely assembled except for the handlebars and the display window.
MX800/MX850
21
23
18
17
22
21
22
21
22
8
11
9
23
20
22
22
21
19
23
19
13
20
22
23
14
10
23
23
16
18
3
5
6
12
1
2
4
15
24
24
Hardware
、
tool
Screws Already in Place on the Treadmill
22
M8(12PCS)
washer
Tool
18
SCREWS
M10*75L(2PCS)
19
M10*10t(2PCS)
20
SCREWS
M8*15L(6PCS)
21
SCREWS
M8*20L(6PCS)
23
SCREWS
M4*10L(14PCS)
nylon nut
24
#8*5/8"L(4PCS)
SCREWS
28
(1PCS)
25
26
27
Wrench-6mm
T Handle
Wrench
Triangle screw
driver
Wrench
(1PCS)
(1PCS)
(1PCS)
Summary of Contents for mx800
Page 13: ...situation I 12 ...


