background image

10

10

(The  menu  options  are  for  an  advanced  adapter  operation).  (If  you  are  not          

familiar with them is recommended not to changed them, the image could be 

distorted or stop showing).

To navigate through the menu use the (up/down) keys to Select an option, left 

and  right  to  modify  and  SELECT  to  confirm  it.  Press  the  right  key  to  enter  a 

submenu. 

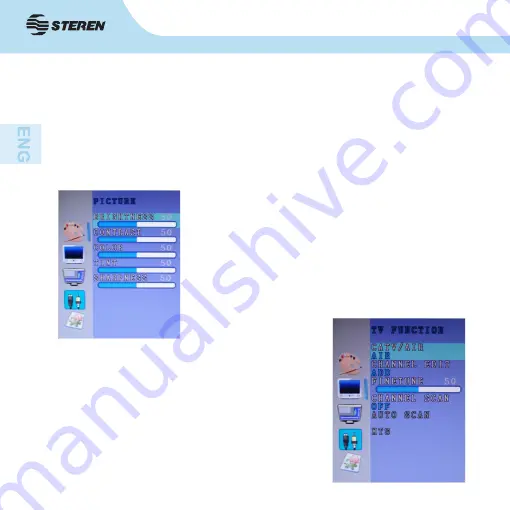
- PICTURE: Modifies the appearance of the image.

- BRIGHTNESS
- CONTRAST
- COLOR
- TINT
- SHARPNESS

-  TV  FUNCTION:  Select  the  type  of  signal  and    

control channels. 

-  TV  SYSTEMCATV/AIR:  Select  the  type  of  TV    

signal: air (AIR) or cable (CATV).

- CHANNEL EDIT: Adds or removes a channel.

-  FINE  TUNE:  Tune  a  channel  manually  to  get  a 

better signal. 
- CHANNEL SCAN: Search channels with signal.

Summary of Contents for COM-260

Page 1: ......

Page 2: ... cómo utilizar apropiadamente el producto Para apoyo compras y todo lo nuevo que tiene Steren visite nuestro sitio web www steren com Convertidor de monitor a TV La información que se muestra en este manual sirve únicamente como referencia sobre el producto Debido a actualizaciones pueden existir diferencias Por favor consulte nuestra página web www steren com para obtener la versión más reciente ...

Page 3: ... x 1024 1336 x 768 1440 x 900 1680 x 1050 y 1920 x 1200 p Control remoto Entradas frontales para audio y video Ajuste de parámetros de TV brillo tinte color etc Entrada y salida de audio Entrada y salida VGA Útil para convertir un monitor LCD o CRT en pantalla para TV videojuegos DVD VCR o en un monitor de seguridad ...

Page 4: ...ección de entrada 5 Selección de canal 6 Control de volumen Panel trasero 1 Entrada de corriente 2 Conector de salida VGA 3 Conector de entrada VGA 4 Entrada de video tipo RCA 5 Entrada de audio 3 5 mm 6 Salida de audio 3 5 mm 7 Conector para extensor infrarrojo incluido 8 Entrada de antena 1 2 3 4 5 6 1 2 3 4 5 6 7 8 ...

Page 5: ...do Selección de TV o PC 2 MUTE Silencio 3 INPUT Selección de fuente de video 4 CH Selección de canales 5 SELECT Selección 6 VOL Control de volumen 7 MENU Menú 8 EXIT Salida 9 Teclado numérico 1 2 3 4 4 5 6 6 7 8 9 10 11 13 14 15 16 12 ...

Page 6: ...trasero 10 FC SCAN Selección de un canal previamente guardado 11 FC MEMO Guarda un canal como favorito 12 RCL Regresar 13 OSD Muestra información en pantalla 14 PIP Muestra la imagen del televisor al mismo tiempo que se encuentra en el modo de PC 15 RES Cambia la resolución de la pantalla 16 CH VIEW Permite visualizar hasta 9 canales previamente vistos en una sola ventana ...

Page 7: ...ctor AUDIO IN El adaptador de corriente en la entrada DC 5 V y en un tomacorriente Encienda el monitor y presione INPUT en el convertidor o el control remoto para seleccionar el modo de CATV En la pantalla se mostrará la señal de la antena o del cable Para ver la pantalla de la computadora vuelva a presionar INPUT hasta ver la imagen El cable VGA incluido del monitor LCD o CRT al conector VGA IN E...

Page 8: ...te Encienda todos los equipos conectados y presione INPUT para seleccionar el modo YPBPR En la pantalla se mostrará la imagen de la consola de videojuegos DVD o VCR 6 CONEXIÓN MEDIANTE VIDEO COMPUESTO Conecte La consola de videojuegos DVD o VCR con un cable de video compuesto en el conector VIDEO IN El cable de audio estéreo rojo y blanco de la consola de videojuegos DVD o VCR en el panel frontal ...

Page 9: ...tilice CH para seleccionar la segunda opción TV FUNCTION Presione VOL para ver los submenús Seleccione la CHANNEL SCAN y presione Vol El equipo comenzará la búsqueda automática de señales de TV Una vez que la búsqueda termine podrá visualizar los canales de TV disponibles en su área 8 MENU Al presionar MENU en el control remoto aparecerá el siguiente recuadro excepto en el modo VGA ...

Page 10: ...quierda para modificarla y SELECT para confirmarla Presione la tecla de derecha para entrar a un submenú PICTURE Modifica el aspecto de la imagen BRIGHTNESS Brillo CONTRAST Contraste COLOR Color TINT Tinte SHARPNESS Nitidez TV FUNCTION Selecciona el tipo de señal y controla los canales TV SYSTEMCATV AIR Selecciona el tipo de señal de TV aérea AIR o por cable CATV CHANNEL EDIT Añade o quita un cana...

Page 11: ...esolución compruebe que su monitor pueda soportarla INPUT SOURCE Selecciona la fuente de video TV Muestra la imagen captada con una antena o por medio de un cable VIDEO Muestra la imagen de la entrada para video compuesto YPBPR Muestra la imagen de la entrada para video componente PC Muestra la imagen de la entrada VGA ...

Page 12: ...60 90 y 120 minutos RESET Restablece los parámetros de fábrica Haga las conexiones necesarias y encienda el convertidor Seleccione la fuente de video con INPUT ubicado en la parte superior del convertidor o en el control remoto Entrada de TV Seleccione el modo CATV En la pantalla aparecerá AIR o CATV según la configuración Para ir a un canal use las teclas numéricas Después de poner el número pres...

Page 13: ...ó el canal Si presiona CH VIEW verá un mosaico con imágenes de los últimos 9 canales sintonizados Puede seleccionar cualquiera de ellos presionando la tecla numérica correspondiente Entrada VGA Cuando el convertidor está apagado o cuando se selecciona el modo VGA podrá verse la imagen de la computadora En este modo podrá usar la función PiP Picture in Picture con la que será capaz de ver simultáne...

Page 14: ...lice la función AUTO SCAN para ver qué canales están disponibles en su área No hay sonido Revise las conexiones de audio Recuerde que debe hacer un puenteo entre el convertidor y la tarjeta de audio de la PC El control remoto no responde Asegúrese de estar apuntando directamente al receptor del convertidor y a una distancia no mayor a 6 metros Revise las baterías En caso de ser necesario cámbielas...

Page 15: ...VGA Conector de 8 pines Alimentación 5V 1000mA Salida VGA Conector de 15 pines Resoluciones 1024x768 1280x1024 1280x768 1366x768 1440x900 1680x1050 1920x1200p Salida de audio 3 5mm Salida de video RCA Adaptador de corriente Alimentación 100 240V 50 60Hz 150mA Salida 5V 1000mA Control Remoto Alimentación 3V 2XAAA El diseño del producto y las especificaciones pueden cambiar sin previo aviso ...

Page 16: ...sa comercial donde adquirió el producto Si la presente garantía se extraviara el consumidor puede recurrir a su proveedor para que le expida otra póliza previa presentación de la nota de compra o factura respectiva DATOS DEL DISTRIBUIDOR Nombre del Distribuidor __________________________ Domicilio ______________________________________ Producto ______________________________________ Marca ________...

Page 17: ......

Page 18: ...view this manual thoroughly to ensure proper installation and operation of this product For support shopping and everything new at Steren visit our website www steren com COM 260 TV to PC monitor adaptor and tuner The instructions of this manual are for reference about the product There may be differences due to updates Please check our web site www steren com to obtain the latest version of the i...

Page 19: ...8 1280x768 1280x1024 1336x768 1440x900 1680x1050 and 1920x1200 Remote control Front inputs for audio and video TV parameters adjustment brightness tint color etc Audio input and output VGA input output Useful to convert a LCD or CRT monitor screen for TV video games DVD VCR or a security monitor ...

Page 20: ...e panel 3 Power button 4 Input selection 5 Channel selection 6 Volume control Rear panel 1 Current input 2 VGA output connector 3 VGA input connector 4 RCA video input 5 3 5 mm audio input 6 3 5 mm audio output 7 Connector for extender included infrared 8 Antenna input ...

Page 21: ...1 POWER Turn on TV or PC selection 2 MUTE Silence 3 INPUT Video source selection 4 CH Channel selection 5 SELECT Selection 6 VOL Volume control 7 MENU Menu 8 EXIT Output 9 Keypad 1 2 3 4 4 5 6 6 7 8 9 10 11 13 14 15 16 12 ...

Page 22: ...ated on the back panel 10 FC SCAN Selection of a previously saved channel 11 MEMO FC Stores a channel as a favorite 12 RCL Return 13 OSD Displays information on the screen 14 PIP Displays the image on the TV at the same time found in PC mode 15 RES Change the screen resolution 16 CH VIEW To display the 9 previously viewed channels in a single window ...

Page 23: ...n the SPEAKER input The 3 5 mm male male cable of the audio card from the PC to the AUDIO IN connector Power input 5V DC to an electrical outlet adapter Turn on the monitor and press INPUT to select TV mode The image of the selected channel is displayed on the screen The included VGA cable of the LCD or CRT monitor to the VGA IN connector Cable 3 5 mm audio in the SPEAKER input Power input 5V DC t...

Page 24: ...utlet adapter Turn on all connected equipment and press INPUT to select YPbPr mode The image of video game console DVD or VCR is displayed on the screen 6 CONNECTION THROUGH COMPOSITE VIDEO Connect The video game console DVD or VCR with a composite video cable into the VIDEO IN connector Stereo audio cable red and white of console video games DVD or VCR in the front panel Power input 5V DC and an ...

Page 25: ...NU on the remote control Use CH to select a TV FUNCTION Press VOL to see submenus Select CHANNEL SCAN The device will begin the automatic search for TV signals Once the search is finished you can view the TV channels available in your area 8 MENU By pressing MENU on the remote control the following window will appear except in VGA mode ...

Page 26: ...ion left and right to modify and SELECT to confirm it Press the right key to enter a submenu PICTURE Modifies the appearance of the image BRIGHTNESS CONTRAST COLOR TINT SHARPNESS TV FUNCTION Select the type of signal and control channels TV SYSTEMCATV AIR Select the type of TV signal air AIR or cable CATV CHANNEL EDIT Adds or removes a channel FINE TUNE Tune a channel manually to get a better sign...

Page 27: ... selecting any resolution verify that your monitor supports it INPUT SOURCE Select the video source TV Displays the image captured with an antenna or a cable VIDEO Shows the image from the composite video input YPBPR Shows the image of the component video input PC Shows the image of the VGA input ...

Page 28: ...5 10 15 30 60 90 and 120 minutes RESET Reset default settings Make the necessary connections and turn on the converter Select the video source using INPUT button located at the top of the converter or on the remote control TV input Select the TV input The information on the screen should say AIR or CATV depending on configuration To go to a channel use the number keys After entering the number wai...

Page 29: ...n which the channel is stored If you press CH VIEW a mosaic with images of the last 9 tuned channels will be shown You can select any of them by pressing the corresponding number key VGA input When the converter is off or when you select VGA INPUT mode you can see the image from the computer In this mode you can use the PiP Picture in Picture function by which you will be able to see the image of ...

Page 30: ...e AUTO SCAN feature to see what channels are available in your area No sound Check the audio connections Remember that there must be a connection between the converter and the PC audio card The remote does not respond Make sure to be pointing directly to the receiver of the converter and at a distance not exceeding 6 metres Check the batteries If necessary change them by two AA batteries ...

Page 31: ...PC 3 5mm VGA input 8 pin connector Input 5V 1000mA VGA output 15pin VGA female Resolutions 1024x768 1280x1024 1280x768 1366x768 1440x900 1680x1050 1920x1200 Audio output 3 5mm Video output RCA AC power adapter Input 100 240V 50 60Hz 150mA Output 5V 1000mA Remote control Input 3V 2XAAA Product design and specifications are subject to change without notice ...

Page 32: ...y service at any of the addresses mentioned later THIS WARRANTY IS VOID IN THE NEXT CASES If the product has been damaged by an accident acts of God mishandling leaky batteries failure to follow enclosed instructions improper repair by unauthorized personnel improper safe keeping among others a The consumer can also claim the warranty service in the purchase establishment b If you lose the warrant...

Page 33: ......

Reviews: