background image

17

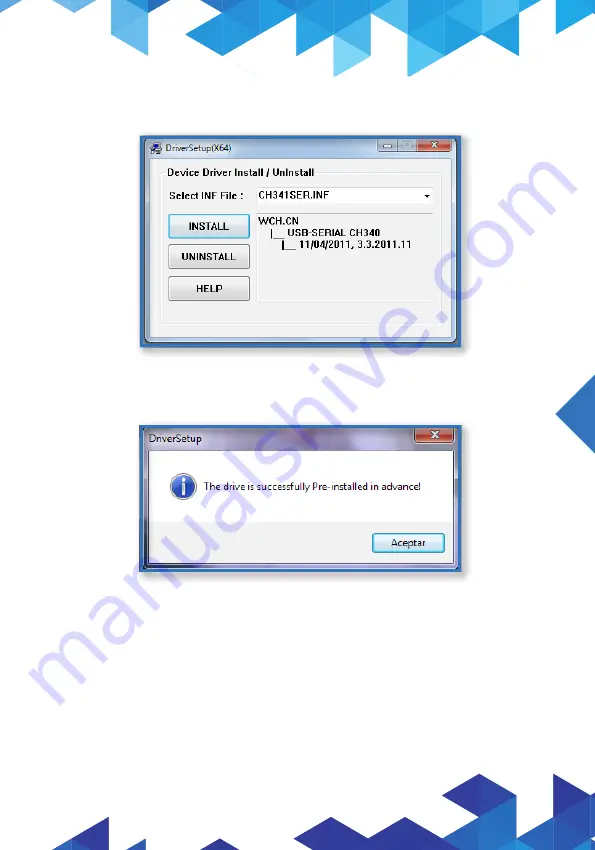
4. When appears the installation window, click INSTALL.

5. Once installed the driver, make click ok.

Summary of Contents for DIS-150

Page 1: ...1 Letrero led programable de 7 colores DIS 150 V0 0 0616v...

Page 2: ...ener la versi n m s reciente de este manual PRECAUCIONES Este producto NO es un juguete mant ngalo fuera del alcance de los ni os Este producto no est destinado para ser utilizado por personas con cap...

Page 3: ...3 CONTENIDO MODO DE USO Conecte el letrero El letrero encender autom ticamente...

Page 4: ...vo Pueden existir variaciones en el proceso de instalaci n de acuerdo con el sistema operativo y la 1 Inserte el disco de instalaci n en la PC 2 Ingrese a la carpeta DIS 150 USB TO RS323 DRIVER y ejec...

Page 5: ...5 4 Cuando aparezca la ventana de instalaci n d clic en INSTALL 5 Una vez instalado el driver haga clic en Aceptar...

Page 6: ...de la PC est conectado el letrero 1 Ingrese a Panel de Control y seleccione Administrador de dispositivos 2 Despliegue la pesta a Puertos COM y LPT Ubique en qu puerto est el letrero USB SERIAL CH340...

Page 7: ...En el CD busque la aplicaci n MiniLEDDisplayEditorV2 y d doble clic para ingresar 2 Ingrese al men de Ajustes y en la opci n Com Port Seleccione el puerto en el que est conectado el letrero 3 Presion...

Page 8: ...imaci n rea de edici n Mensajes que se van a transmitir 1 Haga clic en uno de los renglones de texto del rea de edici n 2 Escriba uno de los siguientes comandos para el color del texto CR ROJO CG CB C...

Page 9: ...desea cargar en el letrero Si desea que su mensaje tenga dos l neas introduzca el comando L1 al inicio y el comando L2 en donde iniciar la segunda l nea sin dejar espacios 6 D clic en para cargar los...

Page 10: ...Perfore e inserte taquetes y tornillos no incluidos Recuerde que los tornillos deben sobresalir de superficie para poder montar el letrero 3 Coloque los soportes sobre los orificios del letrero y ato...

Page 11: ...a no aplicarse ESPECIFICACIONES Alimentaci n 12 V 2 A Dimensiones 73 x 16 x 4 cm Convertidor de voltaje Alimentaci n 100 240 V 50 60Hz 800 mA Salida 12 V 2 A Consumo 20 W h Consumo en espera No aplica...

Page 12: ...mencionadas posteriormente ESTA P LIZA NO SE HAR EFECTIVA EN LOS SIGUIENTES CASOS 1 Cuando el producto ha sido utilizado en condi ciones distintas a las normales 2 Cuando el producto no ha sido operad...

Page 13: ...13 RGB PROGRAMMABLE LED PANEL DIS 150 V0 0 0616v...

Page 14: ...steren com mx to obtain the most actual version of this manual CAUTIONS This product is NOT a toy keep it away from children This device cannot be used by people with different abilities unless they h...

Page 15: ...15 CONTENT HOW TO USE Connect the panel The panel turns on automatically...

Page 16: ...s used a PC with Windows 10 may exists variations in the installation 1 Insert the installation CD into the PC 2 Enter to DIS 150 USB TO RS323 DRIVER and run the SETUP 3 If required you must give the...

Page 17: ...17 4 When appears the installation window click INSTALL 5 Once installed the driver make click ok...

Page 18: ...h USB port of the PC is connected the panel 1 Enter to Control Panel select Devices Manager 2 Check the option Ports COM y LPT Verify in which port is connected the panel USB SERIAL CH340 Example In t...

Page 19: ...n the programming app 1 In the CD search the MiniLEDDisplayEditorV2 2 Enter to the Settings menu and in the Com Port option Select the port where is connected the panel 3 Press Save and Exit to save c...

Page 20: ...ssages Exit Animation modes Edition area Transmitted messages 1 Make click in one of the text lines 2 Write one of the next commands to color the text CR RED CG CB CP GREEN BLUE PURPLE YELLOW CYAN WHI...

Page 21: ...hat you want to appears in the panel If you wish that your messages have two lines enter L1 at the begin ning and without leaving spaces enter the L2 command where starts the second line 6 Make click...

Page 22: ...he desired surface 2 Drill and insert anchors and screws not included Remember that the screws should be a little out of the surface to mount the panel 3 Place the supports into the holes of the panel...

Page 23: ...tion mode selected could be not applied SPECIFICATIONS Input 12 V 2 A Dimensions 73 x 16 x 4 cm Power converter Input 100 240 V 50 60Hz 800 mA Output 12 V 2 A Consumption 20 W h Stand by power consump...

Page 24: ...omer as well as warranty service at any of the addresses mentioned later THIS WARRANTY IS VOID IN THE NEXT CASES If the product has been damaged by an accident acts of God mishandling leaky batteries...

Page 25: ...25...

Page 26: ...26...

Reviews: