Product: Double shelf DVD/CABLE/SAT stand wall rack mount
Part number: STV-300
Brand: Steren
WARRANTY
This Steren product is warranted under normal usage against defects in workmanship and materials to the original purchaser for one year from
the date of purchase.
CONDITIONS
1.- This warranty card with all the required information, invoice or purchase ticket, product box or package, and product, must be presented when
warranty service is required.
2.- If the product stills on the warranty time, the company will repair it free of charge.
3.- The repairing time will not exceed 30 natural days, from the day the claim was received.
4.- Steren sell parts, components, consumables and accessories to customer, as well as warranty service, at any of the addresses mentioned later.
THIS WARRANTY IS VOID IN THE NEXT CASES:
If the product has been damaged by an accident, acts of God, mishandling, leaky batteries, failure to follow enclosed instructions, improper repair by
unauthorized personnel, improper safe keeping, among others.
a) The consumer can also claim the warranty service in the purchase establishment.
b) If you lose the warranty card, we can reissue it, if you show the invoice or purchase ticket.
RETAILER INFORMATION
Name of the retailer ____________________________________
Address _____________________________________________
Product ______________________________________________
Brand _______________________________________________
Serial number _________________________________________
Date of delivery _______________________________________
In case your product fails or have questions, please contact your nearest dealer. If you are in Mexico, please give a call to our Call Center.
01 800 500 9000
Before using your new Steren´s product, please read this instruction
manual to prevent any damage.
C A U T I O N S
H I G H L I G H T S
I N S T R U C T I O N S
C O N T E N T
I M P O R T A N T
• Do not modify any piece.
• Make sure to use wooden pegs when installing in concrete walls.
• At least two people are required for installation.
• Install the bracket in a flat wall.
• Please, alter installation, check that the bracket is firmly installed.
This double shelf can be used perfectly for your DVD, SAT receiver or digital devices. It has a
minimalistic design and shelf is made with 5 mm tempered glass.
The structure is manufactured in high resistance steel and includes all required tools for wall
installation.
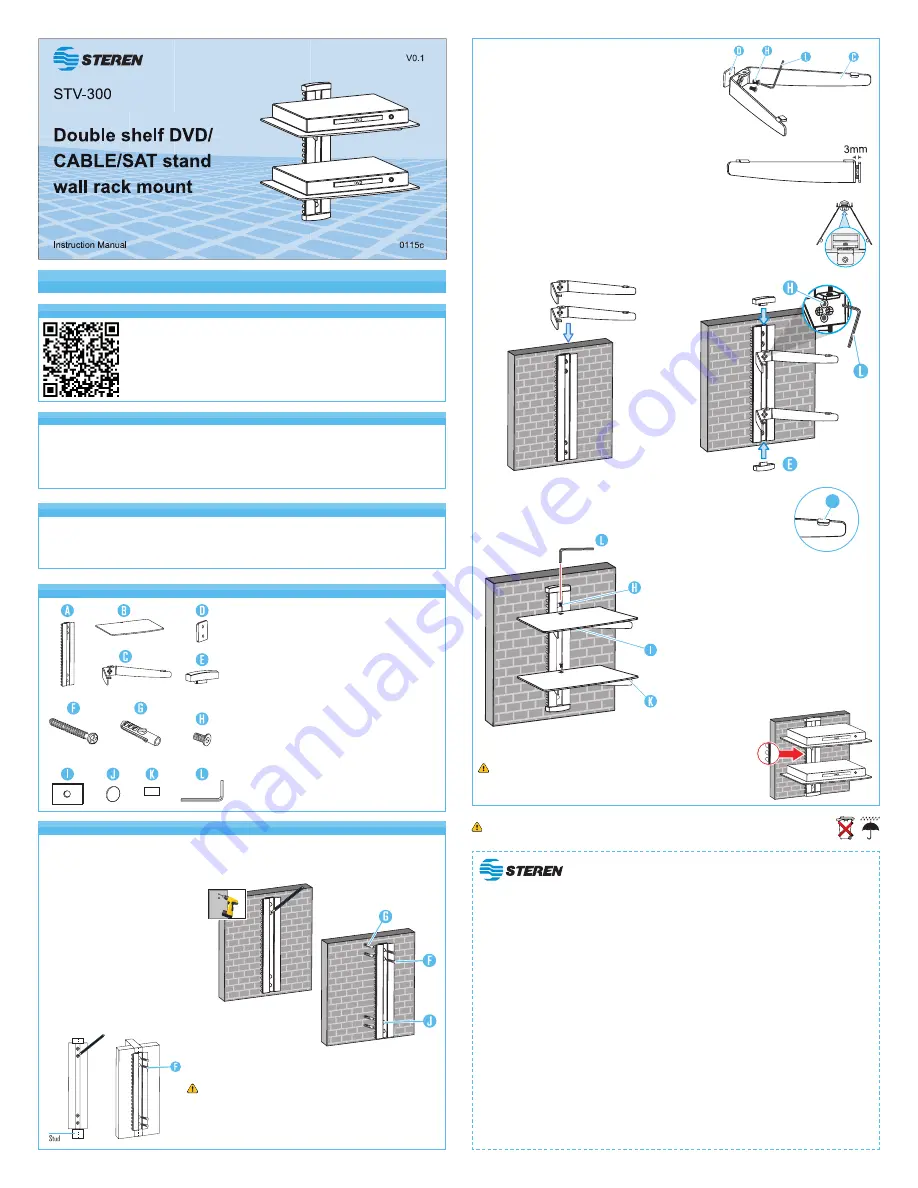
4. INSTALLING THE GLASS SHELF
2. ASSEMBLING THE GLASS HOLDERS
3. INSTALLING THE GLASS HOLDER
Place the two glass shelves (B) gently on the
two glass holders respectively.
Attach the glass shelves to the holders using
screws (H) and plastic bushes (I), tighten
screws with a 3 mm allen key.
To bring protection, fix the 4 small plastic protectors (K) on the holders.
Attach the connect piece (D) to the glass holder
(C) using two screws (H). Leave 3 mm before its
completely tighten.
Repeat the process with the second holder.
Insert the glass holders into the wall plate along the rail at the desired height
respectively, and tighten four screws with a 3 mm allen key.
Repeat the process with the second holder. And when the installation is finished
insert the decorative covers (E) to the top and bottom of wall plate.
Use cord management for good distribution of the cables.
A)
1 wall plate
B)
2 glass shelf
C)
2 glass holder
D)
2 connect piece
E)
2 covers
F)
4 ST5.5x50 screws
G)
4 plugs
H)
6 M5x10 screws
I)
2 big plastic protectors
J)
2 plastic covers
K)
4 small plastic protectors
L)
Allen key
The instructions of this manual are for reference about the product. There may
be differences due to updates.
Please check our website (www.steren.com) to obtain the latest version of the
instruction manual.
Product design and specifications are subject to change without notice.
1. SUPPORT INSTALLATION
After you drill holes, place plugs
inside of the holes. Finally, set the
support with screws (F).
To protect the installation place
four plastic covers (J) over the four
holes.
Locate the place where you want to install the support (A) and place it on the wall, then mark the
holes to drill. Please note that the support should be perfectly vertical.
If you want to install this product in a wooden wall, make sure
to mount the support on the stud centerline.
K


