background image

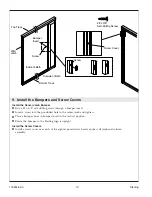
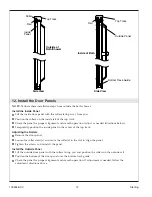
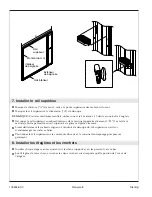
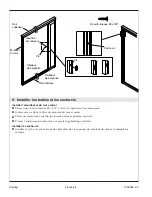
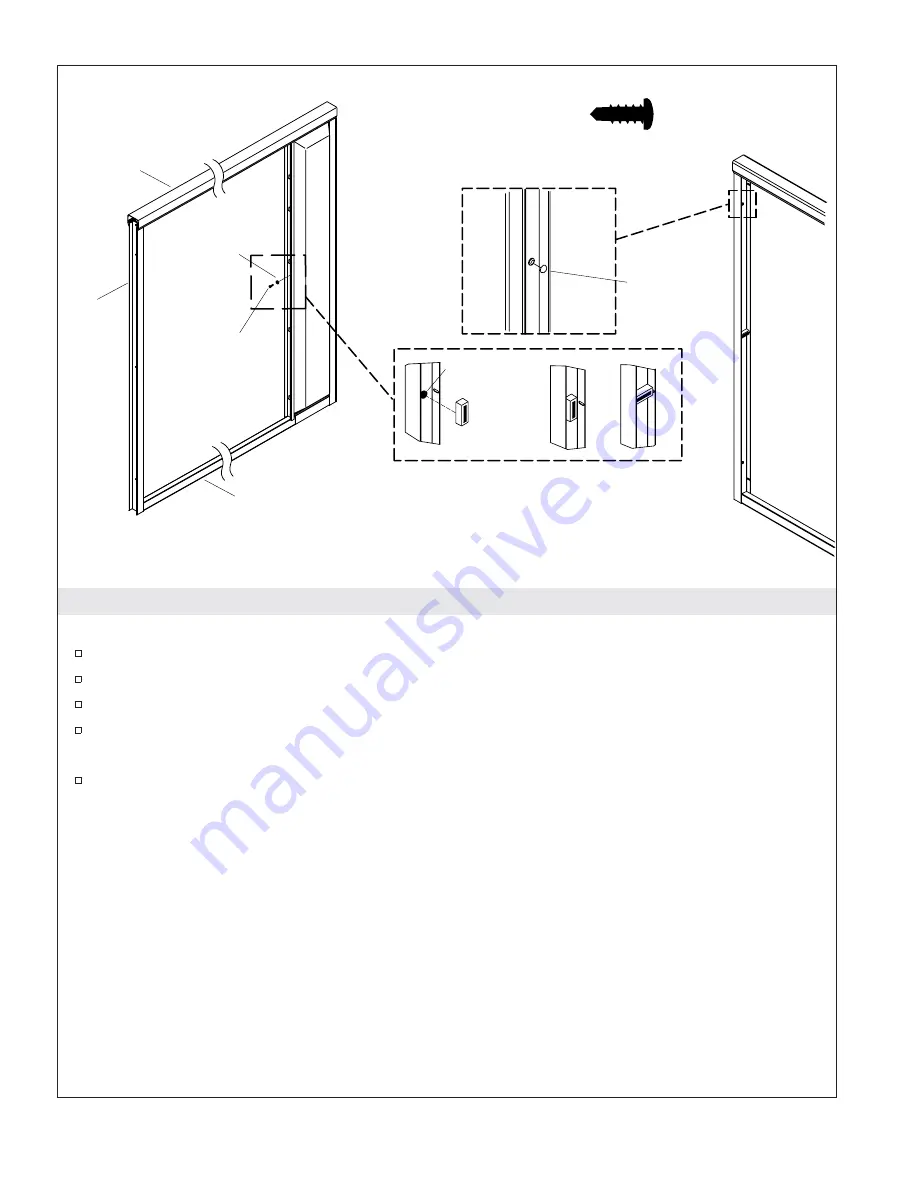
9. Install the Bumpers and Screw Covers

Install the Center Jamb Bumper

Run a #8 x 3/8

self drilling screw through a bumper insert.

Insert a screw into the pre-drilled hole in the center jamb and tighten.

Place a bumper on each bumper insert in the vertical position.

Rotate the bumper so the Sterling logo is upright.

Install the Screw Covers

Install a screw cover over each of the eight exposed screw heads on the wall jamb and column
assembly.

Bottom Track

Screw

Top Track

Bumper 
Insert

Wall
Jamb

Inside of Bath

Screw

Outside of Bath

#8 x 3/8" 
Self-Drilling Screw

Screw Cover

1035946-2-C

10

Sterling

Summary of Contents for 6065

Page 1: ...Installation Guide Bypass Shower Doors Français page Français 1 Español página Español 1 Models 6065 6075 1035946 2 C ...

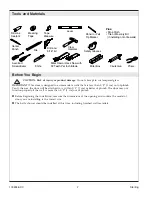
Page 2: ...of plumb Before beginning the installation measure the dimensions of the opening and confirm the model of door you are installing is the correct size The bath shower should be installed at this time including finished wall materials Safety Glasses Level Caulk Gun File Knife Pliers Miter Box Pencil or Felt Tip Marker Tape Measure Masking Tape Silicone Sealant Center Punch Assorted Screwdrivers Mite...

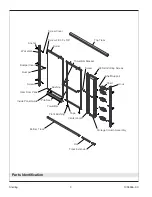
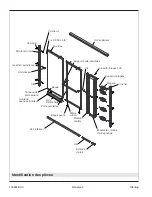
Page 3: ...et Screw 8 Self Drilling Screws Shelf Support Shelf Hook Top Track Tape Track Extension Rail Center Jamb Storage Column Assembly Front Bushing Bottom Track Towel Bar Wall Jamb Rear Door Panel Inside Panel Guide Bushing Pile Seal Anchor Bumper Insert Bumper Sterling 3 1035946 2 C ...

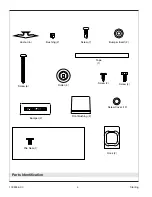
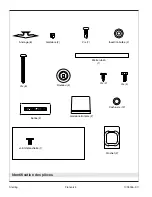
Page 4: ...Parts Identification Anchor 6 Bushing 2 Screw 7 Bumper Insert 2 1 Tape Screw 2 Screw Cover 12 Screw 4 Front Bushing 2 Hook 2 Pile Seal 1 Bumper 2 Screw 6 Roller 4 1035946 2 C 4 Sterling ...

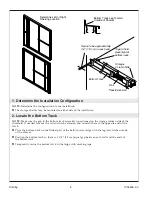
Page 5: ...the opposite end of the track Place the bottom track on the flattest part of the bath shower ledge with the leg toward the outside of the shower Position the bottom track so there is a 3 4 1 9 cm equal gap between each wall and the ends of the bottom track Temporarily secure the bottom track to the ledge with masking tape Determine Left or Right Shelving Location Space to be approximately 3 4 1 9 ...

Page 6: ...bs Make sure the wall jamb is properly situated Use a level to plumb the wall jamb vertically and mark the hole locations on the wall Repeat the procedure with the other wall jamb Remove the bottom track assembly and wall jambs NOTE When installing on ceramic tile use a center punch to nick the surface of the glaze Tap the center punch lightly with a hammer to avoid cracking the tile Lightly cente...

Page 7: ...the middle installation hole and tighten IMPORTANT Do not apply caulk or sealant to the bottom track at this time NOTE When positioning the bottom track make sure the track extension is positioned on the storage column side of the installation Position the bottom track assembly on the threshold Slide the bottom track assembly to each side until both ends are flush against the wall jambs Bottom Tra...

Page 8: ...me and tighten 6 Install the Center Jamb Determine which end of the center jamb is shaped to fit over the bottom track Place the center jamb on the bottom track with the shaped side down and the slots to the inside of the bath NOTE The self drilling screws will create their own hole No pilot hole is needed Secure the center jamb in place with three 8 x 3 8 self drilling screws Bottom Track Wall Ja...

Page 9: ... top track to slide into place easily Carefully file the rough edges smooth where the top track was cut taking care to avoid damaging finished surfaces Position the top track over the wall jambs and storage column and gently push down 8 Install the Shelving Units and Hooks Install each shelf by setting them down over two supports and pressing down On the shelf of your choice clip the two hooks ont...

Page 10: ...hten Place a bumper on each bumper insert in the vertical position Rotate the bumper so the Sterling logo is upright Install the Screw Covers Install a screw cover over each of the eight exposed screw heads on the wall jamb and column assembly Bottom Track Screw Top Track Bumper Insert Wall Jamb Inside of Bath Screw Outside of Bath 8 x 3 8 Self Drilling Screw Screw Cover 1035946 2 C 10 Sterling ...

Page 11: ...ews Lay the outside door panel on a flat surface taking care to protect the glass Cut two 7 8 2 2 cm long pieces of the provided adhesive tape Remove the protective paper from the adhesive side of the tape and attach the tape to the bushings Locate the bushings 1 4 6 mm from each end on the bottom frame of the outside panel With the bushing tab toward the bottom frame groove pinch the bushing legs...

Page 12: ...s Remove the door panel Loosen the roller screw s and move the roller s in the slot to align the panel Tighten the screws and reinstall the panel Install the Outside Panel Lift the outside door panel with the rollers facing you and position the rollers on the outside rail Position the bottom of the door panel over the bottom track guide Check the panel for proper alignment and smooth operation If ...

Page 13: ...on the panel guide with the holes in the inside panel bottom frame Loosely thread two 8 18 x 3 8 panhead screws through the guide and into the frame Do not tighten at this time Push the panel guide all the way into the bottom track Lower the guide slightly for clearance and tighten the screws Move the panel back and forth along the full width of the opening If the panel sticks loosen the screws an...

Page 14: ...ly caulk or sealant where the wall jambs and wall meet inside the shower the bottom track and wall jamb and bottom track and center jamb join the wall jamb and bottom track meet on the inside of the frame the center jamb and bottom track meet on the inside of the frame the area of the bottom track meets the threshold or bath on the outside of the door Seal on inside edge of wall jamb wall seam Ins...

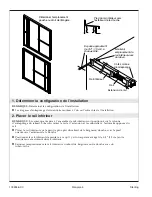
Page 15: ...s d aplomb Avant de commencer l installation mesurer les dimensions de l ouverture et confirmer que le modèle de la porte installée est de la bonne taille La baignoire douche doit être installée à ce moment ainsi que les matériaux du mur fini Lunettes de protection Niveau à bulle Pistolet à mastic Lime Couteau Pinces Boîte à onglets Perceuse et mèche de 5 16 Crayon à papier et feutre Marteau de ch...

Page 16: ...gère Étagère Crochet Rail supérieur Métre ruban Extension de rail Rail Montant central Ensemble colonne d entreposage Bague avant Rail inférieur Porte serviettes Montant du mur Panneau de porte arrière Guide du panneau intérieur Bague Joint d étanchéité Ancrage Insertion amortisseur Amortisseur 1035946 2 C Français 2 Sterling ...

Page 17: ...cation des pièces Ancrage 6 Garniture 2 Vis 7 Insertion butée 2 1 Métre ruban Vis 2 Cache vis 12 Vis 4 Garniture frontale 2 Crochet 2 Joint d étanchéité 1 Butée 2 Vis 6 Rouleau 4 Sterling Français 3 1035946 2 C ...

Page 18: ... sur le point le plus plat du rebord de la baignoire douche avec le pied orienté vers l extérieur de la douche Positionner le rail inférieur de manière à ce qu il y ait un espacement égal de 3 4 1 9 cm entre chaque mur et extrémité du rail inférieur Sécuriser temporairement le rail inférieur au rebord de baignoire ou de douche avec du ruban cache Déterminer l emplacement gauche ou droit de l étagè...

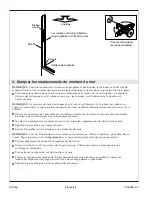
Page 19: ...verticalement les montants du mur et marquer les emplacements des trous dans le mur Répéter la procédure avec l autre montant Retirer l ensemble du rail inférieur et les montants du mur REMARQUE Lors de l installation sur des carreaux de céramique utiliser un poinçon pour ébrécher le vernis Taper le poinçon central légèrement avec un marteau pour éviter de craquer le carreau Perforer légèrement le...

Page 20: ...serrer IMPORTANT Ne pas appliquer de mastic d étanchéité au rail inférieur à ce moment REMARQUE En positionnant le rail inférieur s assurer que l extension du rail soit positionnée du côté de la colonne d entreposage de l installation Positionner l ensemble du rail inférieur sur le rebord Glisser l ensemble du rail inférieur sur chaque côté jusqu à ce que les deux extrémités soient nivelées contre...

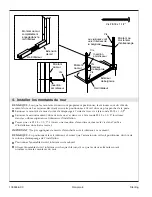
Page 21: ...ntant du mur central Déterminer quelle extrémité du montant central est profilée pour s ajuster sur le rail inférieur Placer le montant central sur le rail inférieur avec le côté profilé vers le bas et les rainures à l intérieur de la baignoire REMARQUE Les vis autoforeuses créeront leur propre trou Aucun trou pilote n est nécessaire Sécuriser le montant central en place avec trois vis autoforeuse...

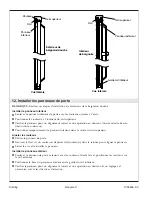
Page 22: ...place aisément Limer délicatement les rebords rugueux à l endroit de découpe du rail supérieur en évitant d endommager les surfaces finies Positionner le rail supérieur sur les montants du mur et la colonne d entreposage puis presser gentiment 8 Installer les étagères et les crochets Installer chaque étagère en les ajustant sur les deux supports et en les pressant vers le bas Sur l étagère de votr...

Page 23: ...ur chaque insertion dans la position verticale Pivoter l amortisseur de manière à ce que le logo Sterling soit droit Installer les cache vis Installer le cache vis sur chacune des huit têtes de vis exposées du montant du mur et l ensemble de colonne Rail inférieur Vis Cache vis Rail supérieur Montant du mur Insertion amortisseur Vis Intérieur de baignoire Extérieur de baignoire Vis auto foreuse 8 ...

Page 24: ...le panneau de porte extérieur sur une surface plate en veillant à protéger le verre Découper deux longues pièces de ruban adhésif de 7 8 2 2 cm Retirer le ruban protecteur de la face adhésive du ruban et l appliquer aux bagues Localiser les bagues 1 4 6 mm de chaque extrémité du cadre inférieur du panneau extérieur Avec la languette de la bague orientée vers la rainure du cadre inférieur pincer le...

Page 25: ... de porte Dévisser la les vis du rouleau et déplacer le s rouleau x dans la rainure pour aligner le panneau Serrer les vis et réinstaller le panneau Installer le panneau extérieur Soulever le panneau de porte extérieur avec les rouleaux faisant face et positionner les rouleaux sur le rail extérieur Positionner la base du panneau extérieur sur le guide du rail inférieur Vérifier le panneau pour un ...

Page 26: ...r les rainures du guide de panneau avec les orifices dans le panneau intérieur du cadre inférieur Visser légèrement deux vis à têtes rondes 8 18 x 3 8 à travers le guide et dans le cadre Ne pas serrer la vis pour l instant Presser le guide du panneau à fond dans le rail inférieur Baisser le guide légèrement pour dégager de l espace puis serrer les vis Déplacer le panneau au long de la longueur tot...

Page 27: ...Installer le guide de panneau cont Installer des cache vis sur les vis du guide de panneau Sterling Français 13 1035946 2 C ...

Page 28: ... montants du mur et le mur se rencontrent à l intérieur de la douche le rail inférieur le montant du mur et le rail inférieur et montant central se joignent le montant du mur et le rail inférieur se joignent à l intérieur du cadre le montant central du mur et le rail inférieur se joignent à l intérieur du cadre l extérieur du rail inférieur rencontre le rebord ou la baignoire à l extérieur de la p...

Page 29: ...enzar la instalación mida las dimensiones de la abertura y verifique que el modelo de puerta que va a instalar sea del tamaño correcto La bañera ducha debe estar instalada en este momento incluyendo los materiales de la pared acabada Lentes de seguridad Nivel Pistola para calafatear Lima Cuchillo Pinzas Caja de ingletes Lona Broca para azulejo o mampostería si se instala en paredes de azulejo Más ...

Page 30: ...antes del 8 Soporte del estante Estante Gancho Carril superior Cinta adhesiva Extensión del carril Riel Jamba central Conjunto de la columna estantería Buje frontal Carril inferior Toallero de barra Jamba mural Panel posterior de la puerta Guía del panel interior Buje Sello de felpa Anclaje Inserto del tope Tope 1035946 2 C Español 2 Sterling ...

Page 31: ... de las piezas Anclaje 6 Buje 2 Tornillo 7 Inserto del tope 2 1 Cinta adhesiva Tornillo 2 Cubre tornillo 12 Tornillo 4 Buje frontal 2 Gancho 2 Sello de felpa 1 Tope 2 Tornillo 6 Rueda 4 Sterling Español 3 1035946 2 C ...

Page 32: ...ior en la parte más plana del reborde de la bañera ducha con la pata hacia el exterior de la ducha Coloque el carril inferior de manera que haya una separación de 3 4 1 9 cm entre cada carril y los extremos del carril inferior Fije provisionalmente el carril inferior al reborde con cinta de enmascarar Determine la ubicación de la columna a la izquierda o a la derecha Extensión del carril Riel Carr...

Page 33: ...orrectamente Utilice un nivel para aplomar verticalmente la jamba mural y marque los lugares de los orificios en la pared Repita este procedimiento con la otra jamba mural Retire el montaje del carril inferior y las jambas murales NOTA Cuando instale en azulejos de cerámica utilice un punzón de marcar para marcar levemente la superficie vidriada Golpee el punzón de marcar levemente con un martillo...

Page 34: ...orificio central y apriete IMPORTANTE No aplique sellador al carril superior en este momento NOTA Al colocar el carril inferior asegúrese de que la extensión del carril esté colocada en el lado de la columna estantería Coloque el montaje del carril inferior en el umbral Deslice el montaje del carril inferior a cada lado hasta que ambos extremos queden al ras de las jambas murales Carril inferior J...

Page 35: ...ine el extremo de la jamba central que está contorneado para encajar sobre el carril inferior Coloque la jamba central sobre el carril inferior con el lado contorneado hacia abajo y las ranuras hacia el interior de la bañera NOTA Los tornillos autoperforantes crearán su propio orificio No es necesario taladrar orificios guía Fije la jamba central en su lugar con tres tornillos autoperforantes del ...

Page 36: ...para que el carril superior encaje con facilidad Con cuidado lime el filo áspero del corte en el carril superior teniendo cuidado de no dañar las superficies acabadas Coloque el carril superior sobre las jambas murales y la columna estantería y presione suavemente 8 Instale la estantería y los ganchos Instale los estantes colocándolos sobre dos soportes y presionando hacia abajo En el estante que ...

Page 37: ...pieza de inserción del tope en posición vertical Gire el tope de manera que el logotipo de Sterling esté colocado correctamente Instale los cubre tornillos Instale un cubre tornillo en cada una de las ocho cabezas de tornillo expuestas en el conjunto de la jamba mural y columna Carril inferior Tornillo Cubre tornillo Tornillo autoperforante del 8 x 3 8 Carril superior Inserto del tope Jamba mural ...

Page 38: ... 32 x 3 8 Coloque el panel exterior de la puerta sobre una superficie plana con cuidado para proteger el vidrio Corte dos trozos de 7 8 2 2 cm de la cinta adhesiva provista Retire el papel protector del lado adhesivo de la cinta y pegue la cinta a los bujes Coloque los bujes a 1 4 6 mm de cada extremo del marco inferior del panel exterior Con la lengüeta del buje orientada hacia la ranura del marc...

Page 39: ...el tornillo o tornillos de la rueda o ruedas y mueva la rueda o ruedas en la ranura para alinear el panel Apriete los tornillos y vuelva a instalar el panel Instale el panel exterior Levante el panel exterior de la puerta con las ruedas orientadas hacia usted y coloque las ruedas en el riel exterior Coloque la parte inferior del panel de la puerta sobre la guía del carril inferior Verifique que el...

Page 40: ... marco inferior del panel interior Atornille sin apretar dos tornillos de cabeza redonda del 8 18 x 3 8 a través de la guía y en el marco No apriete en este momento Empuje la guía del panel por completo en el carril inferior Baje la guía un poco para dejar espacio y apriete los tornillos Mueva el panel de un lado a otro sobre todo el ancho de la abertura Si el panel se atora afloje los tornillos y...

Page 41: ...s murales y la pared en el interior de la ducha se unen el carril inferior y la jamba mural y el carril inferior y la jamba central hacen contacto la jamba mural y el carril inferior en el interior del marco hacen contacto la jamba central y el carril inferior en el interior del marco hacen contacto el área del carril inferior y el umbral o la bañera en el exterior de la puerta Selle desde el inte...

Page 42: ...1035946 2 C ...

Page 43: ...1035946 2 C ...

Page 44: ...USA 1 800 STERLING 1 800 783 7546 México 001 877 680 1310 SterlingPlumbing com 2009 Kohler Co 1035946 2 C ...
Reviews: