background image

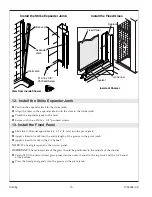
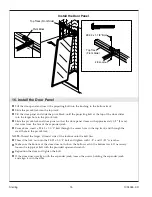
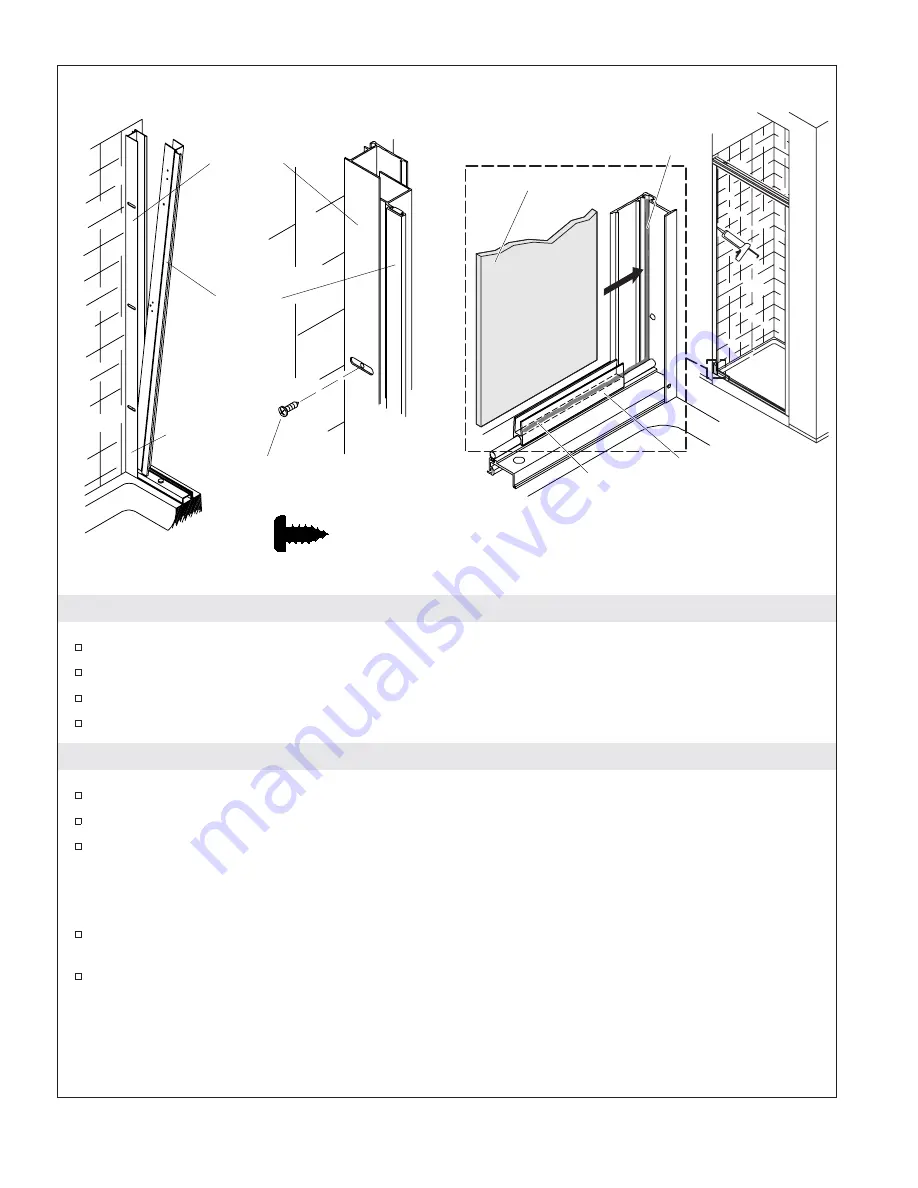
12. Install the Strike Expander Jamb

Position the expander jamb in the strike jamb.

Align the holes in the expander jamb with the slots in the strike jamb.

Plumb the expander jamb with a level.

Secure with three #10-16 x 3/8

panhead screws.

13. Install the Fixed Panel

Slide the U-Channel approximately 3/16

(5 mm) into the pivot jamb.

Apply a bead of caulk into the entire length of the groove in the pivot jamb.

Apply a bead of caulk in the U-Channel.

NOTE:

The fixed glass panel is the narrow panel.

IMPORTANT!

The textured side of the glass should be positioned to the outside of the shower.

Carefully lift the narrow fixed glass panel into the outer channel in the top track and the U-Channel
at the bottom.

Press the fixed panel gently into the groove in the pivot jamb.

#10-16 x 3/8" 
Panhead Screw

Expander 
Jamb

View from Inside Shower

Wall Jamb

Strike Jamb

Install the Strike Expander Jamb

Fixed Panel

Install the Fixed Glass

Inside of Shower

Sealant

U-Channel

Sealant

Sterling

13

1034026-2-D

Summary of Contents for Pivot Shower Doors SP1500D Series

Page 1: ...Installation Guide Pivot Shower Doors Français page Français 1 Español página Español 1 SP1500D Series 1034026 2 D ...

Page 2: ...dd the length of the case to the measurement or measure in a manner that excludes the case Your new Sterling door can be installed with the door opening to either the right or left Install the door with the pivot side away from the showerhead for best results Before starting the installation lay out and identify all of the parts Inspect them for damage Closely follow the instructions pertaining to...

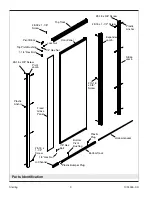
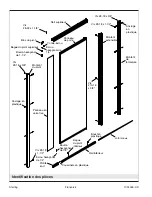
Page 3: ... 8 18 x 1 1 2 Screw 8 18 x 3 8 Screw 8 18 x 3 8 Screw Top Pivot Bushing Plastic Bumper Plug U Channel 1 1 4 Hex Bolt Lock Nut 1 4 Hex Nut Pivot Jamb Plastic Anchor Plastic Anchor Expander Jamb Strike Jamb Door Panel Top Track Pivot Block Plastic Plug Bottom Pivot Bushing Hollow Gasket Bottom Track Sterling 3 1034026 2 D ...

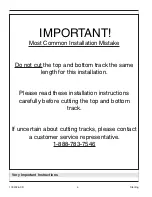
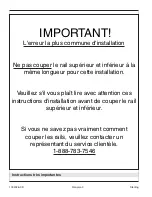
Page 4: ...ut the top and bottom track the same length for this installation Please read these installation instructions carefully before cutting the top and bottom track If uncertain about cutting tracks please contact a customer service representative 1 888 783 7546 1034026 2 D 4 Sterling ...

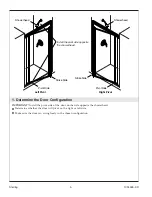
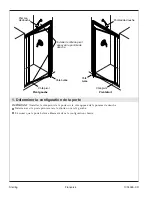
Page 5: ...the showerhead Determine whether the door will pivot on the right or left side Make sure the door can swing freely in the chosen configuration Pivot Side Right Pivot Showerhead Strike Side Pivot Side Left Pivot Showerhead Strike Side Install the pivot side opposite the showerhead Sterling 5 1034026 2 D ...

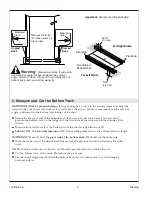
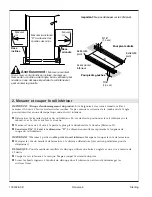
Page 6: ...sure from the pivot side of the bottom track Mark and cut the strike side Mark the strike side at the determined distance see the previous section to determine the strike side NOTE For best results use a miter box and 32 teeth per inch hacksaw to make the cut Cut the bottom track at the mark Do not cut the pivot end File the rough edges smooth where the bottom track was cut taking care to avoid da...

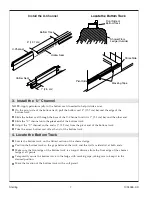
Page 7: ...ack 4 Locate the Bottom Track Locate the bottom track on the flattest section of the shower ledge Position the bottom track so the gaps between the track and the wall are identical at both ends Make sure the front edge of the bottom track is an equal distance from the front edge of the shower ledge at all points Temporarily secure the bottom track to the ledge with masking tape taking care to keep...

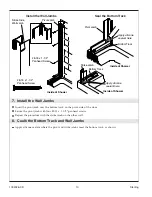
Page 8: ...punch the hole locations Drill a 3 16 hole at each mark Use a masonry bit for ceramic tile Insert plastic anchors in each hole Place the pivot jamb against the wall opposite the strike jamb and fit it over the bottom track Make sure the wide side is toward the outside of the shower Repeat the strike jamb procedures with the pivot jamb Thoroughly clean the shower floor ledge and wall Position the s...

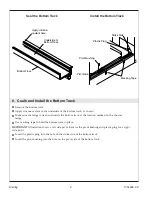
Page 9: ...in place IMPORTANT Illustration shows a left side pivot Reverse the pivot bushing and plastic plug for a right side pivot Insert the plastic plug into the hole on the strike side of the bottom track Insert the pivot bushing into the hole on the pivot side of the bottom track Underside of Bottom Track Bottom Track Seal the Bottom Track Apply silicone sealant here Masking Tape Strike Side Plastic Pl...

Page 10: ...he Bottom Track and Wall Jambs Apply silicone sealant where the pivot and strike jambs meet the bottom track as shown 8 18 x 1 1 2 Panhead Screw 8 18 x 1 1 2 Panhead Screw Strike Side Wall Jamb Install the Wall Jambs Pivot Jamb Inside of Shower Strike Jamb Inside of Shower Inside of Shower Pivot Jamb Bottom Track Bottom Track Seal the Bottom Track Apply silicone sealant here Apply silicone sealant...

Page 11: ... hacksaw blade and miter box Make the cut on the inside of the mark with the blade as close as possible to the mark Cut the top track at the mark on the strike end File the rough edges smooth where the bottom track was cut taking care to avoid damaging finished areas 10 Install the Blocks Insert the smaller end of the pivot block in the pivot side of the top track Important Do not cut on the pivot...

Page 12: ...ck to the pivot jamb with a 8 18 x 3 8 panhead screw Drill a 1 8 diameter hole through the groove in the top track and the strike jamb Secure the top track and the strike jamb with a 8 18 x 3 8 panhead screw To be drilled Top Track Strike Jamb Pivot Jamb Pre Drilled 8 18 x 3 8 Panhead Screw Inside of Shower Install theTopTrack 1034026 2 D 12 Sterling ...

Page 13: ...he pivot jamb Apply a bead of caulk in the U Channel NOTE The fixed glass panel is the narrow panel IMPORTANT The textured side of the glass should be positioned to the outside of the shower Carefully lift the narrow fixed glass panel into the outer channel in the top track and the U Channel at the bottom Press the fixed panel gently into the groove in the pivot jamb 10 16 x 3 8 Panhead Screw Expa...

Page 14: ...bushing in the bottom track at the determined distance Securely tighten the nut with the provided open end wrench 15 Install the Top Pivot on the Door Panel Insert the top pivot bushing over the 1 1 4 hex bolt and partially thread the 1 4 hex nut onto the bolt Insert this assembly into the track on the top frame of the door panel Measure distance A from the edge of the door on the handle side Subt...

Page 15: ...he center hole in the top track and through the small hole in the pivot block NOTE Thread the larger all metal side of the locknut onto the bolt first Thread the lock nut onto the 8 32 x 1 1 8 bolt and tighten with 1 4 and 11 32 wrenches Make sure the bottom of the door does not rub on the hollow seal in the bottom track If necessary loosen the top pivot bolt with the provided open end wrench Repo...

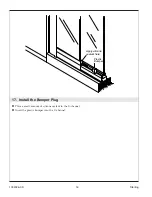
Page 16: ...17 Install the Bumper Plug Place a small amount of silicone sealant in the U channel Insert the plastic bumper into the U channel Plastic Bumper Apply silicone sealant here 1034026 2 D 16 Sterling ...

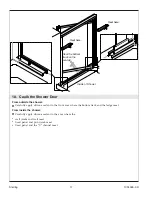
Page 17: ...e the bottom track and the ledge meet From inside the shower Carefully apply silicone sealant to the area where the wall jambs and wall meet fixed panel and pivot jamb meet fixed panel and the U channel meet Seal the bottom track on the outside Seal here Seal here Inside of Shower Sterling 17 1034026 2 D ...

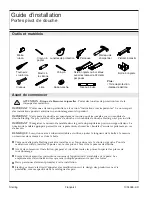
Page 18: ...sure ou mesurer de manière à exclure la boîte Votre nouvelle porte Sterling peut être installée avec l ouverture vers la droite ou gauche Pour de meilleurs résultats installer la porte avec le côté pivot à l écart de la pomme de douche Avant de commencer l installation préparer et identifier toutes les pièces Inspécter les pièces de tout dommage Suivre attentivement les instructions concernant l a...

Page 19: ... 8 18 x 3 8 Bague du pivot supérieur Coussinets en plastique Profilé en U Boulon hexagonal de 1 1 4 Contre écrou Écrou hexagonal de 1 4 Montant du pivot Ancrage en plastique Ancrage en plastique Montant extensible Montant de fermeture Panneau de porte Rail supérieur Bloc du pivot Bouchon plastique Bague du pivot inférieur Joint creux Rail inférieur Sterling Français 2 1034026 2 D ...

Page 20: ... à la même longueur pour cette installation Veuillez s il vous plaît lire avec attention ces instructions d installation avant de couper le rail supérieur et inférieur Si vous ne savez pas vraiment comment couper les rails veuillez contacter un représentant du service clientèle 1 888 783 7546 1034026 2 D Français 3 Sterling ...

Page 21: ...che Déterminer si la porte pivotera vers la droite ou vers la gauche S assurer que la porte balance librement dans la configuration choisie Côté pivot Pivot droit Pomme de douche Côté butée Côté pivot Pivot gauche Pomme de douche Côté butée Installer le côté du pivot opposé à la pomme de douche Sterling Français 4 1034026 2 D ...

Page 22: ...fermeture Marquer le côté du montant de fermeture à la distance déterminée voir section précédente pour le déterminer REMARQUE Pour de meilleurs résultats de découpe utiliser une boîte à onglets et une scie à métaux de 32 dents Couper le rail inférieur à la marque Ne pas couper l extrémité du pivot Limer les bords rugueux à l endroit de découpe du rail inférieur en évitant d endommager les surface...

Page 23: ...rieur 4 Déterminer l emplacement du rail inférieur Localiser le rail inférieur sur la section la plus plate du rebord de la douche Positionner le rail inférieur de manière à ce que les espaces entre le rail et le mur soient identiques aux deux extrêmités S assurer que le rebord avant du rail inférieur soi à égale distance de celui de la douche à tous les points Sécuriser temporairement le rail inf...

Page 24: ... trous Percer un trou de 3 16 à chaque marque Utiliser une mèche à maçonnerie pour du carrelage en céramique Insérer des pièces d ancrage en plastique dans chaque trou Placer le montant du pivot contre le mur opposé au montant de fermeture et le mettre en place sur le rail inférieur S assurer que le côté le plus large soit orienté vers l extérieur de la douche Répéter la procédure de butée de port...

Page 25: ...ace IMPORTANT L illustration indique un pivot gauche Inverser la garniture du pivot et le bouchon en plastic pour un pivot droit Insérer le bouchon plastique dans le trou sur le côté de la gâche du rail inférieur Insérer le bouchon plastique dans le trou sur le côté de la gâche du rail inférieur Dessous du rail inférieur Appliquer du mastic à la silicone ici Rail inférieur Mastiquer le rail inféri...

Page 26: ...pliquer du mastic à la silicone là où les montants pivot et de fermeture rencontrent le rail inférieur tel qu illustré Vis à tête ronde 8 18 x 1 1 2 Vis à tête ronde 8 18 x 1 1 2 Côté butée du montant du mur Installer les montants du mur Montant pivot Intérieur de la douche Appliquer du mastic à la silicone ici Montant de fermeture Intérieur de la douche Intérieur de la douche Montant pivot Appliq...

Page 27: ...Faire la découpe à l intérieur de la marque avec la lame aussi proche que possible de la marque Couper le rail supérieur à la marque de l extrémité de fermeture Limer les bords rugueux à l endroit de découpe du rail inférieur en évitant d endommager les surfaces finies 10 Installer les blocs Insérer l extrémité la plus petite de la butée du pivot dans le côté du pivot du rail supérieur Important N...

Page 28: ... pivot avec une vis à tête arrondie 8 18 x 3 8 Percer un trou de diamètre 1 8 à travers la rainure du rail supérieur et du montant de la butée Sécuriser le rail supérieur et le montant de butée avec une vis à tête ronde 8 18 x 3 8 A perforer Rail supérieur Montant de butée Montant du pivot Vis à tête ronde 8 18 x 3 8 Intérieur de la douche Installer le rail supérieur Préalablement percé 1034026 2 ...

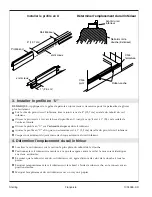
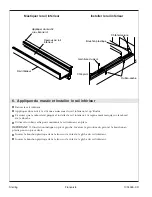
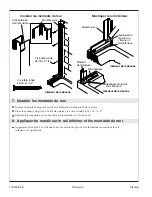
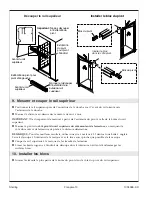
Page 29: ...u mastic dans le profilé en U REMARQUE Le panneau de verre fixe est le panneau le plus étroit IMPORTANT Le côté à texture du verre devrait être positionné à l extérieur de la douche Soulever délicatement le panneau de verre fixé sur le profilé extérieur dans le rail supérieur et le profilé en U à la base Presser le panneau fixé délicatement dans la rainure du montant du pivot Vis à tête ronde 10 1...

Page 30: ...rail inférieur à la distance déterminée Serrer l écrou avec la clé à molette fournie 15 Installer le pivot supérieur sur le panneau de la porte Insérer la bague du pivot supérieur sur le boulon hexagonal de 1 1 4 et visser partiellement l écrou hexagonal sur le boulon Insérer cet ensemble dans la rainure du cadre supérieur du panneau de la porte Mesurer la distance A à partir du rebord de la porte...

Page 31: ...s l orifice central du rail supérieur et le petit orifice du bloc du pivot REMARQUE Visser en premier le côté le plus large tout en métal du contre écrou sur le boulon Visser le contre écrou sur le boulon 8 32 x 1 1 8 et serrer avec des clés 1 4 et 11 32 S assurer que la base du panneau de la porte ne frotte pas sur le joint creux du rail inférieur Si nécessaire desserrer le boulon du pivot supéri...

Page 32: ...butée Placer une petite quantité de mastic à la silicone dans le profilé en U Insérer la butée en plastique dans le profilé en U Appliquer du mastic à la silicone ici Butée en plastique 1034026 2 D Français 15 Sterling ...

Page 33: ...e rencontrent De l intérieur de la douche Appliquer avec précaution du mastic à la silicone à l avant là où les montants du mur et le mur se rencontrent le panneau fixe et le montant pivot se rencontrent le panneau fixe et le profilé en U se rencontrent Sceller le rail inférieur à l extérieur Sceller ici Sceller ici Intérieur de la douche Sterling Français 16 1034026 2 D ...

Page 34: ...ese de añadir la longitud de la caja a la medida o mida de manera que excluya la caja Su nueva puerta de Sterling se puede instalar con apertura tanto a la derecha como a la izquierda Instale la puerta con el lado pivotante del lado opuesto a la cabeza de ducha para obtener mejores resultados Antes de empezar la instalación separe e identifique todas las piezas Revise que no tengan daños Siga aten...

Page 35: ...llo del 8 18 x 3 8 Tornillo del 8 18 x 3 8 Buje del pivote superior Tope de plástico Canal en U Perno hexagonal de 1 1 4 Contratuerca Tuerca hexagonal de 1 4 Jamba pivotante Anclaje de plástico Anclaje de plástico Jamba de expansión Jamba de contacto Panel de la puerta Carril superior Bloque de pivote Tapón de plástico Buje del pivote inferior Empaque hueco Carril inferior Sterling Español 2 10340...

Page 36: ...rior e inferior a la misma longitud para esta instalación Por favor lea estas instrucciones de instalación antes de cortar el carril superior e inferior Si no está seguro de cómo cortar los carriles llame a nuestro Departamento de Servicio al Cliente 1 888 783 7546 1034026 2 D Español 3 Sterling ...

Page 37: ...ivoteará en el lado derecho o izquierdo Asegúrese de que la puerta pueda abrirse completamente en la configuración elegida Lado pivotante Pivote a la derecha Cabeza de ducha Lado de contacto Lado pivotante Pivote a la izquierda Cabeza de ducha Lado de contacto Instale el lado pivotante del lado opuesto a la cabeza de la ducha Sterling Español 4 1034026 2 D ...

Page 38: ...orte el lado de contacto Marque el lado de contacto en la distancia determinada consulte la sección anterior para determinar cuál es el lado de contacto NOTA Para obtener mejores resultados utilice una caja de ingletes y una sierra para metales de 32 dientes por pulgada para hacer el corte Corte el carril inferior en la marca No corte el extremo pivotante Lime los filos ásperos del corte del carri...

Page 39: ...el carril inferior en la sección más plana del reborde de la ducha Coloque el carril inferior de manera que la separación entre el carril y la pared sea la misma en ambos extremos Asegúrese de que el filo frontal del carril inferior esté colocado a la misma distancia del filo frontal del reborde de la ducha en todos los puntos Fije provisionalmente el carril inferior en el reborde con cinta de enm...

Page 40: ...nzón de marcar Taladre un orificio de 3 16 en cada lugar marcado En azulejo de cerámica utilice una broca para mampostería Inserte los anclajes de plástico en cada orificio Coloque la jamba pivotante contra la pared opuesta a la jamba de contacto y encájela en el carril inferior Asegúrese de que el lado más ancho esté hacia el exterior de la ducha Repita los procedimientos de la jamba de contacto ...

Page 41: ...tración muestra un pivote del lado izquierdo Para un pivote del lado derecho invierta el buje del pivote y el tapón de plástico Inserte el tapón de plástico en el orificio del lado de contacto del carril inferior Inserte el buje del pivote en el orificio del lado pivotante del carril inferior Dorso del carril inferior Aplique sellador de silicona aquí Carril inferior Selle el carril inferior Lado ...

Page 42: ... de silicona donde la jamba pivotante y de contacto hacen contacto con el carril inferior como se muestra Tornillo de cabeza redonda del 8 18 x 1 1 2 Tornillo de cabeza redonda del 8 18 x 1 1 2 Jamba mural del lado de contacto Instale las jambas murales Jamba pivotante Interior de la ducha Aplique sellador de silicona aquí Jamba de contacto Interior de la ducha Interior de la ducha Jamba pivotante...

Page 43: ...de cortar en el interior de la marca con la hoja de la sierra lo más cerca posible de la marca Corte el carril superior en la marca en el lado de contacto Lime los filos ásperos del corte del carril inferior para que queden lisos prestando atención para evitar dañar las superficies acabadas 10 Instale los bloques Inserte el extremo más pequeño del bloque de pivote en el lado de pivote del carril s...

Page 44: ...un tornillo de cabeza redonda del 8 18 x 3 8 Taladre un orificio de 1 8 de diámetro a través de la ranura en el carril superior y la jamba de contacto Fije el carril superior y la jamba de contacto con un tornillo de cabeza redonda del 8 18 x 3 8 A taladrar Jamba de contacto Jamba pivotante Taladrados Tornillo de cabeza redonda 8 18 x 3 8 Interior de la ducha Instale el carril superior Carril supe...

Page 45: ...oque una tira de sellador en el canal en U NOTA El panel fijo de vidrio es un panel angosto IMPORTANTE El lado texturizado del vidrio debe colocarse hacia el exterior de la ducha Coloque con cuidado el panel fijo y angosto de vidrio en el canal exterior del carril inferior y en la parte inferior del canal en U Presione suavemente el panel fijo para que entre en la ranura de la jamba pivotante Torn...

Page 46: ... la distancia determinada Apriete bien la tuerca con la llave de boca abierta provista 15 Instale el pivote superior en el panel de la puerta Inserte el buje del pivote superior en el perno hexagonal de 1 1 4 y enrosque parcialmente la tuerca hexagonal de 1 4 en el perno Inserte este ensamble en el carril del marco superior del panel de la puerta Mida la distancia A desde el filo de la puerta del ...

Page 47: ...al del carril superior y a través del orificio pequeño del bloque de pivote NOTA Enrosque el lado más grande de sólo metal de la contratuerca en el perno primero Enrosque la contratuerca en el perno del 8 32 x 1 1 8 y apriete con llaves de 1 4 y 11 32 Asegúrese de que la parte inferior de la puerta no roce con el sello hueco del carril inferior Si es necesario afloje el perno del pivote superior c...

Page 48: ...ale el tope Coloque una pequeña cantidad de sellador de silicona en el canal en U Inserte el tope de plástico en el canal en U Aplique sellador de silicona aquí Tope de plástico 1034026 2 D Español 15 Sterling ...

Page 49: ...el reborde Desde el interior de la ducha Con cuidado aplique sellador de silicona al área donde las jambas murales hacen contacto con la pared el panel fijo hace contacto con la jamba pivotante el panel fijo hace contacto con el canal en U Selle el carril inferior en el exterior Selle aquí Selle aquí Interior de la ducha Sterling Español 16 1034026 2 D ...

Page 50: ...1034026 2 D ...

Page 51: ...1034026 2 D ...

Page 52: ...Phone 1 888 STERLING 1 888 783 7546 Mexico 001 877 680 1310 SterlingPlumbing com 2007 by Kohler Co 1034026 2 D ...
Reviews: