Ste
rlin
g
Po
wer P
ro
d
u
c
ts
C
op
y
rig
h
t
General SAFETY - Please Read
20.
Do not touch the cooling vents on the Battery Tester
immediately after testing the battery. They become very hot.
1.
Keep your work area clean and well lit. Cluttered
benches and dark areas invite accidents.
2.
Do not operate power tools in explosive atmospheres,
WARNING
This Battery Tester becomes very hot during
such as: In the presence of flammable liquids, gases, or
use. Touching it in the wrong places will result in serious
dust. Power tools create sparks which may ignite the dust
burns. Even after tests are completed the unit remains very
or fumes.
hot, ensure its not placed on a surface which can be
3.
Keep bystanders, children, and visitors away while
damaged due to the heat, only hold the unit in the desired
operating this tool. Distractions can cause you to lose
places. I.e. the handle.
control. Protect others in the work area from debris such
as chips and sparks. Provide barriers or shields as
needed.
4.
Do not force the tool. Use the correct tool for the
application. The correct tool will do the job better and
safer at the rate for which it is designed.
5.
Do not use the power tool if the it looks damaged in any
way.
6.
Store idle tools out of reach of children and other
untrained persons. Tools are dangerous in the hands of
untrained users.
7
. Maintain tools with care. Keep clean. Do not use a
damaged tool. Tag damaged tools with "Do not use" until
repaired.
8.
Tool service must be performed only by a qualified
repair personnel. Servicing or maintenance performed
by unqualified personnel could result in injury.
9.
Maintain labels and nameplates on this tool. These
carry important information. If unreadable or missing,
contact us for a replacement or check our website for
download (www.sterling-power.com).
10.
Always wear ANSI approved safety impact eye
goggles and heavy work gloves when using this tool.
Using personal safety devices reduce the risk for injury.
11.
Maintain a safe working environment. Keep the work
WARNING
area well lit. Make sure there is adequate surrounding
Never test or charge a frozen battery.
workspace. Always keep the work area free of
To prevent sparks never disconnect ( or connect ) the
obstructions, grease, oil, trash, and other debris. Do not
unit under test.
use this tool in areas near flammable chemicals, dusts
Always work in a well vented space.
and vapours. Do not use this product in a damp or wet
Always wear safety goggles as battery hydrogen
location.
explosions could happen.
12.
People with pacemakers should consult their
This tester only works if the batteries are fully charged,
physicians before using this product. Electromagnetic
testing an empty battery is a waste of time.
fields in close proximity to a heart pacemaker could
Wear rubber gloves (not included) whenever working
cause interference to or failure of the pacemaker.
with the Battery Tester or batteries.
Caution is necessary when near the coil, spark plug
Only test 1 x 12V battery at a time. For larger banks or
cables, or distributor of a running engine. The engine
voltages they must be broken down to an individual 12V
should always be off if adjustments are to be made.
battery. No larger than about 140Ah / 1000 CCA.
13.
When connecting the battery cables to the battery,
avoid creating sparks (always connect and disconnect
clamps exactly as described in rule number 14, below).
the battery
Explosive gases are created during charging. Sparking
voltage is over 13.2V ( surface voltage ) the load test will
could also damage the vehicle electrical system.
not engage,
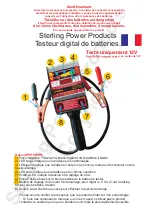
14.
Be certain of the test battery polarity before
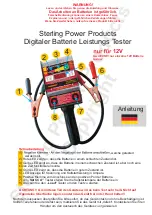
connecting the test Cable Clamps. The red cable clamp
(Marked 6 on front diagram ) goes to the positive terminal
of the battery. The black Cable Clamp (marked 1 on front
diagram) goes to the negative terminal of the battery.
15.
When placing the Battery Tester in the vehicle, take
special care that the metal housing of the Battery Tester
does not come in contact with either terminal of the
battery or other electrical connections.
16.
Do not drop the Battery Tester as it may affect proper
operation.
17.
Do not smoke or have open flames near the battery.
18.
Reversing Battery Tester Cable Clamps on the
battery will damage the tester.
Only an individual 12V battery can be tested and the
19.
Do not connect the Battery Tester to the battery while
battery must be fully charged.
the battery is being charged. Turn the engine off before
connecting.
OPERATING INSTRUCTIONS
What does the tester do?
The Sterling Battery Tester has multiple functions,
however, there are 3 main functions:
1) a voltmeter, the battery voltage alone can give the
user a rough indication of the level of charge in the
battery.
2) a load tester, by applying a 125A load to the battery
(emulating a stater motor) the general condition /
integrity of the battery and its ability to perform at the
stated cold cranking amps (CCA) is determined.
3) a charging system test, this test can determine the
effectiveness of the charging supply onto the battery.
The user will be informed as to whether the alternator /
battery charger (or other) is ‘good’, ‘weak’ or ‘bad’.
Testing the Battery ( 12V battery only up to about 140Ah
and FULLY CHARGED, for 24V then split bank into 2 x
12V )
Note:
The temperature of the battery will marginally affect
the testing data. It will test lower when cold than when warm.
Note:
Before any testing, make sure to clean the battery
contacts. Ensure the battery is fully charged. When
connecting the tester to the charged battery
,
as the unit assumes that you want to do the
charging test only. It also prevents the unit being used on 24-
36V battery banks.
1)
Make sure the vehicle is switched off. If a single battery,
up to about 1000 CCA or about 140Ah then you can test in
position. However, for example, a boat with 4 batteries, each
battery must be isolated (removing the pos from each
battery link would be fine). Test 1 at a time with a 2 minute
rest interval between each test, this allows unit to cool down.
For 24V, 36V or 48V battery banks they must be split into
their 12V components. Do NOT use this directly on the 24V,
36V, 48V directly as it will destroy the unit.


