11-51
4 Mounting the wheel
1. Clean the following areas before mounting the
wheel. Dirt or debris in these areas could cause
the wheel nuts to become loose during opera-
tion.
Threads of the wheel studs and nuts
The spherical surface of the wheel nuts
Inner wheel and hub mounting surfaces
Dual wheel mating surfaces
Wheel nut seating surfaces
Dual wheel inside rim surfaces
Hub pilots
2. Mount the wheel on the hub. Install the wheel
nuts tight enough to hold the wheel in position. If
the wheel nut has a spherical end , direct the
spherical end toward the wheel.
NOTE:
The studs and nuts have stamped marks for easy
identification; an “R” mark for right-hand threads
and an “L” mark for left-hand threads.
3. Lower the vehicle slowly until the tire makes
contact with the ground.
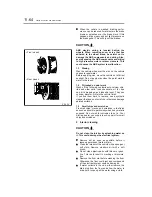
4. Tighten the wheel nuts in three stages, ending
with the final torque shown in the table. Use the
tightening sequence shown in the illustration.
WARNING
•
Dirt or debris in the wheel mounting area
could cause the wheel nuts to loosen,
resulting in an injury accident.
•
If wheel stud or nut threads are damaged,
or the disc wheel is cracked or otherwise
damaged, replace the wheel. A damaged
wheel could work loose and cause an
injury accident.
Wheel nut
torque
325 to 398 lbf·ft (440 to 540 N·m)
Z09309
Z09310
Z09311
1
1
3
4
5
2
6
2
3
4
5
Summary of Contents for 360
Page 13: ...2 1 Locations in cab 2 2 Locations outside cab 2 4 2 Warning labels ...
Page 16: ...2 4 Warning labels Locations outside cab Z12496 ...
Page 19: ...2 7 Warning labels 30 gallon 113 liter fuel tank Z12494 ...
Page 27: ...4 1 Seats 4 2 Seat belts 4 4 Steering wheel 4 7 4 Seat and steering wheel adjustments ...
Page 204: ...14 1 Maintenance schedule 14 2 Lubrication schedule 14 6 14 Maintenance schedule ...
Page 210: ...15 1 15 Alphabetical index ...


