TOP VIEW
FRONT VIEW
BOTTOM VIEW
TOP VIEW
FRONT VIEW
BOTTOM VIEW
3.
Fixture assembly
Choose the location where you want to install the
marker light.
NOTE: Avoid installing the marker light in locations
where water will pool during rain or other situations
that could cause the product to become submerged
in water. The marker light is water resistant but it will
become damaged if completely submerged in water or
sitting where there is water accumulation.
CAUTION:
• Avoid installing the marker light in high traffic areas
where someone could trip over the unit.
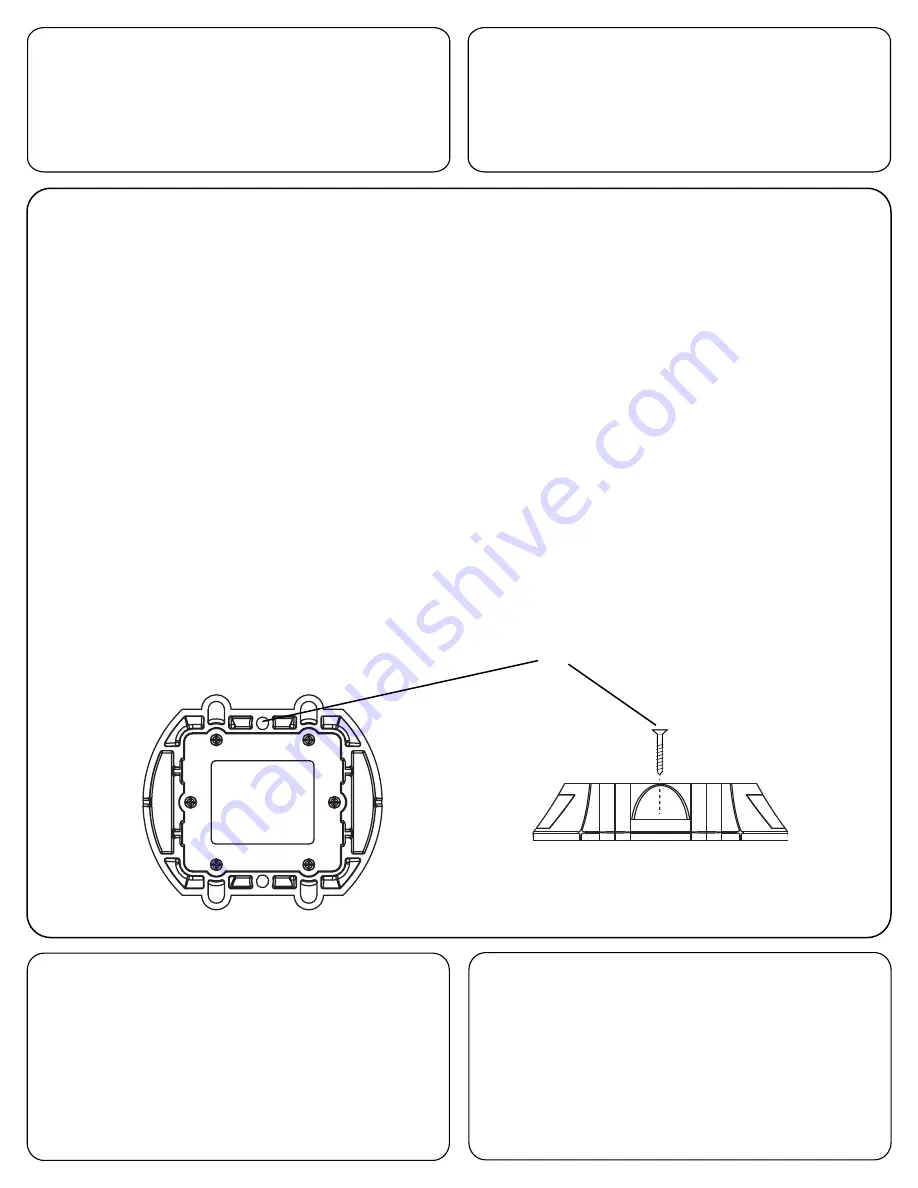
• Using the wood screws provided, affix the marker
light to the surface.
NOTE: Depending on the surface material, other
fasteners maybe required.
Choisissez l’emplacement où vous souhaitez installer
la lumière solaire pour terrasse.
REMARQUE : Évitez d’installer la lumière solaire pour
terrasse aux endroits où l’eau s’accumulera en cas
de pluie ou d’autres situations qui pourrait immerger
l’article dans l’eau. La lumière solaire pour terrasse est
résistante à l’eau mais elle sera endommagée si elle
est complètement immergée dans l’eau ou reste là où
il y a accumulation d’eau.
ATTENTION :
• Évitez d’installer la lumière solaire pour terrasse
dans les zones à forte circulation où quelqu’un
pourrait trébucher sur l’appareil.
• Utilisez les vis à bois fournies pour fixer la lumière
solaire pour terrasse à la surface.
REMARQUE : Selon la surface sur laquelle la lumière
est fixée, d’autres attaches peuvent êtres nécessaires.
3.
Méthode d’assemblage
4.
Troubleshooting
4.
Dépannage
If the light does not turn on at dusk after 8 hours of charging:
• Ensure that the solar fixture is in a bright sunny location and
not in a shady area during the day.
• Make sure that the light’s photocell is not affected by other
light sources at night.
• Verify that the battery/batteries are making contact with the
terminal and that they have been inserted in the correct
polarity.
Si la lumière ne s’allume pas au crépuscule après 8 heures de charge :
• Assurez-vous que la lumière se trouve à un endroit très ensoleillé
et non pas à un endroit ombragé pendant la journée.
• Assurez-vous que les cellules photoélectriques ne sont pas
affectées par d’autres sources d’éclairage durant la nuit.
• Vérifiez que la pile fait contact avec les bornes et qu’elle a été
insérée en respectant la polarité.
Screws
Vis
2.
First time use
If the solar panel is covered by protective film, remove it before
using the product. Using a Philips screwdriver, remove the 6 screws
on the battery cover. Install the AA rechargeable batteries included.
Close the battery cover and reinstall the battery door screws. NOTE:
Do not operate the unit with the battery door loose; water could
infiltrate the battery compartment and damage the product.
2.
Première utilisation
Si le panneau solaire est recouvert d’une fine pellicule protectrice,
retirez-la avant d’utiliser l’article. A l’aide d’un tournevis cruciforme,
retirez les 6 vis du couvercle du compartiment à pile. Installez les piles
AA rechargeables incluses. Fermez le couvercle du compartiment à pile
et réinstallez les vis. REMARQUE : Ne faites pas fonctionner l’appareil
avec la porte du compartiment à pile ouverte; l’eau pourrait s’infiltrer
dans le compartiment à pile et endommager l’article.


