3.5
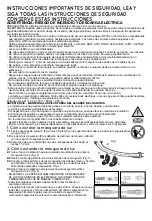
Remove old fuse carefully.
3.6
Never attempt to replace the fuse with a higher Watt fuse. Use only 5 Amps 125 Volt fuse.
Failure to do so may be a fire hazard.
3.7
Set new fuse in holder.
3.8
Reinstall the fuse access cover.
CAUTION: Risk of fire. Do not replace attachment plug. Contains a safety device (fuse) that should not be removed.
Discard product if the attachment plug is damaged.
4. Remote Operation
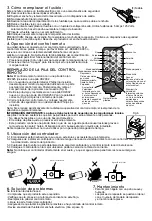
The unit must be operated with the provided remote control.
If the remote is lost or broken, please call 1-888-867-6095 or email
us at customerservice@sternohome.com for a replacement.
Note:
Remove the pull-tab from the battery case to allow the
remote control to function.
1. To turn on rope light, press any color button.
2. Press the OFF button to turn off the rope light.
REMOTE CONTROL
BATTERY REPLACEMENT
Note:
The remote control operates with
one coin cell button battery CR2025
(included) or CR2032.
1. Using Philips screw-driver (not included),
unscrew the security screw at the back of
the remote by gently pulling on it, then
remove the battery compartment as
shown (Fig.6)
2. Remove used battery and replace with
either a new CR2032 or a CR2025 3V
Lithium battery in proper polarity as
indicated. (Fig.6)
Clean the battery contacts.
3. Close battery door on the remote control and put back on the security screw with a Philips screw-driver (not included).
Note:
If the remote distance is significantly reduced, replacing the battery should improve the range.
IMPORTANT INFORMATION: Battery should be recycled as per local guidelines.
Batteries contain substances which are harmful to the environment or persons.
• Do not dispose in municipal waste.
• Recycling batteries helps preserve the environment.
• This product contains a coin cell button battery. If swallowed, it could cause severe injury or death
in just 2 hours.
Seek medical attention immediately.
Remove batteries from equipment which is not to be used for an extended period.
5. Find a location for the controller
5.1
The controller is designed for outdoor use and is weather resistant.
5.2
Make sure that the controller can be installed in a location that will allow a direct line of sight with the remote to
operate properly.
5.3
Any objects between the front of the control box and the remote control will reduce the range.
5.4
Mount the controller in the best location and close to the electrical outlet.
Note:
Do not place the controller directly on the ground as water could penetrate if it is soaking in water.
6. Troubleshooting
All of the lights fail to work:
• Check that the power is on.
• Check if the connection to the outlet is loose.
• Change the remote battery.
• Clean the front of the controller.
• Make sure the pull-tab is removed from the remote.
• Check fuse on electrical plug. (See step 3)
Fig.6
1
2
Remove pull-tab
OFF
Cool white
Yellow
Cyan
Twinkle mode
Sparkle mode
Pause:
Stop the color cycling from
the Play button on the current
color displayed.
Slow speed:
Interacts with the Play button
only. Light will animate for
8 seconds before changing
color.
Red
Green
Blue
Multi-color
Fade mode
Flash mode
Play:
Cycle through colors in
Flash, Fade, Sparkle and
Twinkle modes.
Fast speed:
Interacts with the Play
button only. Light will
animate for 4 seconds
before changing color.
Bushes
r
Controller box
a
Controller box
3.96 METRES/13 FEET
M A X I M U M
3,96 MÈTRES
M A X I M U M
3,96 METROS
M Á X I M O
7. Maintenance
• To clean, wash with a damp soft cloth.
• Replacement parts may be ordered by using the fixture
model number and the part’s name.
Purple


