background image

Service and Parts manual (Version B)

58

Wireless

3.

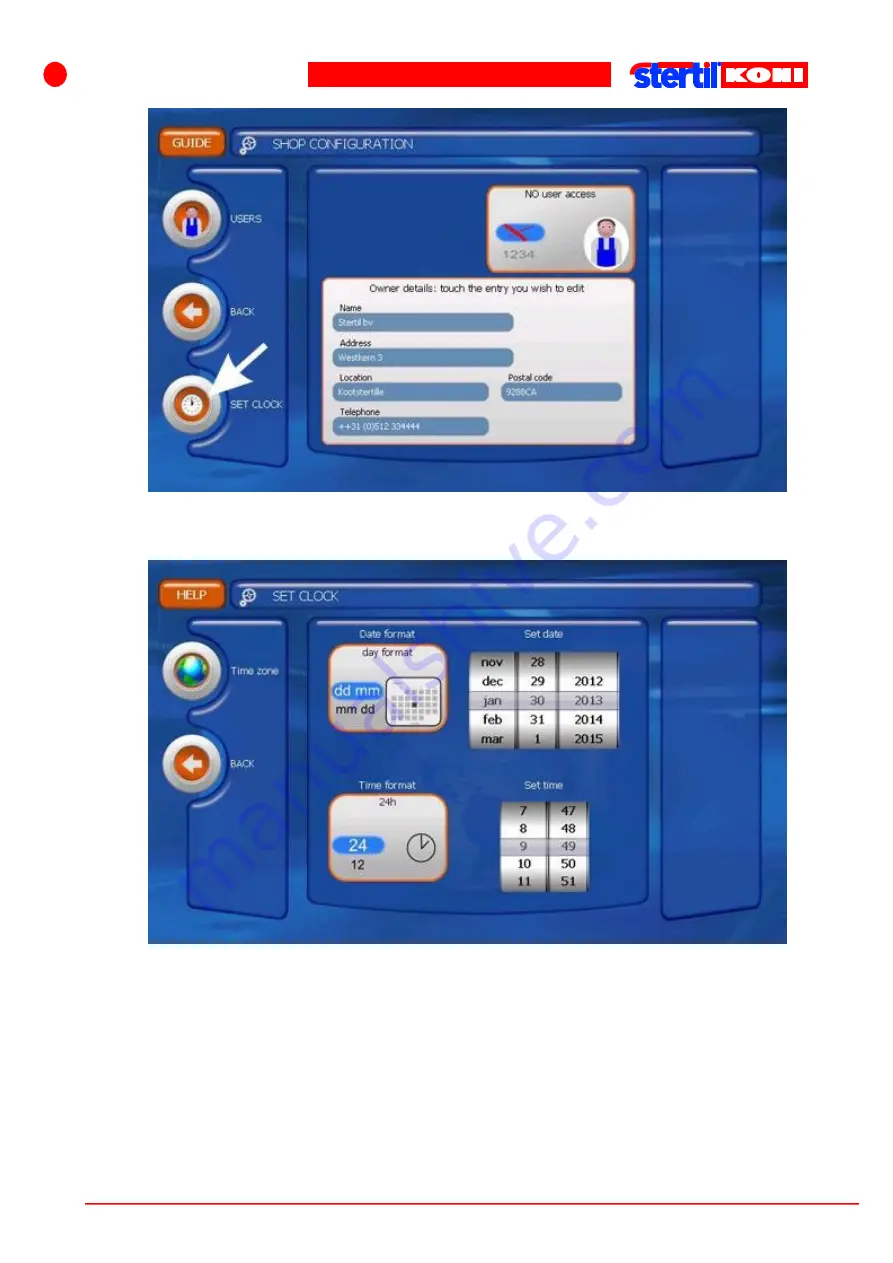
Press the [SET CLOCK] button in the shop configuration screen.
The screen for setting the clock time appears.

4.

Select the desired display format for the date and time.

5.

Set the correct date and time.

6.

Press the [TIME ZONE] button.
The screen for setting the correct time zone appears.

Summary of Contents for ST 1065-FWF

Page 1: ...Mobile column lifts Wireless Service and Parts manual 2015 Stertil B V 38007815 B ...

Page 2: ...vice and Parts manual Version B 2 Wireless Service and Parts manual for the Stertil Koni mobile column lifts ST 1065 FWF ST 1075 FWF FWG ST 1085 FWA FWG RWA RWG VFWA VFWG ST 1100 FWA FWG RWA RWG VFWA VFWG ...

Page 3: ...neral safety instructions 12 2 3 1 The importance of safety 13 2 3 2 Working in accordance with procedures 14 2 3 3 Safety warnings 14 2 3 4 Personnel 14 2 3 5 Safety instructions 15 2 4 Safety features 17 2 4 1 Emergency stop 17 2 4 2 Safety Signs 18 2 5 Lock out Tag out 19 2 5 1 Lock out Tag out procedure 19 2 5 2 End lock out tag out procedure 20 2 6 Environmental aspects 21 2 6 1 Disposal 21 2...

Page 4: ... 5 9 2 Setting the clock 57 5 9 3 Setting the height limit 59 5 10 Corrective maintenance 61 5 10 1 General safety requirements for corrective maintenance 61 5 10 2 Required knowledge 61 5 10 3 Request for repair 61 5 10 4 Communication 61 5 10 5 Spare parts 61 5 11 Technical support 62 5 12 Corrective maintenance procedures 62 5 12 1 Removal and installation of the lifting cylinder 62 5 12 2 Adju...

Page 5: ...1 Column ST 1100 Rxx 99 8 12 Pallet lift mechanism 250 2 retractable wide frame 102 8 13 Pallet lift mechanism 300 2 standard battery 103 8 14 Fork arms ST 1085 104 8 15 Fork arms ST 1100 105 8 16 Drive unit B W 105 8 17 Hydraulic unit 106 8 18 Hydraulic cylinder ST1075 108 8 19 Hydraulic cylinder ST1065 ST1085 ST1100 110 8 20 Control unit W 112 8 21 Control box 115 8 22 Labels 116 9 List of parts...

Page 6: ...he product as intended by the manufacturer In the event that the products parts of the products or procedures are applied in any way other than that described in this manual then confirmation must be obtained as to the correctness and suitability of that use No rights may be derived from this manual or from the documentation supplied together with the product The supplier is bound by no agreement ...

Page 7: ...ely trained Are able to follow the procedures in this manual 1 5 Document conventions In this manual the following signs are used to draw the reader s attention to especially important points Actions the operator or engineer should perform in a specific sequence are numbered Turn on the power switch Bullet points are used for lists of items or actions Soft keys or touch screen buttons are always s...

Page 8: ...herlands Phone 31 0 512 334 444 Fax 31 0 512 332 638 E mail info stertil nl Internet www stertil nl 1 7 Guarantee and liability Please refer to the order confirmation and the delivery terms and conditions for the applicable guarantee and liability 1 8 Compliance with standards The vehicle lift has been tested certified and found to comply with The Machinery directive 2006 42 EC EN 61508 SIL2 EN 14...

Page 9: ...he manual If you receive any supplements to the manual from Stertil these must be inserted into the manual immediately 1 12 Related documents This manual is part of the documentation set for the vehicle lift This set consists of the following documents Operator Manual This manual contains all required information for the operation of the vehicle lift This manual details also operator related maint...

Page 10: ...able for any claims of third parties arising from that recommissioning 1 16 Version history Every effort has been made to make this manual as accurate and complete as possible However should the user s find any errors or omissions it would be appreciated if these were brought to the attention of Stertil Please report any errors or omissions to Stertil Also during the lifetime of the machine engine...

Page 11: ...safety regulations Stertil B V is not liable for damage of physical injury due to ignoring the safety instructions Stertil B V has made all possible efforts to inform you correctly and fully about possible dangers involved in working with this vehicle lift However it is your responsibility to assure that the safety rules are actually observed NOTE By this manual Stertil delivers the complete infor...

Page 12: ...around moving mechanical parts Keep long hair covered when working around moving mechanical parts Stay away from moving machine parts Always use spare parts of a type and part number recommended by Stertil 2 2 3 Fall hazards Precautions to be taken when working on assemblies at higher altitudes Identify potential fall hazards prior to each project and during a daily walk around Pay attention to ha...

Page 13: ...lt in danger for the user The compliance as well as guarantee will then be voided WARNING If you are not familiar with the vehicle lift read the operator manual and especially this chapter about safety before starting to operate the vehicle lift WARNING Do not use the vehicle lift for purposes other than those specified WARNING Never operate the vehicle lift when persons goods or anything related ...

Page 14: ... 2 3 3 Safety warnings This document contains a number of special symbols and conventions that the user must understand For the symbols in the text see section Document conventions on page 7 2 3 4 Personnel Operating maintenance and repair personnel as well as anyone who is around this vehicle lift should be aware of the possible dangers This recommendation applies regardless of other regulations ...

Page 15: ...instructions The vehicle lift is provided with safety and protection features Even so caution is required when using the vehicle lift Work safely Stertil has made every effort to inform you as correctly and completely as possible on any dangers associated with operation of the vehicle lift You must ensure and are responsible for compliance with these behavioral guidelines The buyer user is obliged...

Page 16: ...t Do not use the lifting system outdoors if the wind velocities mentioned in section Outdoor use are exceeded If the lifting system is used outdoors do not leave the vehicles unattended in the lifted position The wind speed may change and exceed the safety limits Danger of getting injured by electrical shock Care must be taken as burns can occur from touching hot parts Only remove the covers to ca...

Page 17: ...tion may be included in the manual in that alternative form provided the user can reasonably be expected to have the capability to access information in that form 2 4 Safety features The vehicle lift has a control and monitoring system which ensures that The guide blocks always stay at an equal height within the control limits Lowering is halted in the event that obstacles cause an elevation diffe...

Page 18: ...the correct place The next table gives an overview of the various safety signs used on or in the vehicle lift For each sign the locations where they are fitted are indicated Pictogram Description Location Capacity sticker example The value stated on this sticker gives the maximum lifting capacity of the column At the left side of the column Operation sticker example On this sticker a short descrip...

Page 19: ...r the application of energy control the lock out or tag out procedures shall cover the following elements and actions and shall be done in the next mentioned sequence 2 5 1 Lock out Tag out procedure 1 Notification Notify all affected employees that service or maintenance is required on the machine and that the machine must be shut down and locked out 2 Preparation for shutdown The machine may onl...

Page 20: ...ing down etc 7 Verification of isolation Make sure that no persons are in or on the machine Make sure that the machine is disconnected from the energy source s Test to verify the isolation of the machine Make certain that the machine will not operate power cannot be turned on CAUTION Return all operating control s to the OFF position after verifying the isolation of the machine The machine is now ...

Page 21: ... chemical substances Stertil B V has the intention to fully comply to REACH regulation and has checked its suppliers to make sure they comply with REACH requirements for all materials and substances used in our products Stertil will provide relevant information e g Safety Data Sheet SDS on request 2 7 Training levels Stertil recommends the following training levels Operator lower vocational educat...

Page 22: ...Motor 24 V 130 A Charging current 24 VDC 10 5 A 20 min 24 VDC 6 25 A cont Charger type Automatic charger can remain connected during use and in storage Charging time when 70 discharged 9 hours Number of complete lifting actions fully charged batteries 25 full load 37 half load 22 full load 33 half load 19 full load 28 half load 16 full load 24 half load Main fuse 24 VDC 200A slow blow Control volt...

Page 23: ...has the following structure STxxxxABCDEE For example ST1075 FWF In this identification structure the individual characters have the following meanings ID xxxx Lifting capacity 1075 7500 kg A Width V widened standard B Wheels F fixed C Type C conventional S superior B battery W wireless R regenerate Earth lift D Fork type A adjustable F fixed G adapter EE Low base frame LB 3 3 Lifting capacity See ...

Page 24: ...1 Column 2 Potentiometer 3 Locking pawl 4 Hydraulic unit 5 Control cabinet 6 Main switch 7 Automatic battery charger 8 200A fuse holder 9 Batteries 10 Pallet lifting mechanism 11 Guide block 12 Lifting fork 13 Wheel adapter option 14 Cylinder 15 Fixed wheels 16 Adjustable forks 17 Retractable wheels fig 1 Main components of a mobile column lift The columns have an integrated power supply batteries...

Page 25: ...levation difference exceeds 60 mm the control voltage will be cut off causing all movement to stop The cause of the fault must then be traced NOTE Height differences may be caused by oil leakage in cylinders or valves The control system is also designed so that Any column lift can be controlled individually Any pair of axles can be controlled individually for an explanation see chapter Operation i...

Page 26: ...toppling over when it is being relocated When relocating the column lift the brake is released so that it can be moved more easily 3 10 Retractable Wheels R models The front wheels are controlled simultaneously with the lifting and lower of the pallet lifting mechanism in the R model 3 11 Locking feature If the hydraulic pressure fails while a vehicle is being raised lowered or standing still on t...

Page 27: ...the column lift in the right manner can cause damage to the column lift and or physical injury WARNING Do not enter the area below the column lift while it is suspended by the lifting equipment If it should fall it could cause serious injury 1 Transport the column lift to the location where it will be used 2 Remove the protective cover from the hydraulic unit 3 Remove the stopper from the filler o...

Page 28: ...ly 1 Fit the switch tube 1 onto the pallet lifting mechanism 2 using the bolt washer and nut 2 Fit the switch bushing 3 onto the switch tube 1 3 Refer to section Adjusting the pallet lifting mechanism safety switch on page 63 for the adjustment fig 2 Switch tube assembly ...

Page 29: ...e WARNING Always follow maintenance instructions NOTE All maintenance actions described must be done on schedule Due to load differences and environmental influences certain parts may require more or less maintenance than specified NOTE The maintenance procedures will refer to special instructions when necessary 5 2 When you carry out maintenance Be aware that If you are in any doubt whether you s...

Page 30: ...sition then pull the mains plug from the socket The power may only be switched on temporarily for bringing the lifting system in another position when required for performing certain checks and adjustments WARNING When the column lifts are in a raised position always lower them into the safety lock 5 2 3 Pay attention to safety Work on installations and devices under safety regulations can only be...

Page 31: ...ust be completed at the start of each work day 5 3 Monthly maintenance The following tasks must be carried out 1 Checking the safety locking feature on page 34 2 Checking the emergency shutdown mechanism on page 34 3 Carry out the monthly lubrication program as set out in Lubrication instructions on page 32 NOTE If a task cannot be performed correctly consult the technical service 5 4 Annual maint...

Page 32: ... system must be inspected for external hoses couplings and internal valves leakage Defective parts must be replaced 8 General inspection for damage If cracks have appeared in structural components then the parts in question must be replaced Immediately repair or replace all parts which could cause hazardous situations 9 Perform all lubrication tasks set out in section Lubrication instructions on p...

Page 33: ... When changing the hydraulic oil proceed as following 1 Fully lower the column lifts and drain off the oil 2 Fill the tank with hydraulic oil filtered at maximum 4 microns Table 3 Hydraulic oil type Oil type Oil name Standard Unil HVC SX 15 Alternative Mobil DTE 10 Excel 15 Biodegradable Panolin SYNTH 15 on customers request The different types of oils should not be mixed NOTE After draining the o...

Page 34: ...o release it 3 Press SELECT and the release button simultaneously for 2 seconds the emergency stop situation is canceled and the system is ready to be used again 5 5 4 Checking the safety locking feature fig 3 Checking the safety locking feature 1 Lower the column lifts completely if necessary use the switches S1 through S4 on the control panel see also section Control box sticker 2 Raise the colu...

Page 35: ...equence 3 Repeat this for all the columns If the message does not appear the switch bushing on the switch rod must be adjusted correctly See also section Adjusting the pallet lifting mechanism safety switch on page 63 5 5 6 Checking the pneumatic spring s With the pallet lifting mechanisms fully raised hoist a vehicle of at least 4 tons by approximately 100 mm Then check at the rear side of each c...

Page 36: ...i battery charger Loading the batteries with a standard charger can cause explosive gasses to be produced WARNING Only replace the batteries with original Stertil Koni batteries Universal car batteries can produce explosive gasses during normal charging Recharging defective or totally discharged batteries can cause explosive gasses to be produced 5 8 Settings screen When the SETTINGS button is pre...

Page 37: ...elected language is highlighted in green Height units The height units are defined here The chosen unit is highlighted in blue Pressing the button lets you toggle between the units Weight units This setting shows the representation of the weight on the screen The load is derived from the hydraulic pressure in the lifting cylinder The chosen unit is highlighted in blue Pressing the button lets you ...

Page 38: ...iption Function Unlocking while raising This option ensures that the pawls are operated when the UP button is used This will suppress the clicking noise while raising This function has no effect on the safety of the column lift The pawl will be enabled again when the UP button is released Unlock while raising is active if this function is enabled Programmable height limit If this function is OFF t...

Page 39: ...her columns can have a height limit that is different from the height limit for the column that they were adjusted to Start Returns you to the main screen Shop Let s you access the screen with the shop configuration settings A PIN code is required to have access to these settings Assistance Let s you access the screen with the service settings A PIN code is required to have access to these setting...

Page 40: ...you access the screen with the service settings A PIN code is required to have access to these settings 5 8 2 Shop configuration The shop configuration screen is where the specific data and settings for the shop can be defined To enter the shop configuration a PIN code is needed SHOP PIN CODE 4837 SERVICE PIN CODE 8365 fig 7 Shop configuration settings example The first shop configuration settings...

Page 41: ...mber of the owner Touching any element allows that element to be modified Users Lets you access the screen in which the users can be managed Please refer to procedure in section Edit user on page 43 Back Go back to the previous screen Set clock Lets your access the screen where the clock time can be set Please refer to procedure in section Setting the clock on page 57 5 8 3 User administration Whe...

Page 42: ...igned example This is the screen where new users can be added or existing users can be edited or deleted If the ID key was already assigned then this is shown on the right hand button and that button for assigning the ID key is not active fig 9 User administration ID key assigned example ...

Page 43: ...ireless Symbol Description Function Back Go back to the previous screen Add Adds a new user Delete Deletes a selected user Edit Edits a selected user Assign ID key Assigns an ID key to a selected user 5 8 4 Edit user fig 10 Edit user example ...

Page 44: ...screen is shown again Please refer to section Users on page 54 for the procedure for adding editing or deleting users 5 8 5 Maintenance configuration There are nine screens for defining service settings The other screens can be selected by pressing the buttons at the bottom of the screen To enter the maintenance configuration a PIN code is needed SERVICE PIN CODE 8365 fig 11 Maintenance configurat...

Page 45: ... Protection Range reached After the lowering button has been released it is possible to resume lowering an acoustic signal will then be given This function must only be disabled during maintenance work on the column Height difference monitoring This option ensures that the column can operate outside the cut off limits 20 mm when being lowered and 60 mm when being raised This could be used for leve...

Page 46: ...eters for height measurement are working properly Height monitoring must then be disabled If the height differences between the columns become larger during raising and lowering there may be problems in the hydraulic circuit or other mechanical faults The screen shows the message Height monitoring off There is also an acoustic signal when raising or lowering to alert the operator to the fact that ...

Page 47: ... often disturbances have been detected System running time This shows the time in days and hours that the controller has run for The time is stored by the controller and cannot be reset If a new PCB is fitted though the measurement will start at zero again Motor running time This shows the time in hours and minutes that the motor has run for The time is stored by the controller and cannot be reset...

Page 48: ...nformation and functions Symbol Description Function User Manual Gives the location of the file containing the user manual Maintenance manual Gives the location of the file containing the maintenance manual Parts list Gives the location of the file containing the parts list The scan be tapped if you want to change the file locations The file dialog is then opened ...

Page 49: ...gs file dialog NOTE If a message is active safety or maintenance then the file location will not be shown fig 15 Maintenance configuration screen 4 example The fourth maintenance configuration screen contains the information and functions relating to the safety messages ...

Page 50: ... fig 16 Maintenance configuration screen 5 example The fifth maintenance configuration screen contains the information and functions relating to the maintenance messages Symbol Description Function Every year This is where you can define whether maintenance messages have to be displayed if the time window for annual maintenance has expired The file location can be set to the right of the button Re...

Page 51: ...ct details to be put on a USB memory stick To do this a USB memory stick must be inserted onto the PCB After pressing the Backup button a dialog screen appears asking for confirmation of the backup Data restore The data from a USB memory stick can be transferred to the column lift To do this the USB memory stick containing the data must be inserted into the PCB before the column is switched on Aft...

Page 52: ...screen contains information about the software versions of the operating system and the control program fig 19 Maintenance configuration screen 8 example The eighth maintenance configuration screen contains the following information and functions Symbol Description Function Column type This setting is used to select the type of column ...

Page 53: ...ype of communication wired 868MHz or 915MHz Enable or disable weight function Measuring the weight on the column and on the hole system using a pressure sensor on the columns fig 20 Maintenance configuration screen 9 example The ninth maintenance configuration screen is for battery settings To prevent damage to the batteries the controller will switch off because of low battery voltage Settings fo...

Page 54: ...ures listed below can only be carried out if you have access to the user settings and have a login PIN code for the workplace 5 9 1 Users Follow the next described procedure to edit add or delete a user 1 Press the SETTINGS button in the main screen The user settings screen appears ...

Page 55: ...3 Press the USERS button in the shop configuration screen The user administration screen appears Edit user 1 To edit a user select the desired user and press the EDIT button The screen for modifying a user s data then appears 2 Change the user s data and press the CONFIRM button to confirm and save the data that has been input Press EXIT to go back to the old data without saving ...

Page 56: ... appear on the display again 3 Now press the BACK button twice followed by the START button once this will take you back to the main screen Delete user 1 To delete a user select the desired user and press the DELETE button 2 Press the CONFIRM button to confirm the deletion and remove the data permanently Press EXIT to leave the selected data intact without deleting it In both cases the user admini...

Page 57: ...ake you back to the main screen 5 9 2 Setting the clock Follow the next described procedure to set the time zone and the clock time fig 21 Main screen example 1 Press the SETTINGS button in the main screen The user settings screen appears 2 Press the SHOP button in the user settings screen The shop configuration screen appears ...

Page 58: ... CLOCK button in the shop configuration screen The screen for setting the clock time appears 4 Select the desired display format for the date and time 5 Set the correct date and time 6 Press the TIME ZONE button The screen for setting the correct time zone appears ...

Page 59: ... should be adjusted automatically for summer time and winter time 9 Now press the BACK button twice followed by the START button once this will take you back to the main screen 5 9 3 Setting the height limit Follow the next described procedure for setting the height limit fig 22 Main screen example 1 Press the SETTINGS button in the main screen ...

Page 60: ...ure that the highest position is well above the locking position 5 Enable the programmable height limit function set it ON and exit the service menu The setting is switched ON for all the columns in the set The current height is set as the height limit for each column even if the current height has been set higher or lower with the SINGLE or PAIR functions This therefore means that the other colum...

Page 61: ...thereof are entirely at the user s own risk NOTE Technical service is taken to mean either the Stertil technical service or another technical service authorized by Stertil 5 10 2 Required knowledge In order to be able to perform a repair on your machine knowledge of the following subjects should be available Mechanical systems Hydraulic systems Electrical systems The scope of the fault and the mea...

Page 62: ...osition 3 Press the DOWN button to lower the cylinder It will take approximately 2 minutes before the cylinder is fully lowered 4 Uncouple the hydraulic coupling at the bottom of the cylinder 5 Lift the cylinder about 20 mm to withdraw it from its seating on the bottom end 6 Pull the cylinder forwards 7 Remove the elastic ring from the head of the cylinder Proceed as follows to install the cylinde...

Page 63: ...not lift if the setting is correct 3 If the cylinder lifts loosen nut 1 and turn the adjusting screw clockwise 4 If the cylinder sinks down turn the adjusting screw anticlockwise until the cylinder no longer sinks Raise the cylinder to the top position and set the lever to position 1 the cylinder should now be lowered 5 If it does not lower or only does so slowly tighten the adjusting screw a litt...

Page 64: ...et lifting mechanism into its lowest position lifting column entirely on the floor 2 Now adjust the switch bushing 3 so that the switch 4 is just not quite activated see section Switch tube assembly in the Installation Manual 3 Check that it is working using the procedure described in section Adjusting the pallet lifting mechanism safety switch on page 63 ...

Page 65: ...to 30 mm by turning the adjusting nut fig 24 Retractable front wheels 5 13 List of parts Explanation of the titles of the columns in the parts list Fig index Fig refers to the related group on the parts drawing Index to the section in this group No Total number of parts in the assembly Reference The numbers in this column are Stertil B V order numbers Please specify these numbers when ordering Des...

Page 66: ... order replacement parts from Stertil B V see section Manufacturers details on page 8 for address details When ordering replacement parts please supply the following information Machine type Wireless Serial number See the type plate on the machine Reference No See List of Parts ...

Page 67: ...ff the main switch at the control box Do this by turning the main switch to the 0 position Never loosen or remove any part of the hydraulic system without first placing the column lifts in the lowest position or in the safety locks NOTE All repairs carried out on the column lifts by persons other than the technical service and the consequences thereof are entirely at the user s own risk NOTE Techn...

Page 68: ...remove any obstacles The column lifts can now be lowered further Do not forget to press the UNLOCK button first When raising The raising motion stops and the message Maximum programmed height reached appears on the screen fig 26 Warning while raising One of the columns has reached its highest position The column lifts can be lowered normally Do not forget to press the UNLOCK button first ...

Page 69: ... the columns has reached its highest position Lower the columns 03 Maximum programmed height reached One of the columns has reached the highest position as defined in the software Lower the columns or disable the programmable height 06 Flat battery It is no longer possible to perform any movements More than 15 movements on a single battery charge If this happens during lifting the motor continues ...

Page 70: ...em tries to reconnect Wait for reconnection or start up the system again 22 PWM output timeout 23 Remote crush limit exceeded Remote crush limit was exceeded Lowering with remote is not possible anymore Use the buttons on the car lift to lower the vehicle 25 Communication lost during settings synchronization Communication problems to other columns during transferring the settings to other columns ...

Page 71: ...aler 105 Error in another column There is an error detect in another column Check other columns for system error 110 Lowering error The maximum height deviation is reached Only raising is possible and check if something was under the columns 111 Lifting error The maximum height deviation is reached Check if one of the columns is lower than the others 137 Emergency switch is pressed Probably a dang...

Page 72: ...iring and switches of the remote control 142 Height sensor short open Check height sensor wiring 143 Potentiometer incorrect value Check value of potentiometer in lowest and highest position of the column 144 Emergency Stop broken Emergency input signals does not match Check wiring of the emergency switch 145 Initial start up current high During start up high current is measured Check outputs Prob...

Page 73: ...tect Contact your local dealer Micro controller error Error on control board detect Contact your local dealer Internal Hardware error Error on control board detect Contact your local dealer 271 Complete communication loss Maybe one of the columns was switched off or communication was disturbed in another way System lost its communication to all columns System needs a restart 282 Hardware error ext...

Page 74: ...tact your local dealer 303 Clock deviation frequency of crystal does not meet specifications Contact your local dealer 6 6 Faults The following troubleshooting guide can be used to help localize faults If in doubt the user should contact the technical service NOTE In the event of malfunctions other than those described here always consult the technical service 6 6 1 The column lift cannot be raise...

Page 75: ...problem Contaminated or damaged lowering valve Have the lowering valve cleaned or have it replaced by technical services The maximum elevation difference more than 30 mm has been exceeded Press UP until the height difference has been leveled out If this occurs regularly contact technical services The maximum height difference more than 60mm has been exceeded Cancel the fault by pressing UNLOCK for...

Page 76: ...tery specialist The main fuse has blown Check the main fuse above the batteries The main switch is OFF Set the main switch to ON Indicator lights and or screen defective Contact technical services 6 6 6 No control voltage Cause Solution Indicator lights and or screen defective Lifting system functioning normally Contact technical services The lifting system may not be set up properly Follow the no...

Page 77: ...ncy situations where it is not possible to lower the column lifts from the control cabinet the column lifts can be lowered manually Please contact the technical service in this case WARNING The emergency lowering procedure must only be performed by persons who are trained in this procedure ...

Page 78: ...For tire sizes R12 500 mm to R15 650 mm two adapters A are needed For tire sizes R15 650 mm to R17 900 mm one adapter B is needed For tire sizes R17 900 mm to R22 5 1140 mm adapters are not needed C For smaller wheel diameters 500 mm special adapters are available 7 1 1 Longer wheel adapters Special 150 mm longer wheel adapters A can be supplied for hoisting vehicles with double wheels such as tru...

Page 79: ...daptors so check the maximum weight carefully The maximum lifting capacity of the columns may only be lifted without wheel adapters When this is the case the column foot extensions may remain fitted 7 2 Traverse beam For the lifting and lowering of trailers on a set of mobile lifting columns a special Stertil Koni traverse beam is available 7 2 1 Before you start working Check both the maximum lif...

Page 80: ...sition under the vehicle 3 Position the mobile lifting columns in such a way that the forks of the columns fully support the pickup points of the traverse beam 4 Operate the mobile lifting columns as described in section Operation procedures 7 2 3 Tilting of the traverse beam with king pin adapter For some trailer models a traverse beam with a King Pin Adapter must be used Due to the design of the...

Page 81: ...iler from an external source 2 Make sure the brakes are released to allow rotation of the wheels while lifting and lowering 7 3 Adaptors with G suspension Some vehicles cannot be lifted by picking it up by its wheels for instance train wagons Stertil has developed special adaptors which are fitted by a pin on a special guide piece This system is assembled in the Stertil factory and is not meant as...

Page 82: ...apacity of the adaptor and the maximum lifting capacity of a column The lowest maximum lifting capacity is always leading CAUTION This can be a potential hazardous situation Because the vehicle lift can be overloaded without warning WARNING Be sure to lift the vehicle with the adaptors at the designated spots WARNING The load should be in the middle of the pads and have sufficient contact area ...

Page 83: ...wheels the dampening properties of the tyres and suspension are gone WARNING The load can than be extremely rigid and will quickly overload one of the columns See Safety when hoisting in the Operating Manual 7 4 Multipurpose fork adaptor See manual Multipurpose fork adaptor part number 38000890 ...

Page 84: ...Version B 84 Wireless 8 LIST OF PARTS The following sections will give an overview of the main assemblies and their components Model Starting at serial number ST1065 UL 216300 ST1075 UM 216300 ST1085 UN 216300 ST1100 UO 216300 ...

Page 85: ...Service and Parts manual Version B 85 Wireless 8 1 Main components Pos Qty Part No Description Remarks 0 0 38007850 Mobile column Battery_Wireless ebright 1 2 69800001 Battery 12V 105Ah VDC31M VMF 2 ...

Page 86: ...lock ST1065 1085 1100xxG 8 1 38130200 Guide block ST1075xxG 9 1 38007600 Hydraulic unit W mod 10 1 38110400 Column ST1075Fxx_1085Fxx 11 1 38250400 Column ST1085Rxx 12 1 38510400 Column ST1085 1100VFxx 13 1 38410400 Column ST1100Fxx 14 1 38450400 Column ST1100Rxx 15 1 38000113 Pallet lift mechanism 250 2 16 1 38000112 Pallet lift mechanism 300 2 17 1 38220300 Fork set ST1085 350 long 18 1 38420300 ...

Page 87: ... Guide piece ST1075xxF 1 1 38110201 Guide piece ST1075xxF Weld assy 2 4 32700104 Caster wheel 3 4 30001006 Slideplate blue groove 16mm 5 8 4 1 34400600 Hydr cyl mount assy L 1860 S 1744 D d 75 50 5 1 34200116 Locking bush 6 1 1035 46 05 66 Cyl head screw M10x25 8 8DIN912 GV 7 1 1036 46 03 45 Grubscrew M5x12 45H DIN916 gl GV ...

Page 88: ...0VxxA 1 1 38320201 Guide piece ST1085V 1100VxxA Weld assy 2 4 32700104 Caster wheel 3 4 30001006 Slide plate blue groove 16mm 5 8 4 1 32706800 Hydr cyl mount assy Mount assy 5 2 30501003 Shim washer 6 1 1036 46 03 45 Grub screw M5x12 45H DIN916 gl GV 7 1 65050144 Hex nut M20 8DIN934 GV 8 1 65058044 Spring washer M20 DIN127B GV 9 1 66201039 Nutcap black 034 2044 ...

Page 89: ...xxA 1 1 38220201 Guide piece ST1085 1100xxA Weld assy 2 4 32700104 Caster wheel 3 4 30001006 Slide plate blue groove 16mm 5 8 4 1 32706800 Hydr cyl mount assy Mount assy 5 2 30501003 Shim washer 6 1 1036 46 03 45 Grub screw M5x12 45H DIN916 gl GV 7 1 65050144 Hex nut M20 8DIN934 GV 8 1 65058044 Spring washer M20 DIN127B GV 9 1 66201039 Nut cap black 034 2044 ...

Page 90: ...de piece ST1065 1085 1100xxG 1 1 38230201 Guide piece ST1065 1085 1100xxG Weld assy 2 4 32700104 Caster wheel 3 4 30001006 Slide plate blue groove 16mm 5 8 4 1 32706800 Hydr cyl mount assy Mount assy 5 2 30501003 Shim washer 6 1 1036 46 03 45 Grubscrew M5x12 45H DIN916 gl GV 7 1 65050144 Hex nut M20 8DIN934 GV 8 1 65058044 Spring washer M20 DIN127B GV ...

Page 91: ...h locking pin 8 6 Guide block ST 1075 xxG Pos Qty Part No Description Remarks 0 0 38130200 Guide piece ST1075xxG 1 1 38130201 Guide piece ST1075xxG Weld assy 2 4 32700104 Caster wheel 3 4 30001006 Slideplate blue groove 16mm 5 8 4 1 34400600 Hydr cyl mount assy L 1860 S 1744 D d 75 50 5 1 34200116 Locking bush ...

Page 92: ...d screw M10x25 8 8DIN912 GV 7 1 1036 46 03 45 Grubscrew M5x12 45H DIN916 gl GV 8 1 32570110 Fixing pin with locking pin 8 7 Column ST 1075 Fxx ST 1085 Fxx Pos Qty Part No Description Remarks 0 0 38110400 Column ST1075Fxx ST 1085Fxx 1 1 38110401 Column ST1075Fxx ST Weld assy ...

Page 93: ...ng cap Skiffy 070012000007 12 1 69090050 GrommetNo 2790 type2 Technogro 13 4 65003526 Hex head screw M16x25 8 8DIN933 GV 14 2 65003285 Hex head screw M6x16 8 8DIN933 GV 15 1 1035 38 04 11 Hex head screw M6x10 8 8DIN933 GV 16 2 65034219 Pan head screw ball M4x10 4 8DIN7985 GV 17 2 65050124 Hex nut M4 8DIN934 GV 18 4 65055024 Flat washer M16 DIN125A GV 19 2 65055015 Flat washer M6 DIN125A GV 20 2 65...

Page 94: ...Part No Description Remarks 0 0 38250400 Column ST1085Rxx 1 1 38250401 Column ST1085Rxx Weld assy 2 1 32550102 Axle 3 1 32700101 Potentiometer bracket 4 1 32700116 Height stop Arched 5 1 30001004 Clamp plate 6 1 32700122 Pawl 7 4 32700111 Hinge pivot 8 2 32700131 Synthetic guard ...

Page 95: ...33 GV 20 1 1035 38 04 11 Hex head screw M6x10 8 8DIN933 GV 21 2 65034219 Pan head screw ball M4x10 4 8DIN7985 GV 22 2 65050124 Hex nut M4 8DIN934 GV 23 4 65725009 L cyl head screw hex socket M10x20 SS70 DIN7984 24 2 65051036 Self lock hex nut M12 8DIN985 GV 25 2 65025007 L button head screw hex socket M10x30 8 8ISO7380 GV 26 4 65055024 Flat washer M16 DIN125A GV 27 2 65055015 Flat washer M6 DIN125...

Page 96: ...ts manual Version B 96 Wireless 37 4 65725009 L cyl head screw hex socket M10x20 SS70 DIN7984 38 2 66103908 Bearing bush GFM 1214 10 Igus 39 2 66103909 Groove ball bearing 60052RSR 8 9 Column ST 1085 VFxx ST 1100 VFxx ...

Page 97: ...00 Potentiometer unit Mount assy 11 2 66201085 Shock absorbing cap Skiffy 070012000007 12 1 69090050 Grommetnr 2790 type2 Technogro 13 4 65003526 Hex head screw M16x25 8 8DIN933 GV 14 2 65003285 Hex head screw M6x16 8 8DIN933 GV 15 1 1035 38 04 11 Hex head screw M6x10 8 8DIN933 GV 16 2 65034219 Pan head screw ball M4x10 4 8DIN7985 GV 17 2 65050124 Hex nut M4 8DIN934 GV 18 4 65055024 Flat washer M1...

Page 98: ...escription Remarks 0 0 38410400 Column ST1100Fxx 1 1 38410401 Column ST1100Fxx Weld assy 2 2 32500109 Wheel axle 3 2 32500116 Wheel 4 1 32550102 Axle 5 1 32700101 Potentiometer bracket 6 1 32700116 Height stop Arched 7 1 30001004 Clamp plate 8 1 32700122 Pawl 9 1 69451400 Lifting solenoid ...

Page 99: ...x25 8 8DIN933 GV 14 2 65003285 Hex head screw M6x16 8 8DIN933 GV 15 1 1035 38 04 11 Hex head screw M6x10 8 8DIN933 GV 16 2 65034219 Pan head screw ball M4x10 4 8DIN7985 GV 17 2 65050124 Hex nut M4 8DIN934 GV 18 4 65055024 Flat washer M16 DIN125A GV 19 2 65055015 Flat washer M6 DIN125A GV 20 2 65055013 Flat washer M4 DIN125A GV 21 4 65062041 Axle locking ring nr 24 DIN6799 GV 22 2 65762024 Axle loc...

Page 100: ... Column ST 1100 Rxx Pos Qty Part No Description Remarks 0 0 38450400 Column ST1100Rxx 1 1 38450401 Column ST1100Rxx Weld assy 2 1 32550102 Axle 3 1 32700101 Potentiometer bracket 4 1 32700116 Height stop Arched 5 1 30001004 Clamp plate 6 1 32700122 Pawl ...

Page 101: ... 2 65003285 Hex head screw M6x16 8 8DIN933 GV 20 1 1035 38 04 11 Hex head screw M6x10 8 8DIN933 GV 21 2 65034219 Pan head screw ball M4x10 4 8DIN7985 GV 22 2 65050124 Hex nut M4 8DIN934 GV 23 4 65725009 L cyl head screw hex socket M10x20 SS70 DIN7984 24 2 65051036 Self lock hex nut M12 8DIN985 GV 25 2 65025007 L button head screw hex socket M10x30 8 8ISO7380 GV 26 4 65055024 Flat washer M16 DIN125...

Page 102: ...S70 DIN7984 38 2 66103908 Bearing bush GFM 1214 10 Igus 39 2 66103909 Groove ball bearing 60052RSR 8 12 Pallet lift mechanism 250 2 retractable wide frame Pos Qty Part No Description Remarks 0 0 38000113 Pallet lift mechanism 250 2 1 1 32700250 Tilt beam Weld assy 2 1 32550103 Axle 3 1 32700120 Bearing head 4 1 32706200 Pallet truck mechanism HU lift HP20S ...

Page 103: ...7150 7 1 65214358 Grub screw M8x8 45H DIN916 GV 8 1 1037 07 50 08 Low hex nut M8 04DIN439B GV 8 13 Pallet lift mechanism 300 2 standard battery Pos Qty Part No Description Remarks 0 0 38000112 Pallet lift mechanism 300 2 1 1 32700300 Tilt beam ST 1082 F BAT Weld assy 2 1 32550103 Axle 3 1 32700120 Bearing head 4 1 32706200 Pallet truck mechanism HU lift HP20S ...

Page 104: ...037 07 50 08 Low hex nut M8 04DIN439B GV 8 14 Fork arms ST 1085 Pos Qty Part No Description Remarks 0 0 38220300 Fork set ST1085 350 long 1 1 32702075 Adjustable fork left welding assembly 2 1 32702085 Adjustable fork right welding assembly 3 2 32700118 Arm lock 4 2 66201102 Handle elesa T griff L 652 80 B M8 nero 32456 5 2 65012443 Cyl head screw M12x20 8 8DIN912 GV 6 2 60201703 Pressure spring 3...

Page 105: ...o Description Remarks 0 0 38420300 Fork set ST1100 300 long 1 1 38420301 Fork left 300 2 1 38420302 Fork right 300 3 2 32700118 Arm lock 4 2 66201102 Handle elesa T griff L 652 80 B M8 nero 32456 5 2 65012443 Cyl head screw M12x20 8 8DIN912 GV 6 2 60201703 Pressure spring 304820 Bakker ...

Page 106: ... unit W mod 1 1 68038 Hydr unit bar corr 24VDC 1 2 2 9 2 1 32736150 Hydr hose L 900 Battery version 3 1 32706075 Oil line mount assy 4 1 68700450 Straight screw coupling GE10 PSR 5 2 65003403 Hex head screw M10x20 8 8DIN933 GV 7 2 65058028 Spring washer M10 DIN127B GV 9 1 68700118 Elbow connector W10 PS 11 2 68039013 Relay ...

Page 107: ... 107 Wireless 8 17 Hydraulic unit Pos Qty Part No Description Remarks 68038427 Hydr unit 1 2cc 24V 265 bar ST 1075 ST 1085 68038429 Hydr unit 1 2cc 24V 290 bar ST 1100 1 1 68039011 Tank plastic 10 liter 3 1 68510911 O ring110 72x3 53 mm ...

Page 108: ... torque 30Nm 8 4 68510124 O ring12 42 x 1 78 mm 9 2 69481501 Solenoid 24 VDC EC 30D 12 1 68039007 Pressure relief valve 265 bar ST 1082 Tightening torque 25Nm 12 1 68039043 Pressure relief valve 290 bar ST 1100 Tightening torque 25Nm 13 1 68039015 Half coupling pump side 15 1 68039014 Electric motor 3kW 24VDC 3300 rpm 16 1 32556904 Check valve Tightening torque 22Nm 17 1 68039004 Breather cap 18 1...

Page 109: ...Service and Parts manual Version B 109 Wireless 8 18 Hydraulic cylinder ST1075 ...

Page 110: ...ylinder bottom 2a 1 O ringØ56 74x3 53 2b 1 Backup ring 3 1 Retaining ring 4 1 Piston seal 5 1 Bearing ring 6a 2 O ringØ34x3 6b 2 Backup ring 7 1 Piston 8 1 Cylinder 9 1 Piston rod 10 1 Guide post 11 1 Bearing ring 12 1 Piston cap 13 1 68228005 Hose burst check valve 14 2 68700451 Union GE 10 PSR 1 4 32599000 Seal kit ...

Page 111: ...Service and Parts manual Version B 111 Wireless 8 19 Hydraulic cylinder ST1065 ST1085 ST1100 ...

Page 112: ...ing 3 2 O ring 4 1 Bearing ring 5 1 Piston seal 6 1 O ring 7 1 Backup ring 8 1 Piston cap 9 1 68700450 Straight adaptor 10 1 1003 91 80 38 Hose burst check valve 11 1 68900000 Air bleeding nipple 12 1 Cylinder 13 1 Piston rod 14 1 Piston 15 1 Gate 16 1 Retaining ring 17 1 65263009 Spring ring 18 1 Cylinder bottom 1 32706900 Seal kit ST1082 ...

Page 113: ...s Qty Part No Description Remarks 0 0 38007750 Control wireless ebright 1 1 38006101 Box battery versions 2 1 32500108 Cable support 3 1 32730251 Draw bar Screen cabinet 4 1 38007760 Control box ebrigh Without wiring 5 1 32730254 Inspection glass Mean well battery charger ...

Page 114: ...003287 Hex head screw M6x20 8 8DIN933 GV 17 6 65003285 Hex head screw M6x16 8 8DIN933 GV 19 2 65052921 Flange nut M3 DIN6923 20 16 65052920 Flange nut M5 DIN6923 21 2 65050132 Hex nut M8 8DIN934 GV 22 1 65050134 Hex nut M10 8DIN934 GV 23 1 65058028 Spring washer M10 DIN127B GV 24 2 65003488 Hex head screw M14x30 25 2 65055023 Washer M14 26 5 65055015 Flat washer M6 DIN125A GV 27 1 65055018 Flat wa...

Page 115: ...4 Grub screw M4x5 45H DIN916 39 1 32739181 Shift tube 40 1 32739182 Gear bush 41 8 1038 13 50 01 Self adhesive cable clamp viba13805 834 80668 42 3 38006105 Hinge 43 2 38006108 Box closure 44 1 38006111 Switch support 45 2 66201026 Self adh clip skiffy nr 1140002 46 2 65055414 Flat washer M6 DIN9021 47 8 65058018 Spring washer M6 DIN127B GV 8 21 Control box ...

Page 116: ...nel 3 1 Display unit 4 1 69900321 Printed circuit board 5 1 60700390 Sticker Blue 7 1 69202031 Beeper 8 1 38007783 Cable tree incl gland and connector Potmeter end switch 9 1 38007782 Cable tree incl gland and connector Power supply antenna 10 1 38007786 Cable tree incl gland and connector Motor and main relay 11 1 38007780 Cable tree incl gland and connector Unlock correction lowering 12 Not used...

Page 117: ...nual Version B 117 Wireless 8 22 Labels Pos Qty Part No Description Remarks 0 0 38000800 W Stickers wireless 1 2 60700037 Capacity sticker 6500 kg 1 2 60700332 Capacity sticker 7500 kg 1 2 60700118 Capacity sticker 8500 kg ...

Page 118: ...0700303 Sticker Stokvis Service 6 7 9 10 11 1 60700385 Sticker Control 12 13 14 15 1 1005 01 01 92 Sticker plate 16 1 60700221 Sticker 230V 17 1 60700223 Sticker Fuse F3 18 1 60700396 FCC Sticker 19 1 60702026 Sticker grounding green 21 22 1 60700304 Sticker Patent 24 26 1 60700330 Sticker License wireless 29 30 31 32 1 60700409 Sticker diagram ...

Page 119: ...arks 1R 1 32700920 Reducer plate 350mm 14 Right side Fixed forks 1L 1 32700925 Reducer plate 350mm 14 Left side Fixed forks 2R 1 34200930 Reducer plate 500mm 20 Right side Fixed forks Max 4000kg 8800lbs 2L 1 34200935 Reducer plate 500mm 20 Left side Fixed forks Max 4000kg 8800lbs 3R L 1 34400945 Set Fork extensions 500mm 20 Fixed forks Max 6600kg 14500lbs ...

Page 120: ...Max 6600kg 14500lbs 6R L 1 32710915 Set base frame extensions Retractable base frame wheels WARNING Longer wheel extensions may only be used in combination with column extensions See the attached label on longer wheel extensions for the maximum allowed capacity 9 2 Traverse beam fig 34 Type 32591100 Pos Qty Part No Description Remarks 32591100 Traverse beam 1 1 32591054 Traverse beam support 2 4 6...

Page 121: ...N934 GV 7 2 32591020 Adapter adjustable 8 2 32591051 Adapter low fig 35 Type 32591500 Pos Qty Part No Description Remarks 32591500 Traverse beam 1 1 32591510 Traverse beam support 2 2 32591020 Adapter adjustable 3 2 1020 50 00 30 Wheel 4 2 1038 40 04 00 Retaining ring A40 DIN471FF 5 2 1005 01 01 49 Stertil Koni sticker 6 2 60700127 Capacity sticker 14400 kg 32 000 lbs 7 2 60700102 Stertil Koni sti...

Page 122: ...se beam 1 1 32592010 Traverse beam support 2 1 32592020 Kingpin support 3 2 32500116 Wheel 4 2 1038 34 02 40 Retaining ring No 24 DIN6799 GV 5 1 4310 09 00 10 Pin with clip 6 1 32592005 Reducing bush 3 5 to 2 7 2 60700102 Stertil Koni sticker 8 2 60700075 Capacity sticker 7200 kg 9 2 60700076 Capacity sticker 16000 lbs ...

Page 123: ...Service and Parts manual Version B 123 Wireless 10 APPENDICES 10 1 Electrical connections fig 37 Electrical connections ...

Page 124: ... 2 Hydraulics diagram fig 38 Hydraulics diagram Item Description Torque C Cylinder EV22 2 2valve 30Nm VCDF Flow control valve F1 F2 Filter K Non return valve 22Nm P Pump 22Nm T Tank O Safety pressure valve 25Nm M Electric motor R Hose burst check valve ...

Page 125: ...Service and Parts manual Version B 125 Wireless 10 3 Dimensional drawing ST 1065 FWF fig 39 Dimensional drawing ST 1065 FWF ...

Page 126: ...Service and Parts manual Version B 126 Wireless 10 4 Dimensional drawing ST 1075 FWF fig 40 Dimensional drawing ST 1075 FWF ...

Page 127: ...Service and Parts manual Version B 127 Wireless 10 5 Dimensional drawing ST 1085 FWA VFWA RWA fig 41 Dimensional drawing ST 1085 FWA VFWA RWA ...

Page 128: ...Service and Parts manual Version B 128 Wireless 10 6 Dimensional drawing ST 1100 FWA VFWA RWA fig 42 Dimensional drawing ST 1100 FWA VFWA RWA ...

Page 129: ...Service and Parts manual Version B 129 Wireless 10 7 Inspection checklist Date Remarks Name of mechanic Initials of mechanic pass ...

Page 130: ...ency shutdown mechanism 34 Emergency stop 17 Environmental aspects 21 Error messages 73 F Fall hazards 12 Fault messages 71 Faults 74 Fork adaptors and frame extensions 119 Fork arms ST 1085 104 Fork arms ST 1100 105 Forms 31 G General information 67 General safety instructions 13 General safety requirements 61 Guarantee and liability 8 Guide block ST 1065 xxG ST 1085 xxG ST 1100 xxG 90 Guide bloc...

Page 131: ...5 Safety locking feature 34 Safety signs 18 Safety switch 35 64 Safety warnings 13 14 Settings screen 36 Setting the clock 57 Setting the height limit 59 Setup 27 Shop configuration 40 Spare parts 62 Special procedures 54 ST 1065 xxG ST 1085 xxG ST 1100 xxG 90 ST 1075 Fxx ST 1085 Fxx 92 ST 1075 xxF 87 ST 1075 xxG 91 ST 1085 104 ST 1085 Rxx 94 ST 1085 VFxx ST 1100 VFxx 96 ST 1085 VxxA ST 1100 VxxA ...

Page 132: ...Manufactured by STERTIL B V P O Box 23 9288 ZG Kootstertille Holland Telephone 31 0 512 334 444 Fax 31 0 512 332 630 Email info stertil nl Website www stertil nl ...

Reviews: