292
FR
ES
PT
IT
EL
PL
RU
KZ
UA
RO
BR
EN
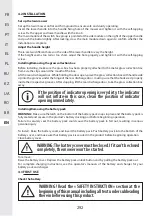
4.2 INSTALLATION
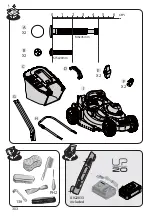
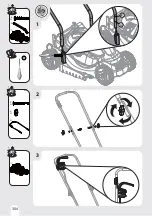
Set up the lawn mower
Set up the lawn mower on fl at and fi rm ground to ensure safe and sturdy operating.
Insert the lower handle into the handle fi xing hole of the mower and tighten it with the self-tapping
screw. Fix the upper and lower handles with the knob .
The main module of the switch box group is pointed at the side module on the right of the upper handle
and push the button lightly. After locking, cross the main module down again to confi rm whether the
installation is complete.
Adjust the handle height
There are two diff erent holes on the side of the lower handle to vary the height.
If the height seems too tall or too short, adjust the hole properly and tighten it with the self-tapping
screw.
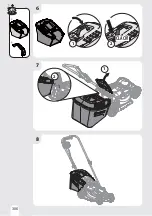
Installing/Removing the grass collection box
Before installing, make sure the grass box has been properly attached to the metal grass collection box
frame via the clips around the mouth of the box.
Lift the rear discharge door . While holding the door open, place the grass collection box with handle side
up into the grooves under the hinge of the rear discharge door , making sure that the hooks rest properly
inside their respective grooves. After stopping, lift the rear discharge door , take the grass collection box
away.
If the position of indicator opening is very dirty, the indicator
will not infl ate-in this case, clean the position of indicator
opening immediately.
Installing/Removing the battery pack
WARNING :
Make sure the latch on the bottom of the battery pack snaps in place and the battery pack is
fully seated and secure in the product’s battery docking port before beginning operation.
Failure to securely seat the battery pack could cause the battery pack to fall out, resulting in serious
personal injury.
To install : Raise the battery cover, and insert the battery pack. Push battery pack into the bottom of the
battery cover, and make sure that battery pack is secured in the product before beginning operation.
Close battery cover.
WARNING: The battery cover must be closed. If it can’t be closed
completely, the mower won’t be started.
To remove:
Raise the battery cover. Depress the battery pack unlock button and by pulling the battery pack out.
For complete charging instructions, see the operator’s manuals of the battery and charger for your
battery pack and charger.
4.3 FIRST USE
Check the battery
WARNING ! Read the « SAFETY INSTRUCTION » section at the
beginning of this manual including all text under subheading
therein before using this product.
Summary of Contents for 20VLM2-33P.1
Page 302: ...PH2 0 1 2 3 4 5 6 cm M6x45mm ST5x20mm A X2 B C I X2 D H G E X2 F X2 13 A022033 included 303 ...
Page 303: ...2 3 A X2 E X2 G I B X2 1 I H A B 304 ...
Page 304: ...5 F X2 4 100 cm 92 cm 305 ...
Page 305: ...6 7 8 C D 1 CLACK 2 1 2 306 ...
Page 306: ...1 2 307 ...
Page 307: ...2 3 1 4 3 2 1 2 5cm 7cm A 1 B 1 A 2 B 2 A 3 B 3 A 4 B 4 1 2 3 4 B A 100 1 2 CLICK 3 308 ...
Page 308: ...4 5 1 2 3 6 309 ...
Page 310: ...8 15 311 ...
Page 311: ...12 13 11 9 10 312 ...
Page 312: ...3 2 4 1 90 3 4 2 1 5 313 ...
Page 313: ...2 3 1 90 3 4 2 1 314 ...
Page 314: ...5 4 7 6 9 8 A022033 included 25 30N m 315 ...
Page 315: ...1 2 4 5 3 4 2 1 3 316 ...
Page 316: ...1 2 4 с 24 с 317 ...

