6. MAINTENANCE
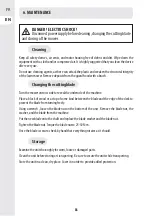
Keep all safety devices, air vents, and motor housing free of debris and dirt. Wipe down the
equipment with a cloth and/or compressed air. It is highly suggested that you clean the device
after every use.
Do not use cleaning agents, as these can attack the plastic and weaken the structural integrity
of the lawn mower. Remove deposits from the guard hood with a brush.
Turn the mower onto its side to reveal the underside of the machine.
Place a block of wood or a stop of some kind between the blade and the edge of the deck to
prevent the blade from turning freely.
Using a wrench , loosen the blade nut on the bottom of the unit . Remove the blade nut, the
washer, and the blade from the machine.
Put the new blade onto the shaft and replace the blade washer and the blade nut.
Tighten the blade nut. Torque the blade nut to 25-30 N•m.
Once the blade is secure, check by hand that everything rotates as it should.
Examine the unit thoroughly for worn, loose or damaged parts.
Clean the unit before storing or transporting. Be sure to secure the unit while transporting.
Store the unit in a clean, dry place. Cover it in order to provide added protection.
Cleaning
Changing the cutting blade
Storage
DANGER ! ELECTRIC SHOCK !
Disconnect power supply before cleaning ,changing the cutting blade
and storing of the mower.
38
38
FR
EN
Summary of Contents for ELM2-36
Page 2: ......
Page 3: ...x4 x2 x3 4x16 4x30 5130 included ...
Page 22: ...10 VUE ÉCLATÉE ET LISTE DES PIÈCES 22 FR EN ...
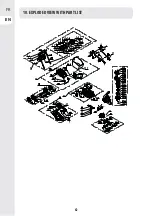
Page 42: ...10 EXPLODED VIEW WITH PART LIST 42 42 FR EN ...
Page 47: ...2 3 4 5 6 7 1 3 47 ...
Page 48: ...6 8 7 4 Clic 5 48 ...
Page 50: ...15 14 110 cm 95 cm 1 2 3 4 1 2 3 4 50 ...
Page 51: ...16 1 2 5 3 4a 4b 51 ...
Page 52: ...17 1 3 cm 1 3 cm 1 3 cm 18 1 3 cm 1 3 cm 1 3 cm 4 3 2 1 19 1 3 cm 1 3 cm 1 3 cm 4 3 2 1 52 ...
Page 53: ...20 21 15 53 ...
Page 54: ...22 54 ...
Page 56: ...27 15 28 56 ...
Page 59: ...37 38 35 36 25 30 N m 5130 included 59 ...
Page 60: ...OR 1 2 3 39 4 60 ...
Page 61: ......
Page 62: ......
Page 63: ......


