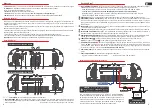
LEVEL
INPUT
L
R
500Hz
60Hz
2K2Hz
1KHz
0dB +16dB
BASS
BOOST
FREQUENCY
H.P.F. L.P.F.
SPEAKER
SPEAKER
6
7
General Description
1
5
9
8
14
11
13
12
2
6
7
3
4
15
16
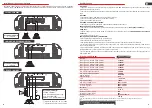
IIn order to install the power supply, use cables with a gauge of
6 AWG
. The
positive cable should come straight from the battery and have a fuse or
protective breaker 30cm from the battery. The negative cable should have the
same gauge as the positive cable and be screwed to the chassis of the vehicle,
being careful to avoid paint and rust. These may interfere with the flow of the
electrical current and cause loss of power and interference in the sound.
Installing the Input Cables
Resources
The
HL1000.2
has 4 channels which provide 900 RMS of total power with a minimum impedance of 2 Ohms. It can be
connected in
BRIDGE
with a minimum impedance of 4 Ohms and operates in frequencies from 10Hz to 22KHz.
It has Left
(L)
and Right
(R)
channels with controls:
• Level:
Adjusts the level of the input signal;
• Crossover:
Allows you to choose between
Low-Pass
,
High-Pass
or
Flat (Full-Range)
performances;
• Bassboost:
Allows variable tuning of the attenuation of the low frequency ranges from 0dB to + 20dB.
Before Installing
Read this manual carefully before installing the amplifier. You must follow the instructions for the product’s installation
and connections to guarantee optimal performance. If you have any questions, get in touch with us. Before using the
amplifier, always follow these guidelines:
• Make sure the appliance is switched off before adding or removing any connections. This prevents possible damage to
the equipment connected to the amplifier;
• Keep all cables as far away as possible from the ignition cables, electronic injection modules and starter switch since
they may cause noise interference;
• Always use good quality cables and connectors. This guarantees the sound’s quality and fidelity;
• To avoid damaging the cables, make sure that they do not touch sharp metal edges.
Important:
Use a 40A fuse 30 centimeters from the battery as a safety precaution.
GND
30 cm (max.)
AUXILIARY BATTERY
REQUIRED.
ATTENTION:
The use of a the fuse or
breaker is required, since this amplifier
has no internal fuses.
REMOTE
(REM)
10
13
15
16
4
5
6
7
10
11
12
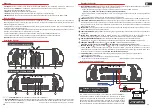
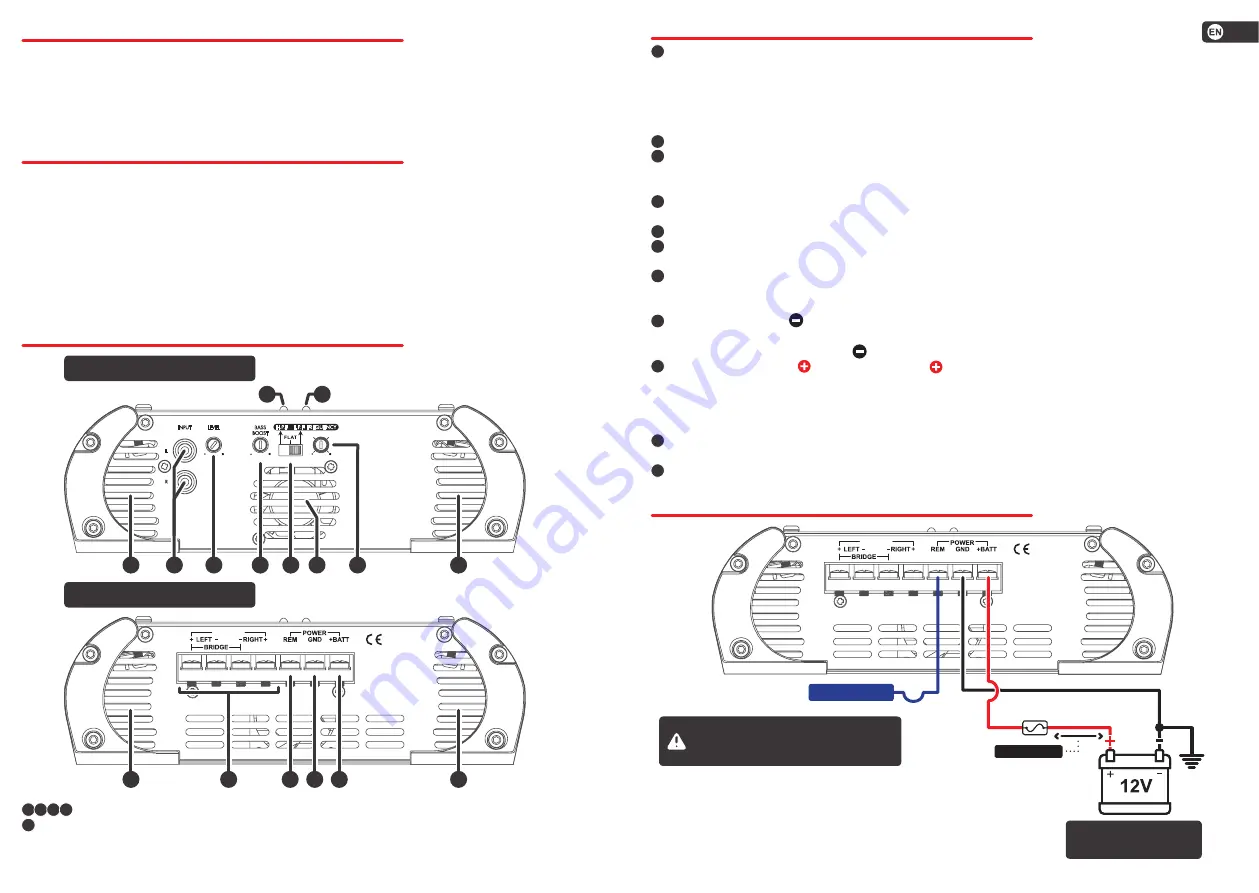
General Description
LEVEL (LEVEL CONTROL):
Controls the level of the input signal, allowing for adequate control of any CD/MP3 player
currently on the market. It can be regulated as follows:
a)
on the CD/MP3 player, play any music signal up to 80% volume
(Ex. If the maximum volume on the player is 45 [100%], adjust it to 36 [80%]).
b)
on the amplifier, begin at the lowest setting and gradually increase the LEVEL until the sound distorts.
c)
slowly decrease the LEVEL until the sound is not distorted.
BASS BOOST:
Reinforces the bass level at low frequencies 25Hz to 110 Hz. From 0 to + 20dB centered on 45Hz.
CROSSOVER (SWITCH H.P.F/FLAT/L.P.F.):
This switch allows you to choose what type of CROSSOVER will be used on
the channel. If the switch is on (L.P.F), then the active filter is the LOW-PASS. If the switch is on (H.P.F), the active filter
is the HIGH PASS. In FLAT position, the channels will be operating in FULL-RANGE.
FREQUENCY:
Adjusts the cutoff frequency of the Crossover. The adjusted frequency acts on both H.P.F and L.P.F.,
depending on which is selected.
COOLER
: This fan turns on when the device is activated. It cools the device.
SPEAKER OUTPUT:
Be careful to maintain the correct polarity on the connections between the speakers and check the
minimum impedance of this output. Use cables with a minimum gauge of
13 AWG
.
REM (REMOTE CONTROL):
Connect the REM terminal to the electric antenna output of the CD/MP3 player. This
will turn the amplifier on automatically when you turn on your CD/MP3 player. A cable with a gauge of
20 AWG
is
adequate.
GROUND CONNECTION :
Use a cable with the same gauge as the +BAT connection. Connect the cable to the chassis
of the vehicle.
(Note: always connect the GND wire of the CD player—or other equipment—to the same ground point.)
POSITIVE POWER SUPPLY :
Connect the terminal
(+BAT)
to the positive terminal of the battery (+12V) with a
cable that has a minimum gauge of
6 AWG
. It is extremely important that a protective fuse or circuit breaker be used
on this cable at a distance of 30 cm from the battery. The fuse or circuit breaker should be at least equal to the max
current
consumption that the amplifier will use as it plays music signals (see technical specifications table).
POWER LED (BLUE):
This indicator LED will light up when it is activated by the remote control signal from the CD/MP3
player.
PROT LED (RED):
This LED will light up for the following reasons
a)
Short circuit in the speakers
b)
Excessive temperature
3
VENTS:
Allows warm air to be removed from the amplifier.
INPUT (RCA INPUT):
This input should receive the signal through an RCA cable connected to the output of the CD/MP3
player. Use quality shielded cables that are specifically for audio to avoid interference from unwanted noise sources.
(We recommend the RCA cables with Triple shielding - STETSOM)
2
1 8 9 14
Fuse
40A
Audio Inputs and Controls
Power and Audio Outputs


