background image

1

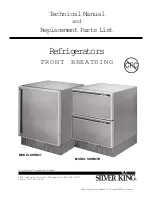
TECHNICAL MANUAL

SILVER KING FRONT BREATHING REFRIGERATORS

MODELS SKRB27 AND SKRB27D

Thank you for purchasing Silver King food service equipment.  Our goal is to provide our customers with the

most reliable equipment in the industry today.  Please read this manual and the accompanying warranty

information before operating your new Silver King unit.  Be sure to complete and mail the warranty card

within 10 days of purchase to validate your warranty.

INSPECT FOR DAMAGE AND UNCRATE

Upon delivery of your new Silver King unit, uncrate at once to examine and test for possible damage

following the instructions printed on the exterior of the container.  Report any damages to the carrier re-

sponsible for transportation and promptly present a claim for any evidence of mishandling.  Save all pack-

aging materials if a claim must be filed.

INSTALLATION

The stainless steel exterior of the cabinet has been protected by a plastic covering during manufacturing

and shipping.  This covering can be readily stripped before installation.  After removing this covering, wash

the interior and exterior surfaces using a warm, mild soapy water solution and a sponge or soft cloth.  Rinse

afterward with clean water and wipe dry.

Location

When locating your new Silver King unit, convenience and accessibility are important considerations, but

the following installation guidelines must be observed;

* Always avoid locating the unit adjacent to an oven, heating element or hot air source which could ad-

versely affect the performance of the unit.

* If the unit is not on casters, it is designed to be sealed to the floor with a waterproof sealant as required by

NSF International.  To do so, locate the unit in its desired location (following the installation instructions),

apply a bead of sealant around the perimeter of the unit at the base and smooth out with a finger to form a

radius with the floor and the unit.

* The unit must be level.

* For proper ventilation, the bottom front of the unit must not be obstructed.

Shelves

Inside the unit you will find Shelves and a plastic bag containing Shelf Supports.  The Shelf Supports with

the “tang” go on the rear Pilasters.  This shelf system allows for easy adjustment to suit your needs.

Drawers

To remove the Drawers on the drawer models for cleaning, simply open them fully, push the stop levers out

of the way on the Cabinet Drawer Tracks while pulling the Drawer out.  To reinstall the Drawer, line up the

Drawer Tracks on the cabinet and the Drawer and push the Drawer into the cabinet.  The Drawer Pan can

be removed by lifting it out with the Drawer extended.

Summary of Contents for Silver King SKRB27

Page 1: ...e Company 1600 Xenium Lane North Minneapolis MN 55441 3787 Phone 763 553 1881 Technical Manual and Replacement Parts List Refrigerators FRONT BREATHING Specifications Subject to Change Without Notice MODEL SKRB27 MODEL SKRB27D ...

Page 2: ...lean water and wipe dry Location When locating your new Silver King unit convenience and accessibility are important considerations but the following installation guidelines must be observed Always avoid locating the unit adjacent to an oven heating element or hot air source which could ad versely affect the performance of the unit If the unit is not on casters it is designed to be sealed to the f...

Page 3: ... average cabinet temperature of 35 to 40 Deg F To obtain colder temperatures turn the Temperature Control knob clockwise and visa versa Allow the unit a minimum of one hour to respond to a control setting adjustment Defrost Your Silver King unit is an automatic defrost unit No additional plumbing is required The frost buildup on the evaporator coil will clear each time the compressor shuts off and...

Page 4: ... elegir una ubicación para su nueva unidad Silver King debe tener en cuenta la conveniencia y facilidad de acceso pero debe seguir las siguientes pautas de instalación Siempre evite colocar la unidad cerca de un horno elemento calefactor o fuente de aire caliente que pueda afectar el funcionamiento de la unidad Si la unidad no está apoyada sobre rueditas está designada para ser sellada al piso con...

Page 5: ...eratura promedio de aproximadamente 1 66 a 4 Grados Centígrados 35 a 40 Grados Fahrenheit Para obtener temperaturas más bajas gire la perilla de Control de temperatura en el sentido de las agujas del reloj y viceversa Espere un mínimo de una hora para que la unidad responda a un ajuste de control Descongelamiento Su unidad Silver King posee descongelamiento automático y no se requieren trabajos de...

Page 6: ...minez l emplacement de votre nouvelle unité Silver King la commodité et l accessibilité sont des considérations importantes mais les conseils d installation qui suivent doivent être observés Évitez toujours de placer l unité dans le voisinage d un four d un élément chauffant ou d une source d air chaud qui affecterait le fonctionnement de l unité Si l unité n est pas sur des roulettes elle est con...

Page 7: ...des températures plus froides tournez le bouton de réglage de température dans le sens horaire et vice versa Laissez à l unité au moins une heure pour répondre à un réglage de fixation de régulation Dégivrage Votre unité Silver King est une unité à dégivrage automatique Aucune tuyauterie supplémentaire n est requise L accumulation de givre sur le serpentin de l évaporateur sera dégagée chaque fois...

Page 8: ...asser ab und wischen sie trocken Aufstellort Für die Wahl des Aufstellortes Ihres neuen Silver King Gerätes sind Bequemlichkeit und Zugänglichkeit wichtige Kriterien folgendes muss jedoch beachtet werden Stellen Sie das Gerät nie direkt neben eine Wärmequelle wie einen Herd oder Heizkörper denn dies würde die Leistung des Gerätes beeinträchtigen Falls das Gerät nicht auf Rollen gestellt wird muss ...

Page 9: ...ren erreichen drehen Sie den Temperaturregler im Uhrzeigersinn wollen Sie die Temperatur erhöhen drehen Sie ihn gegen den Uhrzeigersinn Das Gerät braucht mindestens eine Stunde um auf die neue Einstellung des Temperaturreglers zu reagieren Abtauen Ihr Silver King Gerät taut automatisch ab Dafür sind keine zusätzlichen Installationen nötig Immer wenn der Kompressor nicht läuft wird das Eis auf der ...

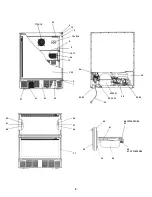
Page 10: ...9 4 6 20 12 17 18 19 8 9 54 52 53 10 11 27 21 23 50 51 45 38 49 51 44 37 40 48 OPPOSITE SIDE 47 41 39 46 14 15 16 24 13 1 2 3 5 7 22 35 32 33 34 28 29 30 31 25 26 36 42 43 OPPOSITE SIDE ...

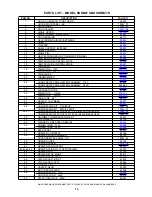
Page 11: ... 115 60 21251 2 FAN MOTOR 220 50 21251 3 26 FAN BLADE 4 5 99751 27 CASTER 2 WHEEL 99641 28 DRIER 22677 29 COMPRESSOR KIT 115V 60HZ 10343 08 COMPRESSOR KIT 220V 50 60HZ 10343 27 30 31 COMPRESSOR ELECTRICAL KIT 115V RELAY OVERLOAD 10344 08 COMPRESSOR ELECTRICAL KIT 220V RELAY OVERLOAD 10344 27 32 GROMMET COMPRESSOR MOUNT 20481 33 CLIP HAIRPIN 98106 34 WASHER COMPRESSOR MOUNT 22401 35 POWER CORD 115V...

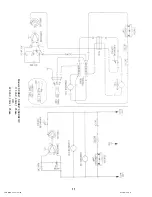
Page 12: ...11 WIRING DIAGRAM Models SKRB27 SKRB270 SKRB27W 115 VAC 60Hz 1 Phase OR 220 VAC 50Hz 1 Phase FORM NO 25961 09 00 Printed in U S A ...

Reviews: