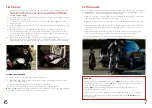
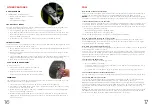
background image

6

7

PUTTING AWAY

Prior to folding, clear any debris from the trolley using compressed air or a soft brush or 

cloth (

never

 use water). Pay particular attention to the base of the main support arms 

for small stones or grit. See the FAQ for a cleaning guide. 

1.  Remove one side of the top bungee and lift your bag up & away from the machine. 

The bottom bungee will release automatically.

2.  Remove the front cover, disconnect and remove the battery and replace the front 

cover.

3.  Release both bottom clips simultaneously by pressing the clips with your thumbs. 

Slowly lower the main support until the top bag support comes to rest on the 

chassis.

4.  Whilst supporting the handle, release the top clip and lower the handle until it 

comes to rest on the rear cover. Do not ‘drop’ the handle or main support.

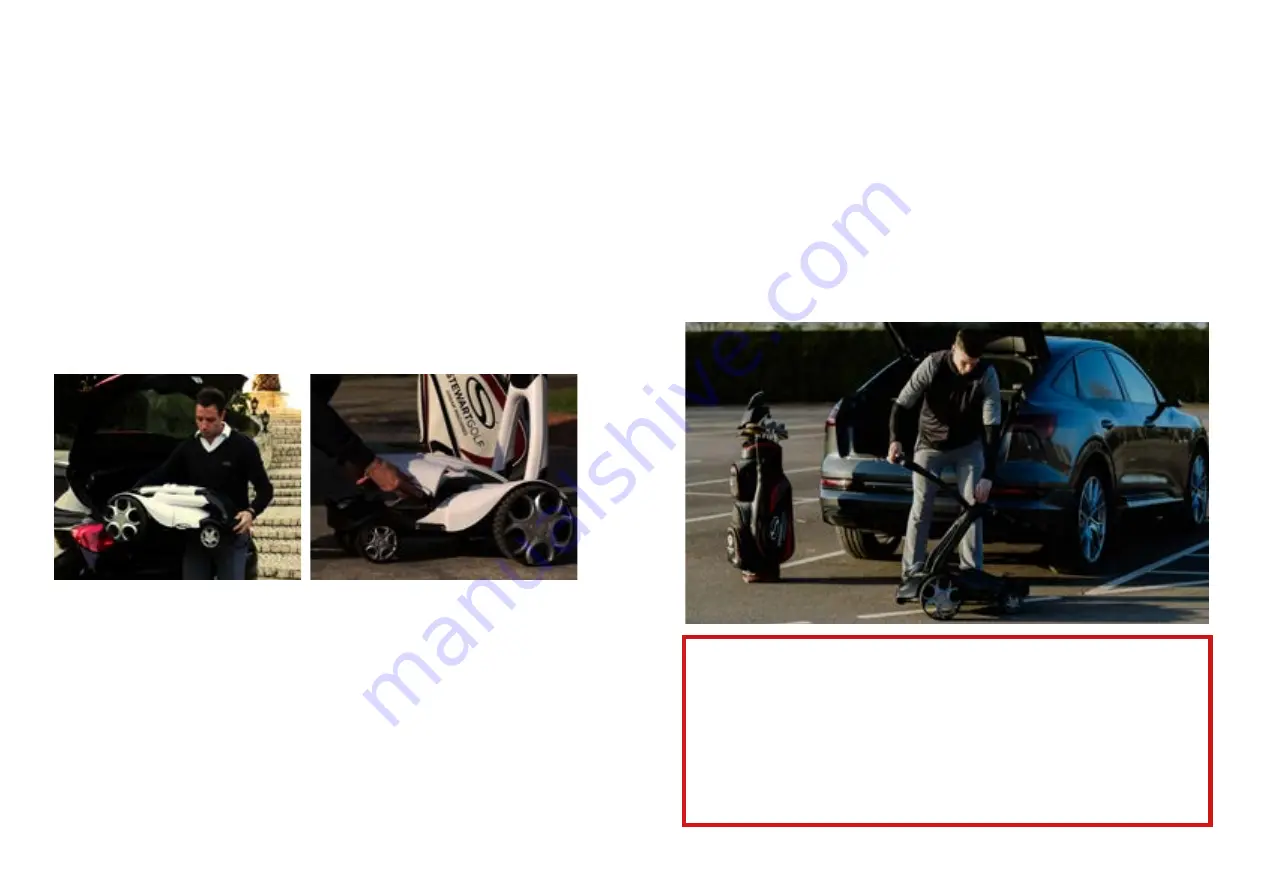
5.  Lift the X10 Remote in to your car using the lifting points specified.

WARNING:

Always ensure that your X10 Remote is turned 

OFF

 at the switch or disconnected 

completely when not in use. Leaving it 

ON

 or connected could drain the battery 

totally and risk irrecoverably damaging it. 

Turning 

OFF

 or disconnecting the battery will ensure that the trolley is not 

accidentally activated in transit. 

You may choose to remove the battery prior to folding to enable you to charge it.

In any case, it is good practice to always turn the switch to the 

OFF (O)

 position 

when not in use.

6

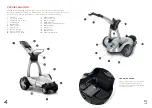
FITTING YOUR GOLF BAG

1.  Stand the base of your golf bag on the front chassis. 
2.  Ensure the bag cradle is fully lowered, then lean the golf bag back until it rests on 

the silicone bag cushion. 

3.  Pull the upper bungee around the golf bag evenly and fix. 
4.  Pull the lower bag strap over the bottom of the bag using the handle.

Note:

 The X10 Remote has been optimised for use with a cart or tour style bag weighing 

14kg (31lbs). Please refer to page 1 for more information. 
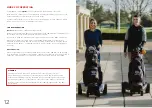
SETTING UP

1.  When removing the X Series from the car, only lift from the two lifting points. These 

are the stabiliser and under the front of the chassis (parts 9 and 16). 

Lifting from 

other parts of the trolley cover could cause unintended damage that will not be 

covered under warranty.

2.  To unfold, simply grip the handle and pull it towards you. The top & bottom clips will 

snap into place automatically.

3.  To remove the front cover, hold the two ‘S’ clips (part 10), apply slight outward 

pressure and lift.

4.  Insert the battery into the tray and secure with the strap. Connect the battery to the 

electronics box.

5.  Replace the front cover by aligning the two lugs on the straight edge with the 

corresponding gaps in the rear cover, and pivot in to place. Ensure the front of the 

cover is behind the small bump near the lower bag stay, apply downward pressure 

to the ‘S’ clips until the cover is secured.

6.  Turn the on/off switch to ‘ON’ (I) and wait for the blue light to flash. Press the 

bluetooth on/off button on the handset for 1 second to switch the handset on. When 

both blue lights are constantly illuminated, the bluetooth connection is established.

Summary of Contents for X Series

Page 1: ...1 OWNER S MANUAL ...

Page 2: ...hannel youtube com c stewartgolf they ll help you get the most from your X10 Remote CONTENTS Important Information Welcome X Series Anatomy Setting Up Putting Away Battery Charging Handset Guide Handset Charging Care Manual Operation Remote Control Follow Other Features FAQ Warranty Information Trouble Shooting Guide WELCOME IMPORTANT INFORMATION This machine is designed solely for the transportat...

Page 3: ...rd Holder 3 Golf Ball Tee Holder 4 Top Bungee 5 Bag Cushion 6 Main Support 7 Front Cover 8 Bottom Bungee 9 Front Lifting Point 10 Front Cover S Clips 11 Handset Cradle 12 Accessory Point 13 Bluetooth Light 14 On Off Button 15 Main Support Release Buttons 16 Rear Stabiliser 17 Rear Cover 18 Front Wheels 19 Rear Wheels 20 Handle Realise Clip 4 UNDER THE COVER Under the front cover you will find the ...

Page 4: ... BAG 1 Stand the base of your golf bag on the front chassis 2 Ensure the bag cradle is fully lowered then lean the golf bag back until it rests on the silicone bag cushion 3 Pull the upper bungee around the golf bag evenly and fix 4 Pull the lower bag strap over the bottom of the bag using the handle Note The X10 Remote has been optimised for use with a cart or tour style bag weighing 14kg 31lbs P...

Page 5: ...e and help extend battery lifespan avoid charging or leaving the battery in very hot environments including direct sun exposure for extended periods of time Please read and follow the advice in this manual LONG TERM STORAGE If you are not going to use the X10 Remote for more than one month the battery should be fully charged after its last game then disconnected from the charger and stored in a dr...

Page 6: ...itch on power if applicable 6 The indicator light on the handset will show RED while charging and GREEN when fully charged 7 Once the indicator light is GREEN disconnect the power cable from the handset 8 Return the black plug to the charging port on the side of the handset then refit the protective silicone skin HANDSET CARE Using the handset skin and charging port plug means that the handset wil...

Page 7: ...ad or negotiating a tight path you should steer manually from the handle You can control the speed of the machine using the speed up slow down buttons or program the cruise control speeds to your walking pace see P16 BEST PRACTICE When in tight areas you should physically keep control of the X10 Remote by steering from the handle The handset can either be clipped to the cradle which can be fitted ...

Page 8: ...ndset in your hand and position the machine approximately 10m in front of you and on the line of your ball Make small adjustments to direction and speed as you see fit Do not place the handset in your pocket When you get to your ball park the machine to the right of your ball or to the left if you are left handed Place the handset on the cradle when taking a shot If you are going to walk any dista...

Page 9: ...el lift from the top of the main support How many holes will the battery last for We expect any genuine Stewart Golf battery to last 18 holes on a normal course with a normal weight bag and in normal conditions However a hole of golf can be anywhere between 100 and 600 yards long so is not a reliable unit of measurement Terrain ground condition bag weight and a number of other factors can make a d...

Page 10: ... year warranty against faulty workmanship and materials Loss of battery performance owing to external damage howsoever caused misuse and or abuse incorrect charging or other failures not attributable to a manufacturing defect are specifically excluded from this warranty The handset and trolley batteries must be charged only with the equipment supplied by Stewart Golf and the instructions must be f...

Page 11: ...20 ...

Reviews: