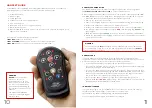
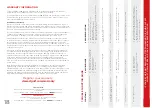
background image

14

15

2. REMOTE CONTROL

Good for: 

Around the greens or when you are in the rough.

Not for:

 Car parks, bridges, paths.

To start the machine moving forwards, press the forward button. Once the machine is in 

motion, continually pressing the “speed up” or “slow down” buttons will either speed up 

or slow down the machine respectively. You can also use the cruise control buttons to 

start the machine.

To reverse the machine press the “reverse” button (it must first be stopped). When 

reversing, the speed is fixed and cannot be increased or decreased.

To steer the machine, press and release either the left or right buttons. When in motion 

this will change the direction slightly and continue moving. A prolonged press will 

tighten the turn. If you press either button with the X10 Remote stationary, the machine  

will turn on the spot.
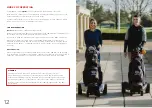
BEST PRACTICE

:

•  The remote has a nominal 50m range. However it is recomended that you keep the 

machine within 25m so that you can see obstacles in its way. 

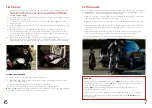
•  Hold the handset in your hand and position the machine approximately 10m in front 

of you and on the line of your ball. Make small adjustments to direction and speed 

as you see fit. Do not place the handset in your pocket.

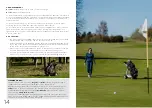
•  When you get to your ball, park the machine to the right of your ball (or to the left 

if you are left handed). Place the handset on the cradle when taking a shot.

•  If you are going to walk any distance away from the machine, keep your handset 

with you so you can drive it to your next position rather than walking back to it. 
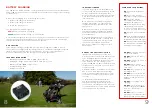
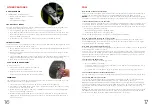
STEERING MODES: 

There are two modes of steering: 

Regular

 and 

Glide

 steering. Regular steering is 

suitable for most situations, whereas Glide steering reacts slower.
Regular steering is the default setting and can always be restored by pressing the 

STOP

 button. In Glide steering mode, the machine steers much more gently. To 

activate Glide Steering, press the orange 

GLIDE STOP

 button and then start the 

trolley moving 

within three seconds

The machine will default back to the Regular steering mode every time the trolley 

stops. If you use the GLIDE STOP, then the ‘STOP’ will engage automatically after six 

seconds which will reset the steering to Regular.

Summary of Contents for X Series

Page 1: ...1 OWNER S MANUAL ...

Page 2: ...hannel youtube com c stewartgolf they ll help you get the most from your X10 Remote CONTENTS Important Information Welcome X Series Anatomy Setting Up Putting Away Battery Charging Handset Guide Handset Charging Care Manual Operation Remote Control Follow Other Features FAQ Warranty Information Trouble Shooting Guide WELCOME IMPORTANT INFORMATION This machine is designed solely for the transportat...

Page 3: ...rd Holder 3 Golf Ball Tee Holder 4 Top Bungee 5 Bag Cushion 6 Main Support 7 Front Cover 8 Bottom Bungee 9 Front Lifting Point 10 Front Cover S Clips 11 Handset Cradle 12 Accessory Point 13 Bluetooth Light 14 On Off Button 15 Main Support Release Buttons 16 Rear Stabiliser 17 Rear Cover 18 Front Wheels 19 Rear Wheels 20 Handle Realise Clip 4 UNDER THE COVER Under the front cover you will find the ...

Page 4: ... BAG 1 Stand the base of your golf bag on the front chassis 2 Ensure the bag cradle is fully lowered then lean the golf bag back until it rests on the silicone bag cushion 3 Pull the upper bungee around the golf bag evenly and fix 4 Pull the lower bag strap over the bottom of the bag using the handle Note The X10 Remote has been optimised for use with a cart or tour style bag weighing 14kg 31lbs P...

Page 5: ...e and help extend battery lifespan avoid charging or leaving the battery in very hot environments including direct sun exposure for extended periods of time Please read and follow the advice in this manual LONG TERM STORAGE If you are not going to use the X10 Remote for more than one month the battery should be fully charged after its last game then disconnected from the charger and stored in a dr...

Page 6: ...itch on power if applicable 6 The indicator light on the handset will show RED while charging and GREEN when fully charged 7 Once the indicator light is GREEN disconnect the power cable from the handset 8 Return the black plug to the charging port on the side of the handset then refit the protective silicone skin HANDSET CARE Using the handset skin and charging port plug means that the handset wil...

Page 7: ...ad or negotiating a tight path you should steer manually from the handle You can control the speed of the machine using the speed up slow down buttons or program the cruise control speeds to your walking pace see P16 BEST PRACTICE When in tight areas you should physically keep control of the X10 Remote by steering from the handle The handset can either be clipped to the cradle which can be fitted ...

Page 8: ...ndset in your hand and position the machine approximately 10m in front of you and on the line of your ball Make small adjustments to direction and speed as you see fit Do not place the handset in your pocket When you get to your ball park the machine to the right of your ball or to the left if you are left handed Place the handset on the cradle when taking a shot If you are going to walk any dista...

Page 9: ...el lift from the top of the main support How many holes will the battery last for We expect any genuine Stewart Golf battery to last 18 holes on a normal course with a normal weight bag and in normal conditions However a hole of golf can be anywhere between 100 and 600 yards long so is not a reliable unit of measurement Terrain ground condition bag weight and a number of other factors can make a d...

Page 10: ... year warranty against faulty workmanship and materials Loss of battery performance owing to external damage howsoever caused misuse and or abuse incorrect charging or other failures not attributable to a manufacturing defect are specifically excluded from this warranty The handset and trolley batteries must be charged only with the equipment supplied by Stewart Golf and the instructions must be f...

Page 11: ...20 ...

Reviews:

Related manuals for X Series