R 8-Oct-05 / P 27-Jul-06
- 7 -
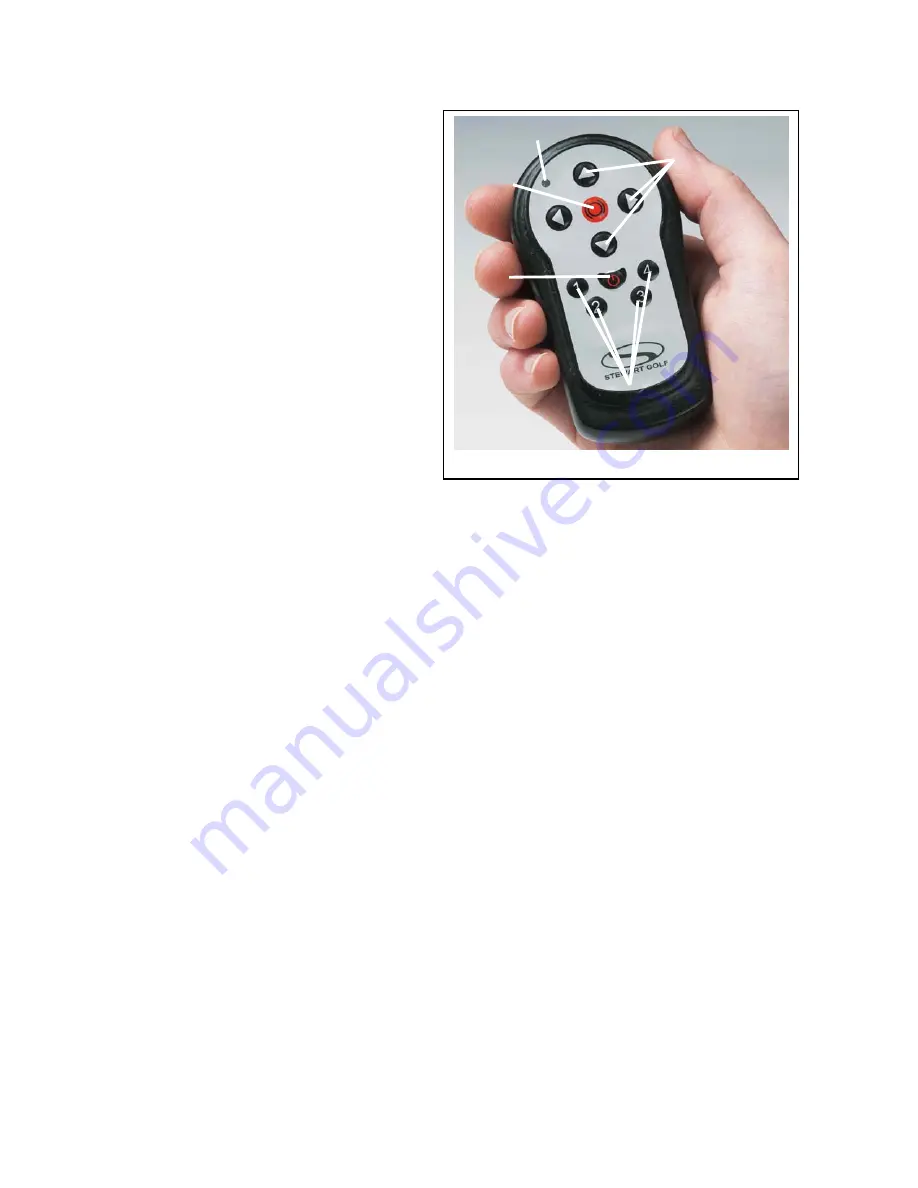
Fig 4: The X3R handset
Directional
Controls
Emergenc
y Brake
Off
Button
Cruise
Control
Indicator
Light
X3R Handset Information
•
Before you start, ensure that the
safety switch
is in the
'on'
position
(fig 3).
•
Get to know your
X3R
by practicing
away from any obstacles. Be aware
that the handling characteristics of
your X3R will be different on grass
than on the car park, and with or
without a golf bag fitted.
•
The
indicator light
will flash every
time a signal is sent to the receiver.
•
The red button in the middle of the
directional controls is an
emergency brake
. Press and release to bring the X3R to an
immediate stop. Do not use this as a matter of course as it may cause the X3R to skid.
This function can also be used as a parking brake when on slopes, however it is still
recommended that the X3R be parked ‘across’ a slope.
•
Pressing the ‘
Off
’ button will bring the X3R to a gradual stop. Use this for normal
stopping.
•
Pressing either the forward button, or any of the 4
cruise control
buttons will set the
X3R in forward motion.
•
Once the X3R is in motion, continually pressing the
forward
or
back
buttons will either
speed up or slow down the trolley respectively.
•
The
Cruise Control
buttons are factory set; button 1 is the slowest with button 4 the
fastest. You can also program your own walking speeds. See the Cruise control section
for instructions.
•
Holding either the left or right button down from stationary will make the X3R turn on
the spot. Releasing the button will stop the caddy.
•
The X3R's handset is designed to have an operating range of
50 metres
. This may be
affected by factors such as atmospheric conditions, proximity to buildings, hills and
trees, power lines and condition of the handset battery (which should be changed every
year).
o
The handset uses a standard 9V PP3 battery. To replace this, remove the
screws on the back of the controller and carefully separate the two halves.


