background image

12

www.

STEWART

GOLF.com

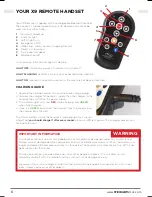
OTHER X9 REMOTE FEATURES

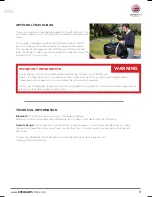
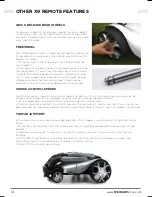
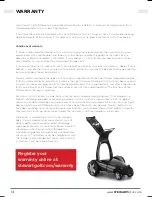
QUICK RELEASE REAR WHEELS

 
To remove a wheel, tilt the machine (holding the main support) 
so that one wheel is off the floor. Hold the centre of the wheel 
and press the black button with your thumb. Now pull the wheel 
away from the trolley. 
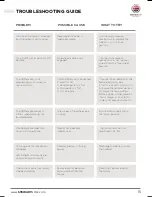
FREEWHEEL

The X9 Remote has a built in freewheel setting which allows you 
to complete your round even in the unlikely event of a fault. To 
engage this mode: 
1. Tilt the machine so that one wheel is off the floor (hold the 
main support). 
2. Press down on the black button in the wheel centre and slide 
the wheel 25mm (1”) away from the motor, but still on the axle. 
3. Rotate the wheel 45 degrees, and push it towards the motor 
until it stops, engaging the wheel on the outer ring of the axle. 
4. Release the black button and the wheel should now be 
locked on to the shaft, but not engaged onto the drive dog. 

CRUISE CONTROL SPEEDS

Your X9 Remote has 3 preset cruise control speeds, on buttons 1, 2 & 3. Use these when you are using the 
remote control mode. You can program these for your own walking speeds as follows: 
1. Use the speed up & slow down buttons to find your desired walking speed. 
2. Press and hold either button 1, 2 or 3 for 3 seconds. The machine will stop to show that the instruction has 
been received, you should now release the button and the machine will restart. Your new speed is now stored. 

TRIM ADJUSTMENT

As the motors wear, your machine may develop a bias. If this happens, you can adjust the right/left trim as 
follows: 
1. Ensure that your machine is on a flat surface and that your golf bag is balanced (no heavy items in side 
pockets). 
2. Hold down the lower left two buttons (1 and 3) for three (3) seconds. The machine will start moving 
forwards. 
3. Use the left & right buttons to fine tune the direction until the machine is travelling in a straight line. 
Alternatively press the forward button to restore the factory setting. 
4. Press STOP to store the new setting. 

Summary of Contents for X9 FOLLOW

Page 1: ...X9 REMOTE OWNER S MANUAL USER GUIDE ...

Page 2: ...golf equipment on a golf course as pictured Warnings and important safety instructions appearing in this manual are not meant to cover all possible conditions and situations that may occur Common sense caution and care must be exercised when operating or cleaning this equipment Always contact Stewart Golf or your local distributor dealer about problems or conditions that you do not understand DESI...

Page 3: ...contains both important safety information and also tips on how to get the best from the machine The first thing that you should do is put both the main battery and the rechargeable handset on charge Both are supplied only partially charged so will need to complete a full charge prior to use Please refer to instructions in this manual The first time you use your X9 Remote practice in an area of op...

Page 4: ... here you can find the battery and main electronics system Use the handle to pull the bottom bungee over the base of your bag Located centrally between the wheels at the front of the chassis Remove the front cover by gently pulling outwards from the chassis The quick release mechanism is in the centre of the wheel Designed to tightly grip your golf bag and stop it rotating The Bluetooth light indi...

Page 5: ...different from any previous X Series machine Now using Bluetooth connectivity a constant two way connection ensures that signals are sent and received more reliably than ever before The blue indicator light has 3 states LIGHT OFF No battery power If the on off switch is on I this indicates that the battery is either not connected or it requires a charge LIGHT FLASHING This indicates that there is ...

Page 6: ...he indicator light will show RED while charging and GREEN when fully charged 4 Once it is GREEN disconnect the handset from the charger and the charger from the wall The lithium battery inside the handset is large enough for 2 rounds of golf but you should charge it after every round to ensure sufficient power The charging process can take up to 6 hours IMPORTANT INFORMATION The handset contains n...

Page 7: ...rs Charge in a well ventilated area on a carpeted surface Store charge the battery in a dry environment between 0 and 35 degrees C Don t Drop or throw the battery charger Immerse in water or any liquid Clean with any abrasives or solvents a damp cloth is fine Leave the battery in a discharged state for longer than 48 hours Open or disassemble the charger This is dangerous and will void the warrant...

Page 8: ...ort 7 Using the handle in the middle of the bottom bungee pull the cord over the base of the golf bag Pull the loose side of the top bungee around the bag and attach it to the other side 8 Turn the on off switch to ON I and wait for the blue light to flash Press the bluetooth on off button on the handset to switch the handset on When both blue lights are constantly illuminated the bluetooth connec...

Page 9: ...elps keep your car clean To use open the bag and place the X9 Remote on to the flat part of the bag then collapse the main support and handle Pull the top of the bag over the X9 Remote The Stewart Golf logo should be on top now zip the bag fully closed and use the handles to lift in to your car HANDBUILT TECHNICAL INFORMATION Bluetooth The X9 Remote uses a Class 1 Bluetooth Module Please visit www...

Page 10: ...are comfortable with the handset in normal use you should use the glide stop button this will cut power to the motors and bring the machine to a gentle stop When in a car park crossing a road or negotiating a tight path you should steer the machine manually by the handle You can control the speed of the machine with the handset clipped to the handle using the cradle provided or just hold it in you...

Page 11: ...our ball Make small adjustments to direction and speed as you see fit Do not place the handset in your pocket When you get to your ball park the machine to the right of your ball or to the left if you are left handed Place the handset on the cradle when taking a shot If you are going to walk any distance away from the machine keep your handset with you so you can drive it to your next position rat...

Page 12: ...drive dog CRUISE CONTROL SPEEDS Your X9 Remote has 3 preset cruise control speeds on buttons 1 2 3 Use these when you are using the remote control mode You can program these for your own walking speeds as follows 1 Use the speed up slow down buttons to find your desired walking speed 2 Press and hold either button 1 2 or 3 for 3 seconds The machine will stop to show that the instruction has been r...

Page 13: ...een 100 and 700 yards long so is not a reliable unit of measurement Terrain ground condition bag weight and a number of other factors can make a difference How you play will also affect power consumption you ll cover less ground less shooting 70 than you will shooting 120 Q Can I make the battery last longer A Yes there are a number of things you can do Don t overload your golf bag Use the steerin...

Page 14: ...the right to inspect these parts We will not bear any costs incurred including carriage due to an item being returned with a suspected fault and after inspection no fault can be found or it is found that the customer has not fully understood all of the functions of the X9 Remote or the part in question Exclusions to the warranty include but are not limited to damage during shipment if not packed i...

Page 15: ... range 1 Connect main battery to the black electronics box 2 Turn the on off switch on I 3 Charge the handset battery 4 Charge the main battery 5 Move closer to the machine If your range is consistently under 25m please contact us The X9 Remote moves in circles when pressing the forward button One wheel in freewheel one in drive Ensure both wheels are in the drive position The X9 Remote does not t...

Page 16: ...www STEWARTGOLF com Contact Online www STEWARTGOLF com Email info stewartgolf com Tel 0333 800 1818 HANDBUILT ...

Reviews:

Related manuals for X9 FOLLOW