background image

stewmac.com

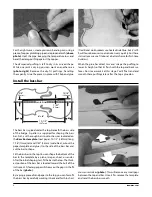
finishing, now is the time for that step (see “Install the tailgut 
saddle”). 

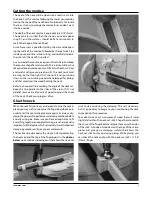
Traditionally, the color of the violin covers the peghead and 
heel of the neck, but feathers away to an almost-bare playing 
surface on the back of the neck. By sanding and scraping, 
feather the finish at the heel and peghead creating a quick, 
smooth transition blend from the finish to bare wood. 

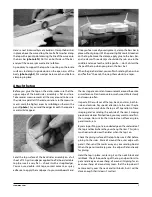
Scrape and sand the maple smooth, then add a light stain 
for  a  traditional  look.  Practice  on  a  scrap  piece  of  maple 

to find the color you want. We used ColorTone Amber and 
Medium Brown, in tiny amounts, added to Behkol solvent 
until we got the look we liked. 

Then we stained the real thing. Allow the stain to dry, then 
rub the neck with a clean rag to burnish it. Wipe on a coat or 
two of Tung Oil for a final finish that has a bare wood feel.

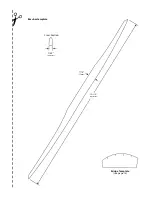
Remove the mask from the mortise you cut for the saddle. 
A little careful cleanup will probably be needed. Glue the 
saddle in place. If you chose to cut and fit the saddle after 

����������

���������

����������

Re-install the tailgut saddle

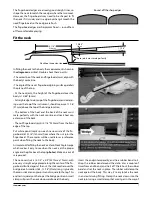
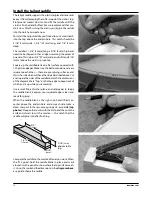
The pegholes are tapered to accept the tuning pegs, but 
you’ll need to refine this shape with a violin peg reamer for 
a good fit. A few careful turns should be all that’s needed. 
Check the fit after every twist of the reamer. The 

diagram 

shows that the band around the tapered shaft is generally 
1/2" (12 to 14 mm) from the side of the pegbox. Try to make 
all four pegs extend the same distance. 

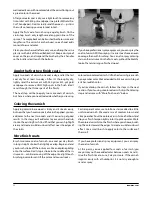
When each peg is properly seated and operating smoothly, 
mark  the  ends  of  the  pegs  with  a  pencil  to  show  where 
the excess wood needs to be cut away. Remove the pegs 
and trim them to length, then smooth the cut ends with 
sandpaper.

Put the trimmed pegs back in their respective holes, and 
mark the location of the string hole in each peg. The string 
hole should be slightly off-center (as measured within the 
pegbox), toward the knob side of each peg. Use an awl to 
make a start for the hole to be drilled.

Carefully drill a 1/16" (1.5mm) hole through each peg, then 
smooth the sharp edges of the hole, for less stress on the 
string. When drilling, hold the peg down firmly on a hard 
wood surface so that when the drill bit comes through the 
other side it doesn’t “blow-out” wood.

Fit the tuning pegs

Final-finish the neck

14

Summary of Contents for 5342

Page 1: ...Violin Kit 5342 Assembly Instructions www stewmac com ...

Page 2: ......

Page 3: ... first two finish coats 12 Table of contents important for you to dry run the fitting gluing clamping and finishing operations before trying them for real You ll need a flat work surface approximately 2 x 4 or big enough for your violin Be safe when using tools glues and finishes Wear eye protection and gloves when needed and always use proper ventilation Welcome to the world of violin building The viol...

Page 4: ...5033 128484 vintage amber 5030 1284812 Tung oil 0624 07S21 Violin LiteCase 1498 Violin bow cherrywood 4275 brazilwood 4277 146417 pernambuco 4278 Reference Violin Setup Video or DVD 5519 5622 The following tools and supplies are recommended to assemble your kit Most of these tools are standard wood working items though a few specialty tools are also shown Where applicable item numbers for ordering...

Page 5: ...e back to trace acurvedlineconnectingthechannelends middlephotos Usingyourtemplateasaguide cutlightlywithasharpknife Slowly make your cuts deeper until you can chisel out the wood with your small micro chisel When cutting the purfling to fit you can get sharp corner joints by cutting with an X acto knife or a sharp chisel bot tom photo To help you visualize the angle you re cutting here s a tip cut ...

Page 6: ...Install the bass bar Traditional violin makers use heated Hide Glue but it s dif ficult to use because it cools and sets very quickly For these instructions we use Titebond a better choice for first time builders When the glue has dried trim and scrape the purfling to lower its height so that it s flush with the top and back sur faces Don t overwork it at this stage You ll final sand and smooth these p...

Page 7: ... upper edge of the back sides assembly is flat and true Take several measurements all the way around to be sure the sides are parallel If there are variations in the measure ments mark the highest areas by scribbling on them with a pencil photo As you sand the edges smooth these pencil marks will disappear Sand the top surface of the back sides assembly on a full sheet of 150 grit sandpaper applied...

Page 8: ...lue up insert two small brads as alignment pins to quickly reposition the top while the glue is wet If you re going to attach a label now s the time before the top goes on photo top right Using spool clamps or cam clamps photo right practice clamping the top onto the back sides assembly without glue If you have a limited number of clamps you can supplement them by also using string and or rubber b...

Page 9: ... ...

Page 10: ......

Page 11: ...ension of the back The nut fingerboard joint is 5 1 8 130mm from the front edge of the top Put white pencil marks on each narrow side of the fin gerboard at 5 1 8 130mm from where the nut joins the fingerboard These marks will be used later as a reference point when fitting the neck to the body AsimpletoolforfittingtheneckisaViolinNeckAngleGauge which makes it easy to see when the neck is at the proper...

Page 12: ... photo below the pencil darkened area marks the woodtobecutaway Removethewoodfromtheheelwitha thinsaworwithchiselsandfiles Removingthefingerboard at this stage makes the cutting easier the neck set stick which must remain on center A wedge of wood placed under the fingerboard will allow you to change the neck angle Slide the wedge in or out to tip the neck if needed The neck pictured above needs to b...

Page 13: ...lel to the sides of the violin If it s not parallel remove tiny amounts of wood to adjust the angle of the neck Check your progress often When the neck fit is correct you are ready to glue the neck in place you may wish to spot glue the fingerboard back on in order to test the centerline alignment again As always dry clampthegluejointtoperfectyourclampingmethodsbefore actually using glue Make sure y...

Page 14: ...e side are square to each other these are your gluing surfaces and thisisthesidewhichwillhavetheridgedescribedabove Cut and square the sides of the saddle to match the dimensions of the diagram Mark Top on the top edge to keep track of which end is up while you re working Use a small file a chisel or plane and sandpaper to shape the saddle blank keeping your squared edges clean and ready for gluing...

Page 15: ...r and well squeezed out to raise the grain dampen the wood don t wet it Wood and finish preparation You can also stain the wood or tint the varnish to achieve a specificcolororshadeusingStewart MacDonald sColorTone concentratedliquidstains Inthefinishstepsshownhere we tint the varnish For a first time builder however the best finishing plan is the simplest so if this is your first finishing project we re...

Page 16: ...er to remove ONLY high spots in the finish don t sand through the thinner parts of the finish The next step will be to apply two more coats of varnish but here is where you need to decide whether you re using Apply the first two finish coats For transparent color use ColorTone stains added to a little unthinned varnish We used a mix of medium brown and vintage amber Pour the colored varnish into a flat...

Page 17: ...rnish You won t know until you try sanding the coat smooth Start with 800 grit Fre Cut paper and graduate to 1200 grit Micro Finishing paper If you still have some low spots in the finish and are unsure whether they would disappear when buffing the finish it s a good idea to add another coat of varnish Set the violin aside to cure for one to three weeks before fitting the parts Level sanding Use a sha...

Page 18: ...le The pegholes are tapered to accept the tuning pegs but you ll need to refine this shape with a violin peg reamer for a good fit A few careful turns should be all that s needed Check the fit after every twist of the reamer The diagram shows that the band around the tapered shaft is generally 1 2 12 to 14 mm from the side of the pegbox Try to make all four pegs extend the same distance When each peg...

Page 19: ...h them with small round files that match the string diameters Nut slotting files work well for this File the nut to its final shape smooth its surfaces and make sure it s not wider than the neck You might want to remove it for this work and glue it back on afterward Beverycarefulandprecisewhenfittingthesoundpostsince it determines the overall volume and tone of the violin The soundpost is fitted inside...

Page 20: ...eet accurately can be difficult A good method is to put a small piece of 120 grit sandpaper on the top in the bridge location and sand the feet with short strokes until they match the top s curve Be careful to keep the bridge standing up straight perpendicular to the top With a pencil mark the locations for the two outer strings G and E 1 5 16 33 5mm apart and centered Mark the two remaining string...

Page 21: ...in the photo Remove the thumb screws pusheachthreadedendthroughthetailpieceholes andthreadthethumbscrewsbackon Whenattachedtothe instrument theendofthetailpieceshouldbealmosttouch ing the front edge of the tailgut saddle Adjust the tailgut s length using the thumbscrews to locate the tailpiece at that point Trim excess material from the tailgut and set the tailpiece aside Install the tailgut The fi...

Page 22: ...t come loose The chinrest bracket has two turnbuckles that work as ad Install the chinrest Before stringing put a little graphite into the string slots at the nut by rubbing pencil lead in them Protect the top by placing a cloth under the tailpiece then install the tailpiece Insert the strings into the tailpiece and run them up to the pegbox installing them loosely before placing the bridge Push a...

Page 23: ......

Page 24: ...21 N Shafer St Athens Ohio 45701 USA USA Canada call toll free 800 848 2273 9am 7pm weekdays Eastern time 24 hour fax 740 593 7922 www stewmac com i 5342 03 05 ...

Page 25: ...rushes Professional Glue Bottle Biscuit Slot Glue Bottle WOODCRAFT Liquid Storage Containers Titebond Glue This yellow aliphatic resin adhesive offers the fast set and handling ease of white glues and tack toughness durability of hide glue Setting time 10 30 minutes depending on temperature and moisture of wood Allow 24 hours for full strength bond Non toxic non flammable Titebond Extend Wood Glue...

Page 26: ...08L46 Price 3 99 Quantity Titebond Dark Wood Glue 16 Ounce 08L47 Price 5 99 Quantity To add more than one item check the box in the left column and click Help Contact About Woodcraft Site Map Home Feedback 2005 by Woodcraft Supply Corp an SBR Company Privacy Policy http www woodcraft com family aspx familyid 1966 2 of 2 11 18 2005 7 31 58 AM ...

Page 27: ... Sheets Abrasive Cords Micro Mesh Sanding Kit Ultra fine grit sandpaper produces the ultimate polished finish Used for years to restore airline windows to optical clarity woodworkers have discovered that these incredibly fine abrasive cloths put a polished sheen on bare wood and a handsome luster on finish coatings This set is ideal for Pen Makers with the paper sized for sanding right on the lath...

Page 28: ...anding Kit Woodcraft com Help Contact About Woodcraft Site Map Home Feedback 2005 by Woodcraft Supply Corp an SBR Company Privacy Policy http www woodcraft com family aspx familyid 4014 2 of 2 11 18 2005 7 32 02 AM ...

Reviews: