stewmac.com
©2017 Stewart-MacDonald
page 7 of 12
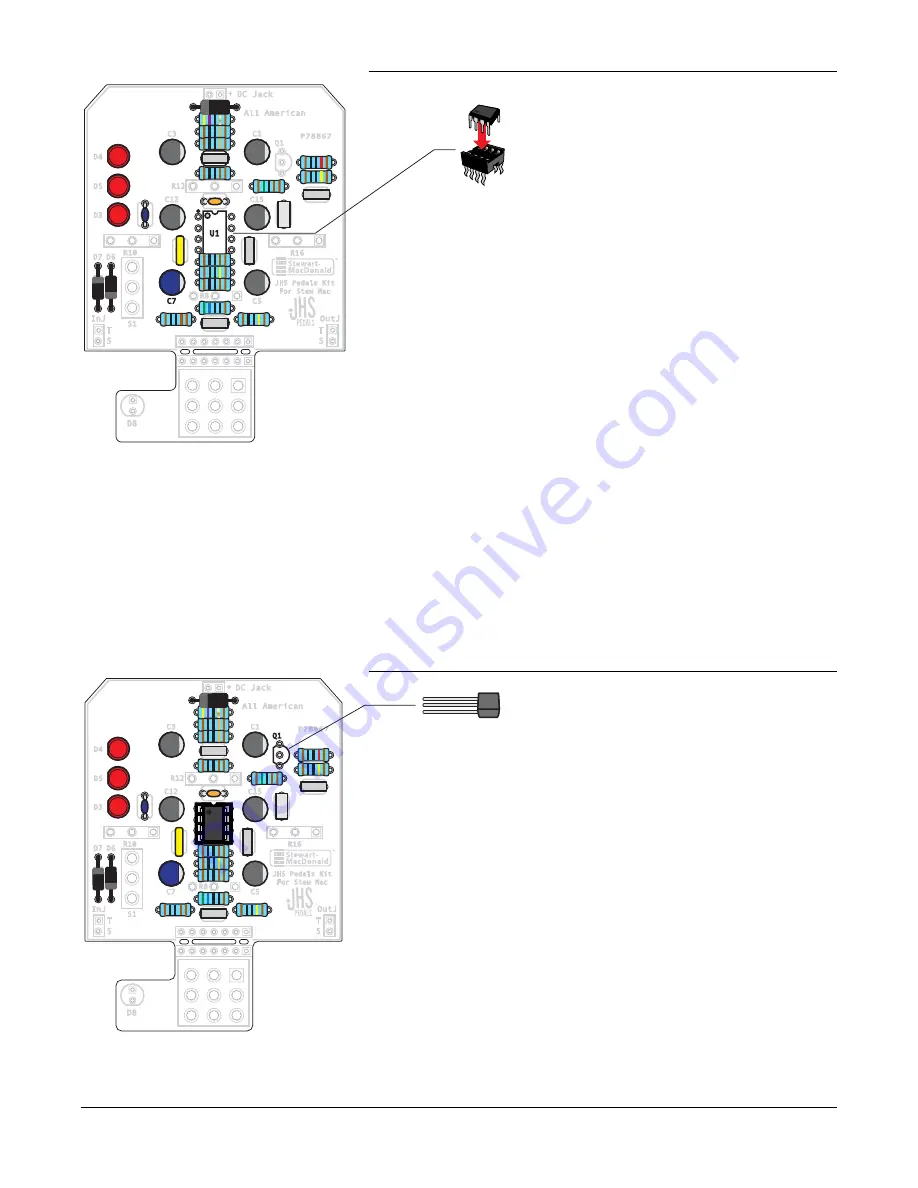
Step 5: Install the transistor
Q1
is a 2n5458 JFET* transistor. It is directional, and needs to be installed
in a specific orientation. Note that it has a flat side. On the circuit board, its
location outline also has a flat side. Install the transistor to match this outline.
*JFET: Junction Gate Field-Effect Transistor
Step 4: Install the operational amplifier
The operational amplifier consists of two parts: the op-amp itself (
U1
), and
the socket it plugs into (
U1.2
).
You’ll solder the socket first, then install the op-amp in the socket.
The op-amp has to be oriented correctly in order to function properly. There
are two indicators on the circuit board to guide you in positioning it:
1. The rectangular
U1
position marker has a small notch at one end. Align the
similar notch in socket
U1.2
when installing the socket.
2. The
U1
position marker has a dot in one corner. There is a dot molded into
the corner of op-amp
U1
. Align these corners when pressing the op-amp
into place.
Solder socket
U1.2
to the board. The op-amp
U1
then snaps in without solder.
This feature allows you to try different op-amps with no soldering.
U1
Low noise op-amp (5534 500nA)
U1.2
socket for op-amp
JHS Pedals Kit
For Stew Mac
DC Jack
All American
InJ
D8
T
S
T
S
R1
R2
R3
R4
R17
R13
R14
R15
R5
R6
R7
R9
R11
D1
OutJ
P78867
R8
R10
S1
R12
C1
Q1
D4
D3
D5
D6
D7
C5
C12
C15
C7
C3
R16
C6
C9
C13
C8
C2
U1
C11
C14
C4
22nJ
22nJ
22nJ
22nJ
3n3K
JHS Pedals Kit
For Stew Mac
DC Jack
All American
InJ
D8
T
S
T
S
R1
R2
R3
R4
R17
R13
R14
R15
R5
R6
R7
R9
R11
D1
OutJ
P78867
R8
R10
S1
R12
C1
Q1
D4
D3
D5
D6
D7
C5
C12
C15
C7
C3
R16
C6
C9
C13
C8
C2
U1
C11
C14
C4
22nJ
22nJ
22nJ
22nJ
Q1
Transistor (2n5458)
3n3K


