10
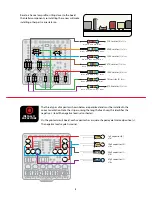
INSTALL 7
CAPACITORS
5
1u
+
1u
+
+
100u
+
10
u
+
100u
+
100u
1u
+
1u
+
1u
+
+
10
u
100pF
22n
22n
22n
22n
22n
22n
220n
2n2
1n
100n
100n
100n
100n
100n
100n
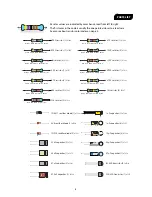
.0022µF capacitor (1)
#7324
.22µF capacitor (1)
#7305
.1µF capacitor (6)
#7304
100pF capacitor (1)
#7326
101J
100V
.001µF capacitor (1)
#7302
102J
2n2J630
.022µF capacitor (6)
#7317
.1J63
.22J63
1µF capacitors (5)
#7314
1uF
10µF capacitor (2)
#7338
100µF capacitor (3)
#7312
10uF
100uF
10K
1M
470K
100K
22K
1K
47K
220K
10K
10K
10K
10K
10K
10K
10K
470K
22K
47K
47K
220K
22K
4K7
10K
1M
470K
100K
22K
1K
47K
220K
10K
10K
10K
10K
10K
10K
10K
470K
22K
47K
47K
220K
22K
4K7
22nJ
47
n
J
22
n
J
47
n
J
33
n
J
10uF
47
4J
100v
33
nJ
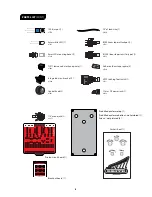
33nF capacitor (1)
#7475
22nF capacitor (2)
#7317
470nF capacitor (1)
#7336
22
nJ
M
MK
BH
8
50
-
47n
J
47nF capacitor (2)
#7307
M
MK
BH
N
50
-
102J
1nF capacitor (1)
#7302
TL071
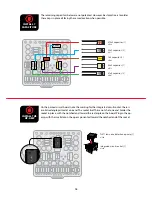
INSTALL THE
OP-AMP
6
2n2J630
TL072
TL071
PT2399
PT2399
PT2399
echo audio
processor (1)
#7490
TL071 low noise distortion op-amp (1)
#7509
Integrated circuit socket (1)
#7484
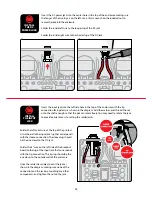
The remaining capacitors below are not polarized. However, best practice is to solder
these caps in place all facing the same direction when possible.
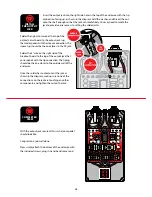
On the printed circuit board, note the marking for the integrated circuit socket: there is
a solid rectangle printed at one end. The socket itself has a notch at one end. Solder the
socket in place, with the notched end toward the rectangle on the board. Plug in the op-
amp, with the small dot on the op-amp oriented toward the notched end of the socket.
2n2J630
TL072
TL071
PT2399
PT2399
PT2399
echo audio
processor (1)
#7490
TL071 low noise distortion op-amp (1)
#7509
Integrated circuit socket (1)
#7484


