background image


11 


CONDITIONING GUIDELINES 


How you begin your exercise program depends on your physical condition. If you have been inactive for several 

years, or are severely overweight, you must slowly and increase your time on the 2 in 1 Elliptical / Stepper 

gradually: a few minutes per workout. 


Initially, you may be able to exercise only for a few minutes in your target zone, however, your aerobic fitness 

will improv

e over the next six to eight weeks. Don’t be discouraged if it takes longer. It’s important to work at 

your own pace. Ultimately, you’ll be able to exercise continuously for 30 minutes. The better your aerobic fitness, 

the harder you will have to work to stay in your target zone. Please remember these essentials: 

 
˙ Have your doctor review your training and diet programs to advise you of a workout routine you should adopt. 
˙ Begin your training program slowly with realistic goals that have been set by you and your doctor. 
˙ Monitor your pulse frequently. Establish your target heart rate base on your age and condition. 
˙ Set up your 2 in 1 Elliptical / Stepper a flat, even surface at least 3 feet from walls and furniture. 
 

EXERCISE INTENSITY 


To maximize the benefits of exercising, it is important to exercise with the proper intensity. The proper intensity 

level can be found by using your heart rate as a guide. For effective aerobic exercise, your heart rate should be 

maintained at a level between 70% and 85% of your maximum heart rate as you exercise. This is known as 

your target zone. You can find your target zone in the table below. Target zones are listed for both 

unconditioned and conditioned persons according to age. 


During the first few months of your exercise 

program, keep your heart rate near the low end 

of your target zone as you exercise. After a few 

months, your heart rate can be increased 

gradually until it is near the middle of your target 

zone as you exercise. 


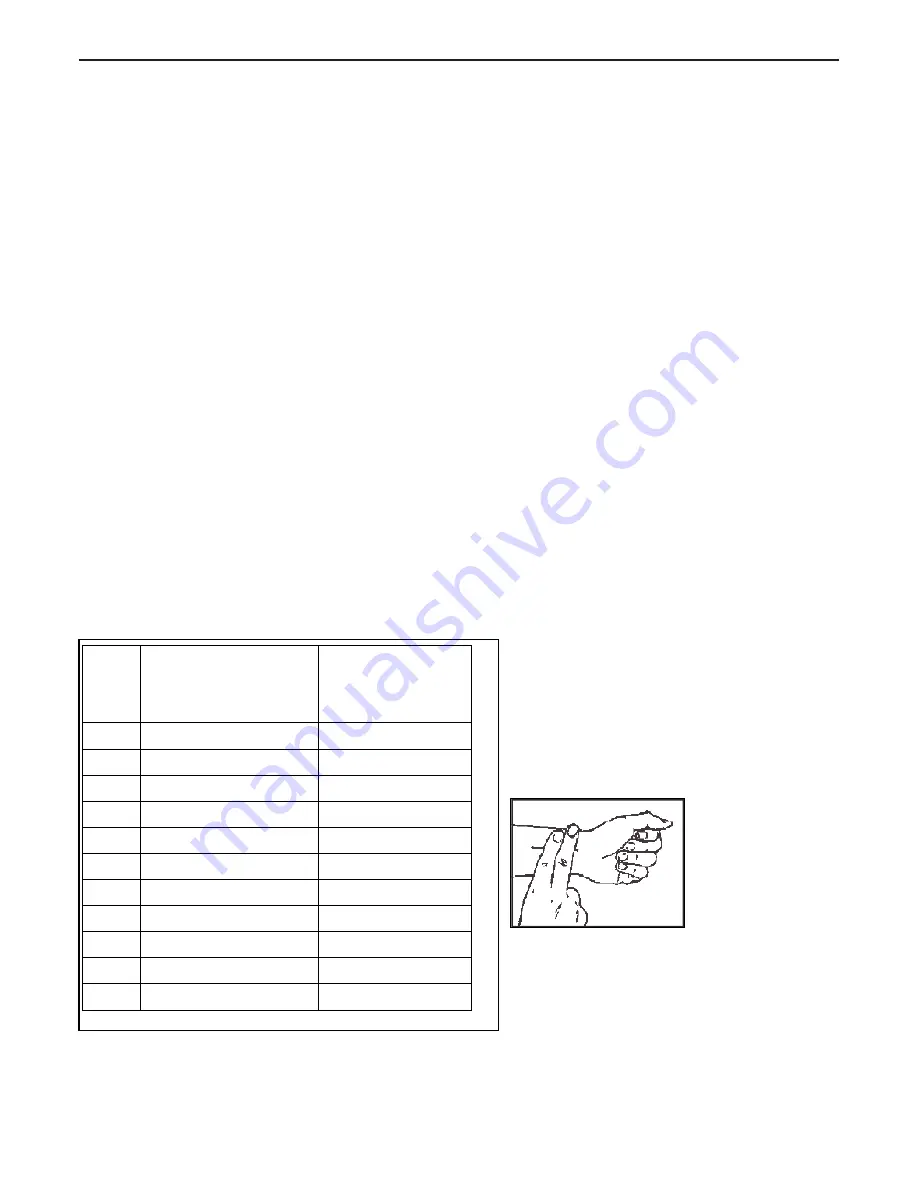
To measure your 

heart rate manually, 

stop exercising but 

continue moving 

your legs or walking 

around and place 

two fingers on your wrist. Take a six-second 

heartbeat count and multiply the results by 10 to 

find your heart rate. For example, if your 

six-second heartbeat count is 14, your heart 

rate is 140 beats per minute. (A six-second count is used because your heart rate will drop rapidly when you 

stop exercising.) Adjust the intensity of your exercise until your heart rate is at the proper level. 

Age 

Target Heart Rate Zone 

(55% ~ 90% of Max. 

Heart Rate) 

Average Max. Heart 

Rate 100% 

20 

110-180 beats per minute 

200 beats per minute 

25 

107-175 beats per minute 

195 beats per minute 

30 

105-171 beats per minute 

190 beats per minute 

35 

102-166 beats per minute 

185 beats per minute 

40 

99-162 beats per minute 

180 beats per minute 

45 

97-157 beats per minute 

175 beats per minute 

50 

94-153 beats per minute 

170 beats per minute 

55 

91-148 beats per minute 

165 beats per minute 

60 

88-144 beats per minute 

160 beats per minute 

65 

85-139 beats per minute 

155 beats per minute 

70 

83-135 beats per minute 

150 beats per minute 


Summary of Contents for PR-7505

Page 1: ...this equipment Serious bodily injury can occur if this equipment is not assembled and used correctly Serious bodily injury can also occur if all instructions are not followed Keep children and pets away from equipment when in use Always make sure all bolts and nuts are tightened prior to each use Follow all safety instructions in this manual WARNING CAUTION Weight on this product should not exceed...

Page 2: ...s and train within them Always use common sense when exercising 12 Before using this product please consult your personal physician for a complete physical examination 13 Do not wear loose or dangling clothing while using the Elliptical Trainer 14 Never exercise in bare feet or socks always wear correct footwear such as running walking or cross training shoes 15 Be careful to maintain your balance...

Page 3: ...d of the bolt or screw Flat head bolts and screws are measured from the top of the head to the end of the bolt or screw After unpacking the unit open the hardware bag and make sure that you have all the following items Some hardware may be already attached to the part Part No and Description Q TY 66 Lock Washer M8 4 70 Washer 8x38x2 0t 4 80 Screw Round Head M5xp0 8x15mm 18 81 Screw Round Head M5xp...

Page 4: ... 94 by using socket wrench as the main assembling drawing shows If the equipment is not level review the LEVELING NOTE on the right side to level the Leveler 58 STEP 3 Tighten the Leveler 58 securely against the Main Frame 1 NOTE It will be easier to attach the Leveler 58 to the Main Frame 1 by placing one Styrofoam or any stationary object under one side of the Main Frame 1 Detailed Lever drawing...

Page 5: ...tration shows on the top right corner making sure that the slotted bracket of the upright post slides between the nuts and the frame b Insert the Upright Post 4 onto the Main Frame 1 and slightly secure with the 2 x Hex Head Bolts M10xp1 5x50mm 95 by using the T Handle SOCKET WRENCH 17mm as shown NOTE Please do not fully tighten Bolts 95 or lock nuts 103 until Step 7 has been c COMPLETED STEP 6 Pl...

Page 6: ... go back to fully tighten with the 2 x Hex Head Bolts M10xp1 5x50mm 95 and the 2 x Lock nuts 103 with the T Handle SOCKET WRENCH 17mm as shown b Attach the Front Decorative Upright Cover 21 onto the front of the Main Frame 1 with the 2 x Round Head Screws M5xp0 8x50mm 81 c Place the Logo Sticker on the surface of the Front Decorative Upright Cover 21 A logo sticker is located in one of the hardwar...

Page 7: ...ron plate that is located in the middle of the Left Pedal Support Arm 10 and secure with 4pcs Bolts M8xp1 25x10mm 83 b Place the Non Slip Pad 34 onto the Left Pedal 33 c Repeat the above procedure from b to c to attach Right Pedal and Non Slip Pad on the Right Pedal Arm ...

Page 8: ... Upright Post 4 and secure with the Bolt Button Head M8xp1 25x12mm 87 and Lock Washer M8 66 STEP 12 NOTE For shipping purpose the Bolt Button Head M8xp1 25x16mm 88 and Lock Washer M8 66 are attached on the Stationary Handlebar 5 a Remove the Bolt Button Head M8xp1 25x16mm 88 and Lock Washer M8 66 from the Stationary Handlebar 5 b Connect the Middle Pulse Sensor Wire 112 and the Lower Pulse Sensor ...

Page 9: ... same for both wires to connect with as the following illustration shown STEP 15 a Place the Console 17 onto the Upright Post 4 and secure with the Screw Round Head M5xp0 8x15mm 80 b Attach the Console Lower Case 19 to the Console 17 under the Stationary Handlebar 5 and secure with the Screw Round Head M5xp0 8x15mm 80 STEP 16 Slide the Console Bracket 18 onto the Console 17 and secure with the Scr...

Page 10: ... 16mm 123 c Repeat the above procedure to insert and secure the Left Upper Handlebar 6 onto the Left Pivoting Arm 8 STEP 19 a Place the Front Rotator Cuff Pivoting Arm 31 and the Back Rotator Cuff Pivoting Arm 32 at both sides of the Right Pivoting Arm 9 b Bolt the Rotator Cuffs together with the Screw Round Head M5xp0 8x15mm 80 c Repeat the above procedure to place the Front Rotator Cuff Pivoting...

Page 11: ... TOW THE SELF POWERED ELLIPTICAL TRAINER SAFELY Move the Elliptical Trainer with the moving wheels on the Rear Stabilizer 3 Lift up the Front Stabilizer 2 with two hands to move the Elliptical Trainer Two people are strictly required to move the Elliptical Trainer together Make sure the floor is level while towing the Elliptical Trainer A B ...

Page 12: ...70 and 85 of your maximum heart rate as you exercise This is known as your target zone You can find your target zone in the table below Target zones are listed for both unconditioned and conditioned persons according to age During the first few months of your exercise program keep your heart rate near the low end of your target zone as you exercise After a few months your heart rate can be increas...

Page 13: ...he legs as wide as possible Stretch the upper body toward the knee on the right leg by using your arms to pull your chest to your thighs Hold this stretch 10 to 30 seconds DO NOT BOUNCE Do this stretch 10 times Repeat the stretch with the left leg Bent Torso Pulls While sitting on the floor have legs apart one leg straight and one knee bent Pull the chest down to touch the thigh on the leg that is...

Page 14: ... Handlebar Plug ψ31 8mm 2 29 Foam Grip Assembly 225mm 2 30 Inner Rotator Cuff Pivoting Arm 2 31 Front Rotator Cuff Pivoting Arm 2 32 Back Rotator Cuff Pivoting Arm 2 33 Pedal Upper Case 2 34 Non Slip Pad 2 NO Item Name Q TY 35 Roller 2 36 EndCap 50x100mm 4 37 Pulley 120mm 1 38 Pulley 235mm 1 39 Magnet 1 40 Belt 1126mm J8 1 41 Belt 1059mm J8 1 42 Square Plug 1 43 Console Fixed Bracket 1 44 Front Al...

Page 15: ...olt Button Head M8 p1 5 85mm 2 91 Carriage Bolt M8 p1 25 75mm 4 92 Bolt Hex Head M8 p1 25 15mm 1 NO Item Name Q TY 93 Bolt Hex Head M8 p1 25 15mm 4 94 Bolt Hex Head M8 p1 25 65mm 4 95 Bolt Hex Head M10 p1 5 50mm 2 96 Flange Nut M10 1 97 Nut M10 p1 25 1 98 Nut M3 4 99 Nut M8 p1 25 1 100 Nylock Nut M6 p1 0 2 101 Nylock Nut M8 p1 25 6 2t 4 102 Nylock Nut M8 p1 25 8 103 Nylock Nut M10 p1 5 8t 2 104 Ny...

Page 16: ...PRODUCT PARTS DRAWING ...

Reviews: