


:::67,(%(/(/7521&20
,:_
(1
*/
,6
+
,167$//$7,21
$33/,$1&(+$1'29(5
»
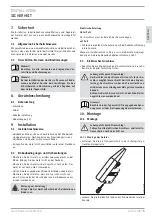
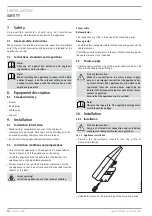
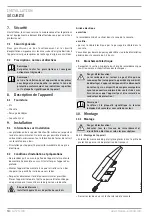
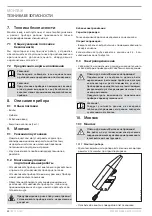
Undo the two screws on the panel cover above the terminals
and remove the cover. This releases the pivot limiter and you
can then tilt the appliance forwards.
2
6
_0
7
_3
1
_0
1
0
1
»
Mark the fixing holes on the wall.
»
Drill the holes and then insert rawl plugs.
»
Secure the appliance to the wall using the screws supplied or
other suitable fixing material.
»
If you have installed the power cable on a finished wall, insert
the cable grommet into the circular panel hole on the connection
side. Route the power cable through the cable grommet.
»
Insert the cap into the opposite circular panel hole, or into
both panel holes if you have installed the power cable on an
unfinished wall.
»
Connect the cable to the free terminals on the appliance.
Note!
Ensure that you do not strip too much of the power
cable to prevent any wires from touching the screws.
»
Pivot the appliance upwards. Refit and secure the panel cover.
This protects the connection space and limits the pivoting range
to approx. 30°.
»
Adjust the tilt angle as appropriate and secure the pivoting
mechanism by tightening both screws previously undone.
Note!
Ensure that the appliance does not touch the power
cable after installation and assembly.
11. Appliance handover
Explain the functions of the appliance to the user. Draw special
attention to the safety information. Hand the operating and
installation instructions to the user.
12. Specification
12.1 Specification
0RGHO
Type
IW 120
IW 180
Part number
229339
229340
2SHUDWLQJGHWDLOV
Rated output
W
1200
1800
Connection
230 V 1/N/PE ~ 50 Hz 230 V 1/N/PE ~ 50 Hz
heating stage 0
Appliance off
Appliance off
heating stage 1
W
400
600
heating stage 2
W
800
1200
heating stage 3
W
1200
1800
Protection class to EN 60335
1
1
Protection
IP X4
IP X4
'LPHQVLRQVDQGZHLJKWV
Dimensions H x W x D
mm
145 x 535 x 85
145 x 535 x 85
Weight
kg
1.55
1.55
Pivoting range
°
30
30
Connecting cable
≥ mm²
1.0
1.0
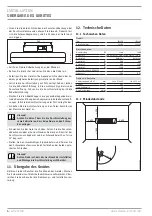
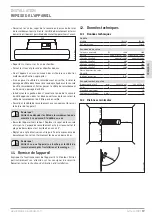
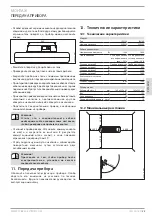
12.2 Minimum
clearances
2
6
_0
7
_3
1
_0
1
0
9


