background image

OPerATION 


settings

20

 | CON Premium | CON Premium U 

www.stiebel-eltron.com

4.3  Standby mode


Material losses

In standby mode, the appliance will not switch on heating 

under any circumstances. There will be no frost protec-

tion.


f

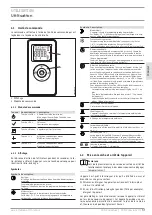
To switch on the programming unit, press "Standby". The 

standard display appears.


f

To put the programming unit and the heating appliance into 

standby mode, press "Standby". The display shows "- - - -".

5.  Settings

5.1  Operating lock

To lock or unlock the user interface, press and hold "+" and "–" 

simultaneously for 5 seconds.

5.2  Standard display

D

00000

75

500

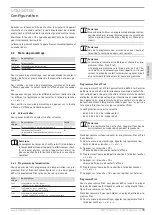
The standard display is continuously displayed. If no user action 

is performed for longer than 20 seconds while in the menu, the 

device automatically switches to the standard display.
The default display shows the current set room temperature as 

well as the "Editable parameter" symbol. You can use "+" and "–" 

to change the set room temperature.
If the set room temperature corresponds to one of the values 

set for the comfort or setback temperature, the symbol for the 

corresponding operating mode (comfort mode, setback mode) 

appears in the menu bar.
The set room temperature can also be changed manually with a 

time program activated. The changed set room temperature is 

maintained until the next programmed switching point is reached.

5.3  Standard menu

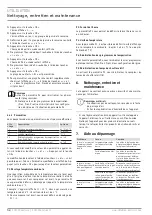
To access the standard menu, briefly press "Menu". You can now 

call up the following menu items:

display

description


Select day of the week and time 


Select comfort temperature 

The comfort temperature must be set at least 0.5 °C higher 

than the setback temperature. 


Select setback temperature 

The setback temperature must be set at least 0.5 °C lower 

than the comfort temperature. 


display

description


Switch "Window open detection" function on and off 

If the Pro4 time program (120 minute timer) is activated, the 

"Window open detection" function is not active. 


Select time program (Pro1, Pro2, Pro3, Pro4, off) or external 

input (FP) 


Switch "Adaptive start" function on and off 

If the Pro4 time program (120 minute timer) is activated, the 

"Adaptive start" function is not active. 


To change the setting of a menu item, call the relevant menu item 

up using "+" and "–". Press "OK". 
As soon as the "Editable parameter" symbol appears, you can 

change the setting of the menu item with "+" and "–". Press "OK" 

to save the setting. 
To exit the standard menu, press "Menu". The standard display 

appears.

5.3.1  120-minute short-time timer

With the 120-minute short-time timer, you can activate comfort 

mode for a selected time of up to 120 minutes. During this selected 

time, the appliance heats to the set comfort temperature. After 

this, the appliance operates in setback mode.
If you wish to use the 120-minute short-time timer, select time 

program Pro4 from the standard menu.

D

00000

75

53

1

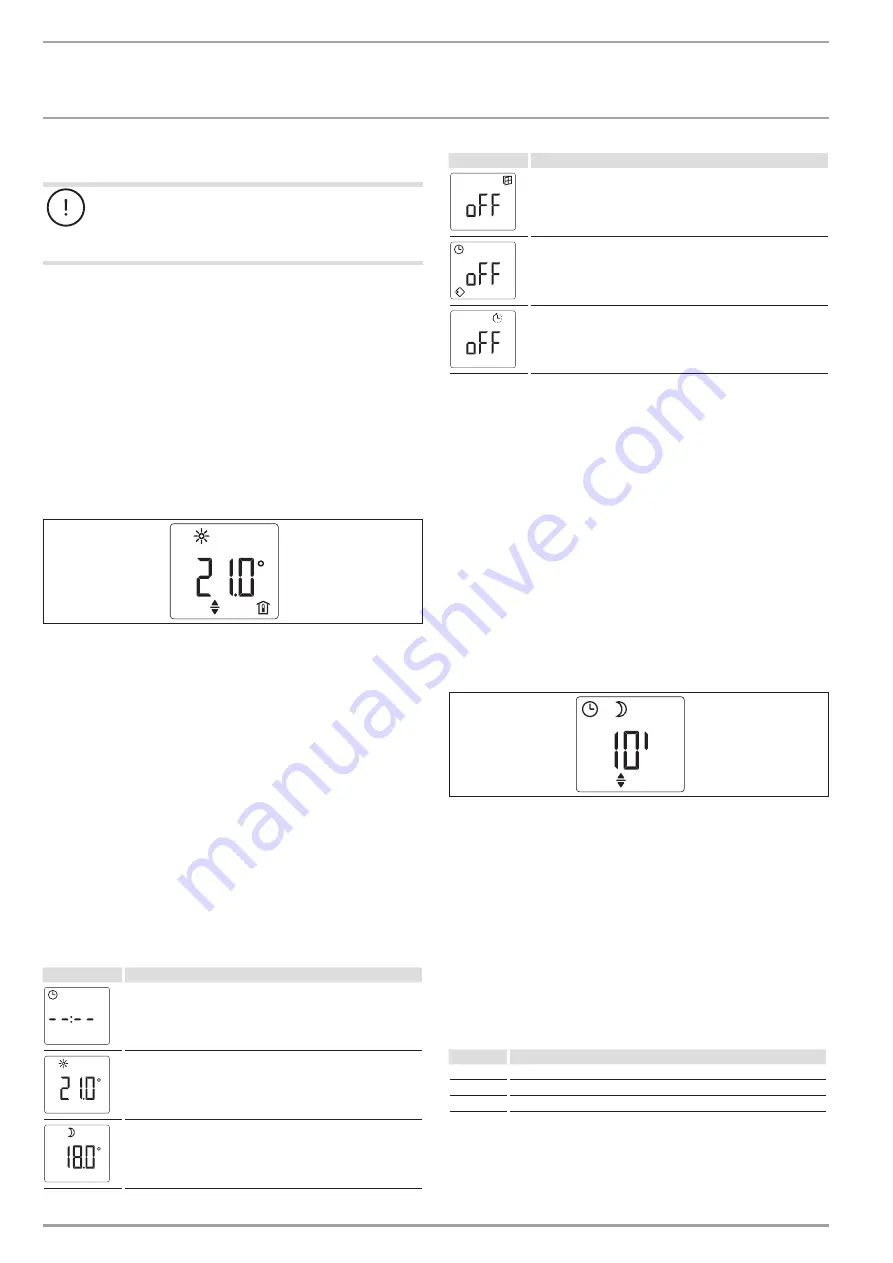
The standard display shows the selected time in minutes as well 

as the "Editable parameter" symbol. Using the "+" and "-" buttons, 

you can select any length of time from 10 - 120 minutes.
To activate the short-time timer, press "OK". The appliance switch-

es to comfort mode until the end of the selected time. The minute 

display flashes during this period. 
If you wish to stop the short-time timer, press and hold "OK" for 

longer than 3 seconds.
At the end of the selected time, the appliance automatically reverts 

to setback mode.

5.4  Configuration menu

display

description

I1-I2

Actual values

Pro1-Pro3 Time programs
P1-P5

Parameter

In the configuration menu, you can call up actual values, set time 

programs and adjust parameters.

Summary of Contents for CON 10 Premium

Page 1: ...OBS UGA I INSTALACJA KEZEL S S TELEP T S Wandkonvektor Wall mounted convector heater Convecteur mural Wandconvector N st nn konvektor Konwektor wisz cy Fali konvektor CON 5 Premium CON 10 Premium CON...

Page 2: ...en anwesend sind ist besondere Vorsicht geboten Um eine berhitzung des Ger tes zu vermei den decken Sie das Ger t nicht ab Bringen Sie das Ger t nicht unmittelbar unter einer Wandsteckdose an Bei Fest...

Page 3: ...letzungen oder Tod zur Folge haben WARNUNG Hinweise deren Nichtbeachtung schwere Verletzungen oder Tod zur Folge haben kann VORSICHT Hinweise deren Nichtbeachtung zu mittelschweren oder leichten Verle...

Page 4: ...oder D mpfe feuer oder explosionsgef hrdet sind L f ten Sie den Raum vor dem Heizen ausreichend in unmittelbarer N he von Rohrleitungen oder Be h ltnissen die brennbare oder explosionsgef hrde te Sto...

Page 5: ...t eingeschaltet siehe Kapitel Einstellungen Basismen Fenster offen Erkennung Um einen unn tigen Energieverbrauch w hrend des L ftens zu vermeiden schaltet das Ger t bei ge ffnetem Fenster auto matisch...

Page 6: ...ltzeitpunkt erhalten 5 3 Basismen Um in das Basismen zu gelangen dr cken Sie kurz die Taste Men Sie k nnen nun folgende Men punkte aufrufen Anzeige Beschreibung Wochentag und Uhrzeit einstellen Komfor...

Page 7: ...len siehe Kapitel Einstellungen Basismen Hinweis Beachten Sie beim Einstellen der Zeitprogramme dass Wochentag und Uhrzeit korrekt eingestellt sind Hinweis F r alle Zeitprogramme Pro1 Pro2 Pro3 gilt W...

Page 8: ...ob die Uhrzeit im 12 Stunden oder im 24 Stunden Format angezeigt wird P3 Einheit Temperaturanzeige ber den Parameter P3 k nnen Sie festlegen ob die Raumtempe ratur in Grad Celsius C oder in Grad Fahre...

Page 9: ...er reagiert nicht auf den externen Eingang Wenn das Ger t kein Signal am externen Ein gang erkennt heizt es im Komfortbetrieb Pr fen Sie das externe Steuerger t und dessen Ein stellungen Die Verdrahtu...

Page 10: ...en in der Wandhalterung deckungsgleich mit den gerade angebrachten Markierungen an der Montagewand sind f Markieren Sie die Bohrungen 3 und 4 an der Montagewand f Bohren Sie die Bohrl cher an den 4 Ma...

Page 11: ...s Netzanschlusskabel darf nicht in den Hohlraum zwi schen Ger ter ckseite und Montagewand geschoben werden f Wickeln Sie das bersch ssige Netzanschlusskabel auf die Kabelhalterung an der Ger ter cksei...

Page 12: ...als die eingestellte Komfort temperatur 11 Inbetriebnahme Das Ger t ist betriebsbereit sobald Sie es an der Montagewand befestigt und elektrisch angeschlossen haben f Entfernen Sie die Schutzfolie vo...

Page 13: ...r kontrolle Raumtemperaturkontrolle mit mechanischem Thermostat Mit elektronischer Raumtemperaturkontrolle Elektronische Raumtemperaturkontrolle und Tageszeitregelung Elektronische Raumtemperaturkontr...

Page 14: ...n Etwaige ausgewechselte Teile werden unser Eigentum F r die Dauer und Reichweite der Garantie bernehmen wir s mtliche Material und Montagekosten Soweit der Kunde wegen des Garantiefalles aufgrund ges...

Page 15: ...der Dualen Systeme in Deutschland Entsorgung von Altger ten in Deutschland Ger teentsorgung Die mit diesem Symbol gekennzeichneten Ger te d r fen nicht mit dem Hausm ll entsorgt werden Als Hersteller...

Page 16: ...ting never cover it with anything Never install the appliance directly below a wall socket In the case of a permanent connection en sure the appliance can be separated from the power supply by an isol...

Page 17: ...e this information will result in serious injury or death WARNING Failure to observe this information may result in serious injury or death CAUTION Failure to observe this information may result in no...

Page 18: ...es or vapours Venti late the room sufficiently before heating in the direct proximity of pipes or receptacles that carry or contain flammable or explosive materials if an appliance component is damage...

Page 19: ...nting the appliance automatically switches to frost protection mode for one hour if a window is opened The window open detection symbol flashes After venting frost protection mode can be terminated ma...

Page 20: ...be set at least 0 5 C lower than the comfort temperature Display Description Switch Window open detection function on and off If the Pro4 time program 120 minute timer is activated the Window open de...

Page 21: ...pecify the comfort mode start and end times with time programs Pro1 and Pro2 During this time period the appliance heats to the set comfort temperature Outside this specified time period the appliance...

Page 22: ...m enough al though the appliance is hot Overheating High limit safety cut out limits heating output Eliminate the cause dirt or obstructions at the air intake or discharge Observe mini mum clearances...

Page 23: ...that the power cable is not in contact with any appliance components 8 2 Instructions standards and regulations Note Observe all applicable national and regional regulations and instructions 9 Applian...

Page 24: ...push down the springs at the top of the wall mounting bracket f Tilt the appliance away from the wall and lift it off the bottom tabs on the wall mounting bracket 10 5 Electrical connection WARNING E...

Page 25: ...ure the black control cable is activated via an external electronic contact e g a time switch Control cable connected to external control unit The appliance can be connected to any control unit that i...

Page 26: ...TRON STIEBEL ELTRON Heating output Rated heating output Pnom kW 0 5 1 0 1 5 2 0 3 0 Minimum heating output standard value Pmin kW 0 0 0 0 0 0 0 0 0 0 Maximum continuous heating output Pmax c kW 0 5 1...

Page 27: ...all mounted appliance Wall mounted appliance Wall mounted appliance Wall mounted appliance Wall mounted appliance IP rating IP24 IP24 IP24 IP24 IP24 Protection class I I I I I Colour Alpine white Alpi...

Page 28: ...as le couvrir N installez pas l appareil directement sous une prise lectrique murale En cas de raccordement fixe l appareil doit pouvoir tre isol du secteur par un dispositif de coupure omnipolaire ay...

Page 29: ...voire la mort AVERTISSEMENT Caract rise des remarques dont le non respect peut entra ner de graves l sions voire la mort ATTENTION Caract rise des remarques dont le non respect peut entra ner des l si...

Page 30: ...u vapeurs A rez suffi samment le local avant de le chauffer proximit imm diate de conduites ou r cipients susceptibles de contenir ou de transporter des ma t riaux inflammables ou explosibles si un co...

Page 31: ...es Menu principal D tection de fen tre ouverte Pour viter de consommer de l nergie inutilement lors de l a ration des pi ces l appareil passe automatiquement en mode protection hors gel pendant une he...

Page 32: ...r acc der au menu principal appuyez bri vement sur la touche Menu Vous pouvez alors acc der aux rubriques suivantes Affichage Description R glage du jour de la semaine et de l heure R glage de la temp...

Page 33: ...usqu 14 phases de confort en configuration libre Remarque Si vous d sirez utiliser un programme de temporisation vous devez choisir le programme qui vous convient dans le menu principal voir chapitre...

Page 34: ...Vous avez mesur une temp rature de 20 C L cart constat est de 1 C f Pour compenser cet cart vous devez d finir un d calage de P1 1 P2 Format de l heure Le param tre P2 vous permet de d finir le forma...

Page 35: ...ilis La fonction D mar rage adapt n est pas activ e Activez la fonction D mar rage adapt dans le menu principal Le programme FP est activ mais l ap pareil ne r agit pas l entr e externe Si l appareil...

Page 36: ...3 et 4 sur le mur f Percez les 4 trous de fixation sur les 4 rep res f Fixez le support mural l aide d un mat riel de fixation ad quat vis chevilles Les trous oblongs verticaux permettent de compense...

Page 37: ...riels Raccourcissez le c ble d alimentation pour qu il m ne directement la bo te de raccordement Lors du raccourcissement du c ble d alimentation assurez vous de pouvoir encore d crocher facile ment l...

Page 38: ...au d pannage En cas de d t rioration ou pour le remplacement du c ble d ali mentation veuillez n utiliser que des pi ces de rechange d origine et faire appel un installateur agr par le fabricant 13 Re...

Page 39: ...mostat m canique Avec contr le de la temp rature ambiante lectronique Contr le de la temp rature ambiante lectronique et r gulation en fonction de l heure Contr le de la temp rature ambiante lectroniq...

Page 40: ...garan tie Une telle garantie ne pourra cependant tre accord e que si la filiale a publi ses propres conditions de garantie Il ne sera accord aucune garantie par ailleurs Nous n accordons aucune garan...

Page 41: ...zijn is extra voorzichtigheid geboden Dek het toestel niet af om oververhitting van het toestel te vermijden Plaats het toestel niet direct onder een stopcontact Bij een vaste aansluiting moet het toe...

Page 42: ...n worden WAARSCHUWING Aanwijzingen die kunnen leiden tot zwaar letsel of overlij den wanneer deze niet in acht genomen worden VOORZICHTIG Aanwijzingen die kunnen leiden tot middelmatig zwaar of licht...

Page 43: ...dampen gevaar voor brand of explosies bestaat Ventileer de ruimte voldoende voordat deze ver warmd wordt In de onmiddellijke omgeving van leidingen of con tainers met brandbare of explosieve stoffen...

Page 44: ...eschakeld zie hoofdstuk Instellingen Basismenu Venster open herkenning Om nodeloos energieverbruik tijdens het ventileren te vermij den schakelt het toestel bij een geopend venster automatisch geduren...

Page 45: ...aan het volgende geprogram meerde schakeltijdstip 5 3 Basismenu Om naar het basismenu te gaan drukt u kort op de toets Menu U kunt nu de volgende menuopties oproepen Display Beschrijving Dag van de w...

Page 46: ...programma te selecteren zie hoofdstuk Instellingen basismenu Info Let er bij het instellen van de tijdprogramma s op dat de dag van de week en de tijd correct ingesteld zijn Info Voor alle tijdprogram...

Page 47: ...tten Door parameter P5 te activeren zet u de teller voor de relatieve verwarmingsduur I2 terug 6 Reiniging verzorging en onderhoud Het toestel bevat geen onderdelen die door de gebruiker moeten worden...

Page 48: ...t 000000 0000 000000 INSTALLATIE 8 Veiligheid Installatie ingebruikname onderhoud en reparatie van het toestel mogen alleen door een gekwalificeerde installateur uitgevoerd worden 8 1 Algemene veiligh...

Page 49: ...st met de meegeleverde borgschroef aan de linker of rechterzijde van de wandhouder zodat het toestel niet ongewenst kan loskomen 10 4 Demontage van het toestel f Draai de borgschroef uit de wandhouder...

Page 50: ...niet aangesloten Isoleer in dat geval de stuurdraad Temperatuurverlaging via de stuurdraad Om de ingestelde temperatuur te verlagen wordt de zwarte stuurdraad via een extern elektronisch contact bijv...

Page 51: ...L ELTRON STIEBEL ELTRON STIEBEL ELTRON Warmtevermogen Nominaal warmtevermogen Pnom kW 0 5 1 0 1 5 2 0 3 0 Minimaal warmtevermogen richtwaarde Pmin kW 0 0 0 0 0 0 0 0 0 0 Maximaal continu warmtevermoge...

Page 52: ...wandtoestel Beschermingsgraad IP IP24 IP24 IP24 IP24 IP24 Beveiligingsklasse I I I I I Kleur alpinewit alpinewit alpinewit alpinewit alpinewit Waarden Instelbereik C 5 30 5 30 5 30 5 30 5 30 Garantie...

Page 53: ...o p ipojen mo n odpojit od elektrick s t na v ech p lech na vzd lenost nejm n 3 mm P vodn kabel sm p i po kozen nebo p i v m n nahradit origin ln m n hradn m d lem pouze autorizovan servis s opr vn n...

Page 54: ...ch kroc ch 1 3 Upozorn n na p stroji Symbol V znam Nezakr vejte p stroj 1 4 M rn jednotky Upozorn n Pokud nen uvedeno jinak jsou v echny rozm ry uvedeny v milimetrech 2 Zabezpe en 2 1 Spr vn pou v n P...

Page 55: ...dn p edm ty V STRAHA pop len P stroj nen ur en k pou it jako samostatn stoj c P stroj provozujte pouze na dod van m n st nn m dr ku viz kapitola Instalace Mont POZOR nebezpe pop len sti p stroje moho...

Page 56: ...eje m st nost na nastavenou po adovanou teplotu Aby se aktivovala funkce Zji t n otev en ho okna mus b t d ny n sleduj c p edpoklady Po adovan teplota v m stnosti je nastavena na 15 C nebo v ce Skokov...

Page 57: ...Jakmile se zobraz symbol Parametry lze editovat m ete nasta ven polo ky nab dky zm nit pomoc tla tek a K ulo en nastaven stiskn te tla tko OK K opu t n z kladn nab dky stiskn te tla tko Nab dka Zobra...

Page 58: ...te tla tko OK Zobraz se as zah jen komfortn ho re imu f Nastavte po adovan as zah jen pomoc tla tek a f Stiskn te tla tko OK Zobraz se as ukon en komfortn ho re imu f Nastavte po adovan as ukon en po...

Page 59: ...Pot eba tepla v m stnosti je vy ne v kon p stroje Omezte tepeln ztr ty za v ete okna a dve e Zabra te trval mu v tr n M stnost je p li tepl Je nastavena p li vysok teplota na p stroji Zkontrolujte nas...

Page 60: ...tano ven 9 Popis p stroje 9 1 Rozsah dod vky Spolu s p strojem je dod v no N st nn dr k zav en na p stroji 10 Mont 10 1 Minim ln vzd lenosti 150 100 100 100 500 D0000074786 10 2 Mont n st nn ho dr ku...

Page 61: ...lech na vzd lenost nejm n 3 mm Instalace s pevn m p vodn m veden m nen p pustn V cn kody Dodr ujte daje uveden na typov m t tku Uvede n nap t se mus shodovat se s ov m nap t m V m st mont e dbejte na...

Page 62: ...zen P stroj lze p ipojit k libovoln mu dic mu za zen kter jako dic sign l vys l formy sign lu uveden v n sleduj c tabulce P kaz Osciloskop Re im Teplota topen Bez proudu Komfortn re im V z vislosti n...

Page 63: ...eln v kon Jmenovit tepeln v kon Pnom kW 0 5 1 0 1 5 2 0 3 0 Minim ln tepeln v kon sm rn hodnota Pmin kW 0 0 0 0 0 0 0 0 0 0 Maxim ln trval tepeln v kon Pmax c kW 0 5 1 0 1 5 2 0 3 0 Spot eba pomocn ho...

Page 64: ...ti zamrznut C 7 7 7 7 7 Proveden N st nn p stroj N st nn p stroj N st nn p stroj N st nn p stroj N st nn p stroj Kryt IP IP24 IP24 IP24 IP24 IP24 T da kryt I I I I I Barva Alpsk b l Alpsk b l Alpsk b...

Page 65: ...owa dzi do jego przegrzania Nie montowa urz dzenia bezpo rednio pod ciennym gniazdkiem elektrycznym W przypadku pod czenia na sta e nale y za pewni mo liwo od czania wszystkich bie gun w urz dzenia od...

Page 66: ...wki kt rych nieprzestrzeganie prowadzi do ci kich obra e cia a lub mierci OSTRZE ENIE Wskaz wki kt rych nieprzestrzeganie mo e prowadzi do ci kich obra e cia a lub mierci OSTRO NIE Wskaz wki kt rych...

Page 67: ...iem ogrzewania przewietrzy pomieszczenie w wystar czaj cym stopniu Nie montowa w bezpo redniej blisko ci rur lub pojemnik w przewodz cych lub zawieraj cych ma teria y atwopalne albo wybuchowe Nie mont...

Page 68: ...b e nastawiona temperatura zadana pomieszczenia osi gana jest ju o zaprogra mowanej godzinie rozpocz cia Warunek w czona jest funkcja Start adaptacyjny patrz roz dzia Nastawy Menu podstawowe Wykrywan...

Page 69: ...onym programie czasowym Zmieniona temperatura zadana pomieszczenia pozostanie zachowana do nast pnego zaprogramowanego czasu prze czenia 5 3 Menu podstawowe Aby przej do menu podstawowego nacisn kr tk...

Page 70: ...y przez u ytkownika do 14 faz komfortowych z mo liwo ci dowolnej konfiguracji Wskaz wka Chc c korzysta z programu czasowego w menu podsta wowym nale y wybra dany program czasowy patrz rozdzia Nastawy...

Page 71: ...C Wyst puje r nica 1 0 C f Aby wyr wna r nic nale y nastawi tolerancj P1 1 0 P2 Format godziny Parametr P2 pozwala okre li czy godzina wy wietlana b dzie w formacie 12 godzinnym czy te 24 godzinnym P3...

Page 72: ...cja ustabilizuje si Funkcja Start adaptacyj ny nie jest uaktywniona W czy w menu podstawo wym funkcj Start adapta cyjny W czony jest pro gram FP ale urz dzenie nie reaguje na wej cie zewn trzne Je li...

Page 73: ...r aby dolne otwory w uchwycie pokrywa y si z naniesionymi w linii prostej oznaczeniami na cianie monta owej f Zaznaczy otwory 3 i 4 na cianie monta owej f Wywierci otwory na 4 oznaczeniach f Zamontow...

Page 74: ...1 Mocowanie sieciowego przewodu przy czeniowego Szkody materialne Sieciowego przewodu przy czeniowego nie wolno wpy cha w pust przestrze mi dzy tyln ciank urz dzenia a cian monta ow f Nawin nadmiar si...

Page 75: ...Brak Pe na oscylacja 230 V przez 3 se kundy Tryb komforto wy 1 C 1 C mniej ni nasta wiona temperatura komfortowa Pe na oscylacja 230 V przez 7 se kundy Tryb komforto wy 2 C 2 C mniej ni nasta wiona te...

Page 76: ...owa moc grzewcza Pnom kW 0 5 1 0 1 5 2 0 3 0 Minimalna moc grzewcza warto orientacyjna Pmin kW 0 0 0 0 0 0 0 0 0 0 Maksymalna ci g a moc grzewcza Pmax c kW 0 5 1 0 1 5 2 0 3 0 Zu ycie pr du pomocnicze...

Page 77: ...Wersja Urz dzenie wisz ce Urz dzenie wisz ce Urz dzenie wisz ce Urz dzenie wisz ce Urz dzenie wisz ce Stopie ochrony IP IP24 IP24 IP24 IP24 IP24 Klasa ochrony I I I I I Kolor Bia y alpejski Bia y alp...

Page 78: ...ell elj rni A t lmeleged s elker l se rdek ben ne ta karja le a k sz l ket Ne helyezze a k sz l ket k zvetlen l fali csat lakoz aljzat al Fix bek t s eset n a k sz l ket egy minden p lust legal bb 3 m...

Page 79: ...n k v l hagy sa s r l shez vagy hal lhoz vezet FIGYELMEZTET S Olyan tudnival k amelyek be nem tart sa s lyos vagy ha l los s r l seket okozhat VIGY ZAT Olyan tudnival k amelyek figyelmen k v l hagy sa...

Page 80: ...apcsol sa el tt ala posan szell ztesse ki a helyis get ghet vagy robban svesz lyes anyagot tov bb t vagy tartalmaz vezet kek s tart lyok k zvetlen k zel ben ha a k sz l k valamely alkatr sze megs r lt...

Page 81: ...t v ind t s funkci be van kapcsolva l sd a Be ll t sok Alapmen c m fejezetet Nyitott ablak szlel se A szell ztet s alatti sz ks gtelen energiafogyaszt s elker l se rdek ben a k sz l k nyitott ablakn l...

Page 82: ...v nyben marad a k vetkez beprogramozott kapcsol si id pontig 5 3 Alapmen Az alapmen be a Men gomb r vid lenyom s val l phet nk A k vetkez men pontokat lehet beh vni Kijelz Le r s A h t napja s a ponto...

Page 83: ...sok Alapmen c m fejezetet Megjegyz s Az id programok be ll t sakor gyeljen a h t napja s a pontos id szab lyos be ll t s ra Megjegyz s Valamennyi id programra Pro1 Pro2 Pro3 n zve rv nyes a k vetkez s...

Page 84: ...elz m rt kegys ge A P3 param ter seg ts g vel lehet meghat rozni hogy a helyi s g h m rs klet kijelz se Celsius fokban C vagy Fahrenheit fokban F t rt njen e P4 Id programok vissza ll t sa A P4 param...

Page 85: ...Ellen rizze a k ls vez rl k sz l ket s annak be ll t sait A huzaloz st szab lyo san kell kivitelezni gyelve a p lusokra A kijelz n Err vagy E l that A k sz l k bels hib t szlelt Forduljon szakemberhe...

Page 86: ...megakad lyoz s hoz r gz tse a k sz l ket a k szletben tal lhat biztos t csa varral a fali tart bal vagy jobb oldal n 10 4 A k sz l k leszerel se f Ha laz tsa meg s vegye ki a biztos t csavart a fali...

Page 87: ...em vez relt k sz l k A vez rl k bel nincs bek tve Ebben az esetben szigetelje a vez rl k belt H m rs klet cs kken s a vez rl k belen kereszt l A be ll tott cs kkentett h m rs kletre val cs kkent shez...

Page 88: ...Pnom kW 0 5 1 0 1 5 2 0 3 0 Minim lis h teljes tm ny ir nyad rt k Pmin kW 0 0 0 0 0 0 0 0 0 0 Maxim lis folyamatos h teljes tm ny Pmax c kW 0 5 1 0 1 5 2 0 3 0 Seg d ram fogyaszt s N vleges h teljes...

Page 89: ...ali k sz l k Fali k sz l k Fali k sz l k Fali k sz l k Fali k sz l k V detts g IP IP24 IP24 IP24 IP24 IP24 V detts gi oszt ly I I I I I Sz n alpesi feh r alpesi feh r alpesi feh r alpesi feh r alpesi...

Page 90: ...1 91 1 1 91 1 2 91 1 3 91 1 4 91 2 91 2 1 91 2 2 92 2 3 92 3 92 4 93 4 1 93 4 2 94 4 3 94 5 94 5 1 94 5 2 94 5 3 94 5 4 95 6 97 7 97 8 98 8 1 98 8 2 98 9 98 9 1 98 10 98 10 1 98 10 2 98 10 3 99 10 4 9...

Page 91: ...www stiebel eltron com CON Premium CON Premium U 91 3 1 1 1 1 1 1 f 1 1 2 1 1 3 1 2 f f 1 3 1 4 2 2 1...

Page 92: ...92 CON Premium CON Premium U www stiebel eltron com 2 2 3 3 7 3 7 8 2 3 004 2011 TP TC 020 2011 RU DE 46 18437 21 11 03 2021 10 03 2026 3...

Page 93: ...www stiebel eltron com CON Premium CON Premium U 93 4 D0000074791 2 1 1 2 4 1 D0000080849 2 1 1 2 4 1 1 OK 4 1 2 20 21 0 C 18 0 C 7 0 C OK 15 C 3 C...

Page 94: ...94 CON Premium CON Premium U www stiebel eltron com FP CON Premium U 1 2 7 4 2 f f 4 3 f f 5 5 1 5 5 2 D0000075500 20 5 3 0 5 C 0 5 C Pro4 120...

Page 95: ...N Premium CON Premium U 95 Pro1 Pro2 Pro3 Pro4 off FP Pro4 120 5 3 1 120 120 120 120 Pro4 D0000075531 10 120 3 5 4 I1 I2 Pro1 Pro3 P1 P5 3 I1 5 4 1 I1 C F I2 5 I2 60 5 4 2 Pro1 Pro2 Pro3 Pro1 Pro2 Pro...

Page 96: ...Pro1 Pro2 Pro1 Pro2 8 00 22 00 22 00 8 00 Pro2 Pro1 Pro2 f f f f f f Pro3 Pro3 14 Pro3 f Pro3 f 3 f f f f f f f 3 01 f 3 P4 f P4 Pro1 Pro2 Pro3 5 4 3 P1 3 C 5 F P2 12 24 P3 C F P4 Pro1 Pro2 Pro3 P5 P...

Page 97: ...www stiebel eltron com CON Premium CON Premium U 97 P4 4 Pro1 Pro2 Pro3 P5 P5 I2 6 7 10 15 C 15 C FP Err E 000000 0000 000000...

Page 98: ...98 CON Premium CON Premium U www stiebel eltron com 8 8 1 85 C 8 2 9 9 1 10 10 1 150 100 100 100 500 D0000074786 10 2 a a a D0000072159 1 3 2 4 246 246 D0000074785...

Page 99: ...www stiebel eltron com CON Premium CON Premium U 99 f f 1 2 f f 3 4 f 4 f 10 3 D0000074782 1 1 f f f D0000074783 2 1 1 2 f 10 4 f f f 10 5 3 10 5 1 CON Premium CON 5 30 Premium X X D0000076073 1 1...

Page 100: ...CON Premium CON Premium U www stiebel eltron com f f f f 10 5 2 CON Premium U f 1 2 3 4 1 2 3 4 D0000068123 CON 5 20 Premium U CON 30 Premium U 1 2 3 4 230 115 115 230 3 1 C 1 C 230 7 2 C 2 C 11 f 12...

Page 101: ...on com CON Premium CON Premium U 101 14 14 1 a20 470 126 256 i13 b01 D0000081187 CON 5 Premium U CON 10 Premium U CON 15 Premium U CON 20 Premium U CON 30 Premium U a20 345 470 625 780 1090 b01 i13 10...

Page 102: ...N Premium U 237830 201278 237831 200268 237832 200269 237833 200270 237834 200276 STIEBEL ELTRON STIEBEL ELTRON STIEBEL ELTRON STIEBEL ELTRON STIEBEL ELTRON Pnom 0 5 1 0 1 5 2 0 3 0 Pmin 0 0 0 0 0 0 0...

Page 103: ...N PE 230 1 N PE 230 1 N PE 230 1 N PE 230 A 2 2 4 3 6 5 8 7 13 0 50 50 50 50 50 s 39 39 39 39 39 470 470 470 470 470 345 470 625 780 1090 126 126 126 126 126 4 3 5 9 7 5 9 3 12 6 C 7 7 7 7 7 IP IP24 I...

Page 104: ...Finland STIEBEL ELTRON OY Kapinakuja 1 04600 M nts l Tel 020 720 9988 info stiebel eltron fi www stiebel eltron fi France STIEBEL ELTRON SAS 7 9 rue des Selliers B P 85107 57073 Metz C dex 3 Tel 0387...

Reviews: